Blog
  • One More Engineer on the Loose

    Phew! Last Wednesday was my final university exam. It seems unbelievable, but the Computer Engineering course has finally come to an end. We still have to hand in some paperwork for the final course project, but those are just papers. The exams, the assignments and the reports are over, and now a huge weight is starting to come off my back as the grades are released on the university’s website. Those who follow me on Twitter got an idea of how much of a rush it has been. This year was especially tight because of the dependencies I had to take, the internship I had to do, and finally the graduation project we had to present.

    The project was the main reason for my absence from the blog — there were many tests, scares, burned sensors, presentations and fairs.

    Hold on! Did you say burned sensors?

    That’s right. Murphy can be considered a member of our group, since he was always present during the project’s development. On the eve of the presentation to the evaluation board, a bad contact in the voltage regulators, caused by the vibration of the model helicopter’s engine, made almost everything burn out. It was widespread despair, since the sensors were imported. Not to mention the money we would have to shell out, we would still have to wait for the delivery, which takes about two weeks on average. At that moment Murphy gave us a break. Personally, I think he felt sorry for us. I say this because the next day we found a reseller of sensors similar to the ones we were using in the project, right here in Santo André (the city where I live). When we contacted the reseller, we found out they had the sensors in stock. Unbelievable, isn’t it?

    After the presentation we gave to the evaluation board, we were also invited to take part in the university’s gala presentation, where the best projects of the year were shown.


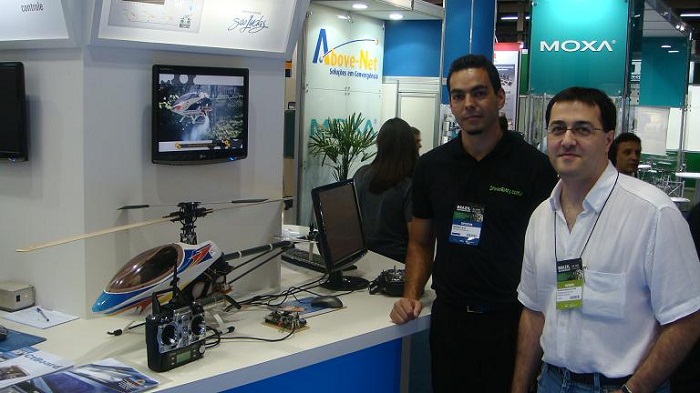
    We also came in second place in the “Best PC-Based Academic Application” contest promoted by National Instruments, and with that we were invited to exhibit our work at the National stand at the ISA Show 2009. The coolest part is that first place in this contest was won by a group also from my class at São Judas Tadeu University. This showed that, besides getting ahead of several other universities, our class is no joke.

    National Instruments produced this explanatory video where I talk about the basic idea of the project. The video was made at the country house of one of the group members, where we were holed up during the last weeks before the final presentations.

    This is just a “Hey, I’m coming back from the coma!” post. Now I’m going to stop talking about the project and get back to talking about what really matters: “Blue Screens of Death”. My big dilemma now is whether I should also comment something about firmware and hardware. I developed many activities with embedded software, and not only during the making of the project.

    During the project, especially developing the USB protocol on an 8051 using Keil, besides reading sensors and working with buses on a PIC using the C18 compiler in MPLAB.

    Besides that, I had the opportunity to contribute to the development of a project at IPEI. This project’s hardware measures the results of a tensile-testing machine and sends them to a computer via USB. I contributed to the development of the PIC firmware, implementing the HID protocol, once again using MPLAB.

    Last but not least, I also contributed to the development of FreeScale firmware during my internship at Commodity. This firmware also deals with the USB protocol, and relies on the help of a chip that provides this interface, since the DSP that made up the solution did not. This time I had to use Code Warrior in the development, and I relived the time when I worked at Provectus developing a Bootloader to update the firmware itself over a 485 network, except that this time it was through USB.


    So much interaction with USB on both sides of the cable is mainly the fruit of the knowledge acquired from the book “USB Complete” by Jan Axelson. I don’t remember whether I have mentioned this book here before, but it is worth talking about, especially from the electronics/firmware point of view. The book is simply excellent, but it says it does not cover the development of USB drivers, because that subject would require a book of its own. With that, it recommends an old acquaintance of ours, “Programming the Windows Driver Model” by Walter Oney.

    In any case, wait for renovations on this blog. For a long time I have been working at my limit to manage to post and still handle everything else. Now my extra time will allow me to make posts more frequently and finally set up open classes of the Windows Drivers Course.

    As some of you already know, I keep a list of people interested in the course who will be notified by e-mail when the classes open. Regardless of that, I would like to receive e-mails about schedule preferences and specialties, such as WDM/KMDF/UMDF/File Systems, or even about an emphasis on USB/PCI.

    That is it. For a post that had nothing to say, it ended up saying quite a lot.
    See you soon!

  • A Model Helicopter at the XV Multidisciplinary Symposium

    This is another one of those Off-Topic posts that has nothing to do with anything. Or almost nothing. I think most of you are already tired of knowing that this is my last year at university and that this year I’m all tangled up with our Graduation Project (TG). Those who follow my Twitter have some idea of how much this has been eating up my time. You may be asking yourself: “What does this project do?”. In one word: “Nothing”. We have been working for more than a year developing hardware, firmware, driver, software and control so that the project does nothing. Actually, the goal is that nothing happens to a model helicopter in flight. OK, alright, let’s start from the beginning now.

    Once upon a time there was a model helicopter

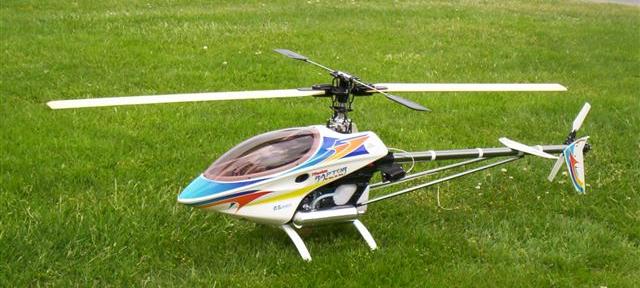
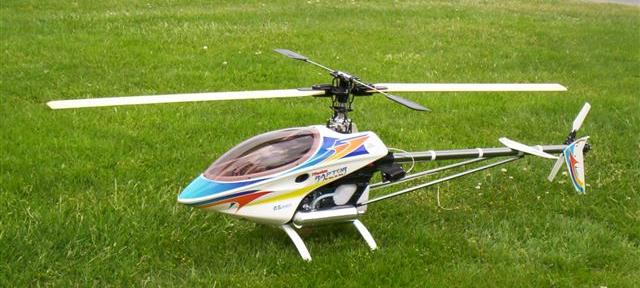
    Some of you already know that besides being a dumb programmer, I also try to spend the time I don’t have as a model-helicopter hobbyist. A model helicopter is a reduced-scale helicopter, equipped with a combustion or even electric engine. With the functionalities of a conventional helicopter, it is capable of performing flights with the same characteristics and freedom of movement. In fact, when it comes to flight capability, a model helicopter can do more than a real helicopter. It is not uncommon to see a model helicopter flying upside down.


    A model helicopter is controlled by a radio-control system that determines the movements of servomotors installed on the aircraft. Each servo has its specific role within the model helicopter. One controls the throttle, another the pitch of the tail-rotor blades, and so on.

    Is it easy to control a model helicopter?

    Not at all. The radio control has two sticks, so there are 4 movements you must command at the same time, on top of the extra switches. The big problem is that gaining the reflexes needed to make the correction takes a certain amount of training time. Believe me, you don’t want a model helicopter flying out of control near you. Besides the risk of getting hurt, it is almost certain that the model helicopter will hit something and split into several pieces. I can tell you this is not cheap equipment, and each crash can mean hundreds of reais to get everything working again. To get started with this hobby we normally use a simulator.


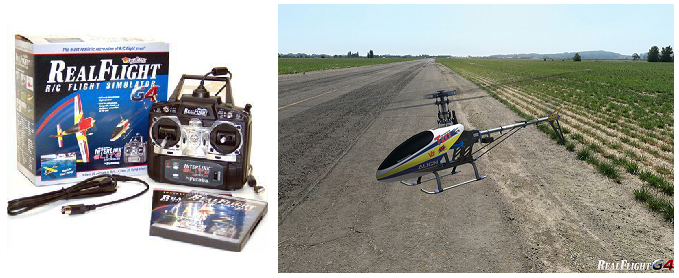
    A simulator is very much like a video game. With it you get a special joystick that is a replica of a radio control, but which interfaces with your computer via USB. You use that joystick to control a model helicopter on your computer screen. So, at each crash the model suffers, you just press a reset button on the control itself so you can try again. When I was starting out in the hobby, everyone recommended a simulator to me until I bought one. I kept thinking: “Hard, my foot… Bring it on? Only for those old-timers. I’ve got more than twenty years of video games under my belt”. When I started playing with the simulator I saw it wasn’t so easy after all. Dozens and dozens of crashes. Simulators are really an excellent start. They manage to reproduce a model’s behavior in great detail.


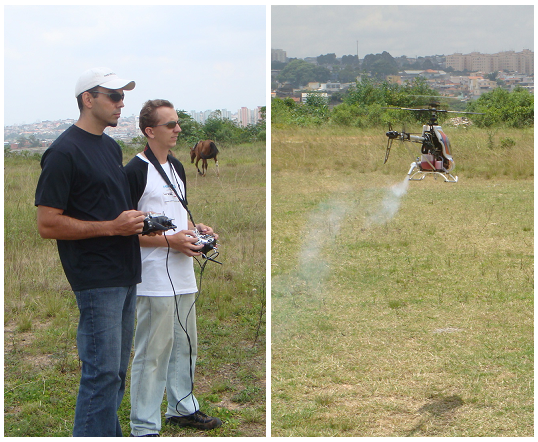
    After the simulator, you normally take flight lessons. And for that you hire an instructor. But what can an instructor do besides wishing you good luck? What happens is that radio controls can be connected by a training cable. This cable allows the instructor to control the model helicopter, and by flipping a switch, control passes to the student’s hands. If the student loses control over the model, the instructor can take control back and keep your brand-new model helicopter from turning into a pile of junk.

    Cool, but what about the project?

    Our project aims to control a model helicopter in flight in order to stabilize it. That is why I say our project is going to do nothing. There was even a professor who said: “Wow! You’re going to do all this to make a helicopter stand still?”. If you are a model-helicopter hobbyist, you know that keeping the model helicopter still is a pilot’s first challenge. Even in windless environments, stabilizing a model helicopter requires a good amount of experience. Our final goal would be to describe a simple flight plan where it takes off, stabilizes in the air, makes a few movements and finally lands. We don’t want to bite off more than we can chew. Let’s see what we can get by presentation day.

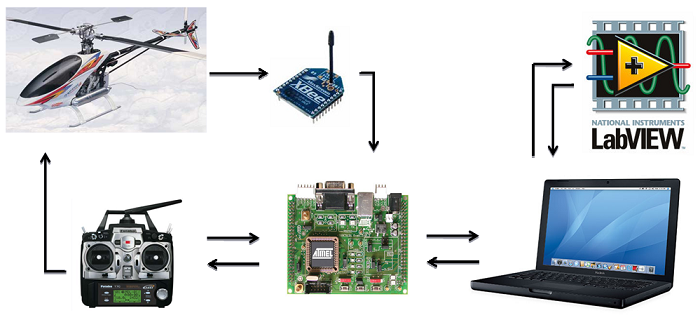
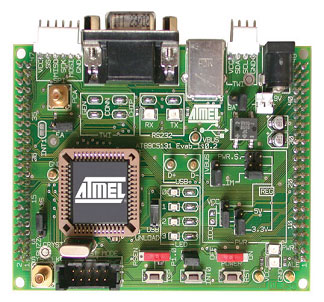
    To detect the model helicopter’s movements, we installed some sensors on it; the sensor data is gathered by a microcontroller installed on a board also on board the model helicopter. Once gathered, the data is sent to another board on the ground through a ZigBee module. In the photo below you can see our little board. This board on the ground is an Atmel kit that supports several interfaces, USB being one of them. So we wrote the firmware and the USB driver to make those readings now be received by our control software.


    To do the control, we will use the new Fuzzy logic Toolkit available in the new LabVIEW 2009 from National Instruments. For those who don’t know it, LabVIEW is one of the main control tools used by modern engineering. It is possible to build control programs just by drawing and dragging components onto the screen; it may seem contradictory for a low-level developer to say this, but all that abstraction gives us time to dedicate to the things that really need time. The tool also offers I/O interfaces, allowing us to work with sensors and actuators directly over the electronic medium.

    Another interesting piece of information is that the PID and Fuzzy Logic Toolkit was completely rewritten and reformulated with the help of a Brazilian. That’s right, Bruno Cesar (in the photo beside) works at National Instruments Brazil and was one of the people responsible for this development. Do you think that is a coincidence? Then what would you say if you learned that he also graduated from São Judas Tadeu University? Bruno was on the Mooca campus last week giving a talk about the new Fuzzy logic module. This made us even more certain that Fuzzy logic is ideal for our control problem, since it is perfect for dealing with complex problems where you don’t have the mathematical model that describes a model helicopter’s behavior. Fuzzy logic relies on an operator’s experience to act on the controls. It is quite interesting.

    LabVIEW also lets us make calls to DLLs. This was a simple way we found to get the data that was in the driver to reach the control software. So we created a DLL that would abstract many of the complications of interacting with a USB device. LabVIEW just calls functions like LeAmostra() that already return the data ready for use. All that code with CreateFile() and DeviceIoControl() was left up to the DLL, along with other helper functions.

    Now you may be asking yourselves: “But how is LabVIEW going to act on the model helicopter?”. Remember that training cable? Our USB board will receive the control actions from LabVIEW through the same DLL. To make those commands be applied to the model helicopter, we made our USB board behave like a radio control, which will use the training cable to apply control over the model helicopter. Obviously we will still have a pilot holding the radio in the instructor’s role, mainly to avoid accidents where a malfunction of our project could turn my model helicopter into a pile of junk.

    The Multidisciplinary Symposium

    Ever since I started writing about the project on this blog, some people got curious and said: “Let me know when there is a presentation”. Well, this is your chance to take a look at some projects. Our project was accepted to have a space at this event, which will take place from September 18 to 25 at São Judas Tadeu University. There will be several short presentations of 15 minutes each. The projects are not finished yet, and so you still won’t see any model helicopter flying by itself there, but we will be there with our equipment, ready to answer a few questions. The symposium is open to public visitation. You don’t need to be a student to attend; you just need to register for free on the university’s website and that’s it. If you want to chat a bit about sensors, microcontrollers, firmwares, drivers, control or even model helicopters, even over a coffee, just show up.

    Well, that is it. I have written too much already. Now I need to get back to my project.
    See you!

  • Notifying events to the application

    A few weeks ago, here I was all tangled up with my college project. With all this activity, what I have been telling my friends is that my Twitter looks more like a schedule. But anyway, in the middle of so much rush, I received the following question from reader Júlio César (Rio de Janeiro – RJ):

    “How do you implement communication between a driver and an application such that the driver initiates the communication? That is, I do not want the application to send a message to the driver, but rather the driver to send a message to the application.”

    My short but blunt answer is that there are no means for a driver to simply wake up on a sunny morning, scratch its belly while stretching and say to itself: “Today I am going to surprise my friend notepad.exe. I am going to send it a postcard from Kernel-land.”

    A Client-Server model

    Windows works on a Client-Server model, where the Server side would be the Kernel, which serves the requests of its clients, which in this case are the applications. No activity is initiated by the Kernel of its own free will. It is always the applications that, using the system’s native API, request notifications from the system for a series of events.

    “But Fernando, what about the plug-and-play notifications to user-mode applications?”

    Actually they are requested by the applications using the RegisterDeviceNotification() routine. This subject is quite nice to comment on in a future post. Let me jot it down here on my list of posts to write.

    “But Fernando, when the system starts, do not things start automagically?”

    The Boot is a special procedure in which the Kernel starts only the Session Manager in User-land, also known among the close ones as Smss. Smss is a native process (which uses only the native API) and is considered a trusted component. It does not use the Windows API because the Windows Subsystem (Csrss) does not exist yet. From there on a series of initializations originated by Smss and its child processes occurs, but I will leave the details about this to the Slug. That reminded me that Csrss stands for “Client Server Run-Time Subsystem”.

    “But Fernando, what about the services?”

    Services are started by a process called Services.exe, which in turn was also started by another component during the Boot process.

    “But Fernando, what about the boot drivers?”

    The loading of drivers is not considered a notification to user-mode.

    “But Fernando, does it rain in September?”

    Well, that is enough, right? Let us talk about what matters now.

    Pending I/O operations

    We have already seen in another post that an application can request services from the driver. To give the impression that the driver sent a notification to the application, we can use an operation that would remain pending until the desired event occurs. Such as a read operation on a serial port, which would remain stuck in the ReadFile() call until one or more characters were received.

    This works reasonably well, but we would have some complications if the event never occurs and your application needs to leave because it left the beans on the stove or something like that. So, we would have to adopt a multi-threaded solution, where a second thread would warn the pending thread that it is too late, that there is no point in waiting for the event anymore, it is over, meow, forget it, get real.

    For the people who suffer from “thread-phobia”, a solution using Overlapped I/O would fit like a glove, but I am not going to talk about that today. Actually that is already on my list, but it is not going to be today.

    Sharing an event

    The way I most like to work is by sharing an event. Does everyone know what an event is? It may seem silly, but there are a lot of people who do not really know what a handle is and want to program the Kernel. That worries me a little. What kind of drivers can these people generate? Allow me to open a parenthesis here to ask a question: What do you think about, besides me offering driver posts, me offering posts about System Programming? Things like Processes, Threads, Objects, Handles, Virtual Memory, Heaps, Dispatch Objects, Synchronization and so on. Send me e-mails with suggestions, which will be very welcome.

    Getting back to what matters, if an application creates an event and sends its handle to the driver, the driver will be able to signal the existence of relevant information to the application. So the application can wait for this event, and when it is signaled, the application does the I/O to fetch such information using the means of communication we have already seen in other posts.

    Image Notifier

    To exemplify the reception of events generated by a driver, today we are going to see a driver that will warn us whenever an image is mapped in a process.

    First we are going to define an interface for this communication. The application will need to send the handle of an event to the driver; this will also tell the driver that the application wishes to receive notifications about image mapping. For that we are going to define our IOCTLs as we already saw in this other post.

    //-f--> This will be the IOCTL to notify the driver that an
    //      application is interested in the image load
    //      events. This IOCTL must carry the handle of the event
    //      to be signaled when there is data for the application.
    #define IOCTL_IMG_START_NOTIFYING   CTL_CODE(FILE_DEVICE_UNKNOWN,   \
                                                 0x800,                 \
                                                 METHOD_BUFFERED,       \
                                                 FILE_ANY_ACCESS)
     
     
    //-f--> I know it is silly to create a structure with a single member,
    //      but besides being more didactic, this makes it easier for that
    //      crowd that is going to do "Copy and Paste" of my code into
    //      other projects. Later they will want to send more data
    //      to the driver and will get tangled up with it. And then you know whose
    //      fault it is: "I got this code on that fool's blog!".
    typedef struct _IMG_START_NOTIFYING
    {
        HANDLE  hEvent;
     
    } IMG_START_NOTIFYING, *PIMG_START_NOTIFYING;
     
     
    //-f--> This will be the IOCTL that the application will send to the driver to
    //      get the details about the image load in a process.
    #define IOCTL_IMG_GET_IMAGE_DETAIL  CTL_CODE(FILE_DEVICE_UNKNOWN,   \
                                                 0x801,                 \
                                                 METHOD_BUFFERED,       \
                                                 FILE_ANY_ACCESS)
     
     
    //-f--> Here I am going to define a maximum path of 260 characters, but
    //      there may be cases of longer paths. I am not going to handle
    //      all the cases nor optimize the transport of this buffer
    //      by taking only the valid bytes.
    #define IMG_MAX_IMAGE_NAME  260
     
     
    //-f--> Here follows the path of the image that the driver will obtain
    //      before notifying the application.
    typedef struct _IMG_IMAGE_DETAIL
    {
        CHAR    ImageName[IMG_MAX_IMAGE_NAME];
     
    } IMG_IMAGE_DETAIL, *PIMG_IMAGE_DETAIL;
     
     
    //-f--> Here the application says it is no longer interested in the
    //      image notifications. This will make the driver
    //      release the reference it made to the handle.
    #define IOCTL_IMG_STOP_NOTIFYING    CTL_CODE(FILE_DEVICE_UNKNOWN,   \
                                                 0x802,                 \
                                                 METHOD_BUFFERED,       \
                                                 FILE_ANY_ACCESS)

    I am not going to put all the code here in the post, but it is all available in the example for download at the end of this post. Remember that nine out of ten dentists recommend reading the comments for a better understanding of the example. The application will basically create an event and send its handle to the driver through an IOCTL.

        //-f--> Creates the event that will be shared.
        hNotificationEvt = CreateEvent(NULL,
                                       TRUE,
                                       FALSE,
                                       NULL);
        _ASSERT(hNotificationEvt);
     
        printf("Requesting device to start notifying.\n");
     
        //-f--> We copy the event handle into the structure
        //      that will be sent to the driver. As we know, handles
        //      are valid only in the context of this process,
        //      so we are assuming that our driver will be
        //      at the top of the device stack.
        StartNotifying.hEvent = hNotificationEvt;
        if (!DeviceIoControl(hDevice,
                             IOCTL_IMG_START_NOTIFYING,
                             &StartNotifying,
                             sizeof(StartNotifying),
                             NULL,
                             0,
                             &dwBytes,
                             NULL))
        {
            //-f--> Take a deep breath and open WinDbg...
            dwError = GetLastError();
            printf("Error #%d on starting device notification.\n",
                   dwError);
            __leave;
        }

    When the driver receives this IOCTL, it will acquire a reference to the object pointed to by the handle. Note that for this the driver uses the ObReferenceObjectByHandle() routine of the Object Manager, which besides incrementing the object’s reference counter, also certifies that the handle is of the object type you expect to receive. This would prevent, for some reason, the handle of another object from being passed in place of the event handle. The result of this call will be a pointer to an event received by the driver. As we know, objects have their header in a standard format, but the body of the object varies depending on its type. Imagine that someone sent a handle to a thread in place of a handle to an event; we could use the event routines to manipulate a thread and the chance of everything going blue is high. That is why the use of the ObjectType parameter, although optional, is highly recommended.

        //-f--> Gets a reference to the object
        nts =  ObReferenceObjectByHandle(pStartNotifying->hEvent,
                                         EVENT_ALL_ACCESS,
                                         *ExEventObjectType,
                                         UserMode,
                                         (PVOID*)&g_pEvent,
                                         NULL);

    “Fernando, is this really necessary? My application is the only one that is going to use this driver, and it will always send a handle to an event.”

    This kind of precaution prevents a smart-aleck program from sending anything to your driver, deliberately producing a blue screen.

    “Fernando, in my opinion what you really like is to complicate things. Couldn’t I simply make a copy of the handle and use routines like ZwSetEvent() that receive the event handle as a parameter?”

    Look, the handle is valid only within the process that obtained it. In our case, that handle is valid only in the context of our test application. Image notifications run in an arbitrary context, that is, God knows in which process context. That is why we will have to obtain a reference that is valid in any context. The pointer obtained by the ObReferenceObjectByHandle() routine is valid in any context, because it points to the object itself, which resides in System Space. If you do not know what System Space means, then take a stroll through this post.

    Well, after that the application is going to keep waiting for the event to be signaled by the driver. In the code below, two events are monitored; one of them is signaled by the driver while the other is signaled by the application itself at the moment of ending its activity.

        //-f--> Here we create an array of handles to wait
        //      for multiple objects.
        hObjects[0] = hFinishEvt;
        hObjects[1] = hNotificationEvt;
     
        do
        {
            //-f--> Waits either for a signal from the device indicating the
            //      presence of data in the driver, or a signal from the
            //      primary thread saying that soap-opera
            //      nonsense and stuff.
            dwWait = WaitForMultipleObjects(2,
                                            hObjects,
                                            FALSE,
                                            INFINITE);
            switch(dwWait)
            {
            case WAIT_FAILED:
                //-f--> Come on, Murphy, give it a rest!
                dwError = GetLastError();
                printf("Error #%d on waiting for device notification.\n",
                       dwError);
                __leave;
     
            case WAIT_OBJECT_0 + 1:
                //-f--> Whoa! The driver has something for us, let us go get it.
                if (GetImageDetail(hDevice) != ERROR_SUCCESS)
                    __leave;
                break;
            }
     
            //-f--> We will stay in this while the termination event
            //      is not signaled by the primary thread.
        } while(dwWait != WAIT_OBJECT_0);

    When the event is signaled, the application will send an IOCTL to get the data from the driver. Our test application also prints this data on the screen for pure fun. Let us take a look at the driver’s code to find out how this happens.

    During initialization, the driver calls the PsSetLoadImageNotifyRoutine() routine to register a callback routine that is called whenever an image is mapped to some process.

        //-f--> Registers a callback routine to receive
        //      the notifications of images mapped to
        //      processes.
        nts = PsSetLoadImageNotifyRoutine(OnLoadImage);
        ASSERT(NT_SUCCESS(nts));

    Our callback routine converts the path of the mapped image from Unicode to ANSI. More details about string conversion in this post. Next the routine places this path in a list and sets the event sent by the application. If you still do not know how to play with linked lists in the Windows kernel, then read this post.

    VOID
    OnLoadImage(IN PUNICODE_STRING  pusFullImageName,
                IN HANDLE           hProcessId,
                IN PIMAGE_INFO      pImageInfo)
    {
        PIMG_EVENT_NODE pNode;
        ANSI_STRING     asImageName;
        NTSTATUS        nts;
     
        //-f--> We are going to acquire control of the variables
        //      shared by different threads.
        nts = KeWaitForMutexObject(&g_EventMtx,
                                   UserRequest,
                                   KernelMode,
                                   FALSE,
                                   NULL);
        ASSERT(NT_SUCCESS(nts));
     
        __try
        {
            //-f--> Checks whether the application is interested in this
            //      event.
            if (!g_pEvent)
                __leave;
     
            //-f--> Allocates a node for the list of image paths
            pNode = (PIMG_EVENT_NODE)ExAllocatePoolWithTag(PagedPool,
                                                           sizeof(IMG_EVENT_NODE),
                                                           IMG_TAG);
            if (!pNode)
            {
                //-f--> Oops!
                ASSERT(FALSE);
                __leave;
            }
     
            //-f--> Initializes an ANSI_STRING to use in the conversion
            //      of the image path. We will always provide one byte
            //      less to reserve space for adding a
            //      null terminator.
            RtlInitEmptyAnsiString(&asImageName,
                                   pNode->ImageDetail.ImageName,
                                   sizeof(pNode->ImageDetail.ImageName) - 1);
     
            //-f--> Does the conversion without allocating the result.
            nts = RtlUnicodeStringToAnsiString(&asImageName,
                                               pusFullImageName,
                                               FALSE);
            if (!NT_SUCCESS(nts))
            {
                //-f--> Oops!
                ASSERT(FALSE);
                ExFreePool(pNode);
                __leave;
            }
     
            //-f--> Places the null terminator so that the test
            //      application can count on it when doing the print.
            asImageName.Buffer[asImageName.Length] = 0;
     
            //-f--> Inserts the node into the list.
            InsertTailList(&g_ListHead,
                           &pNode->Entry);
     
            //-f--> We set the event informing the application that there is
            //      data in the list to be read.
            KeSetEvent(g_pEvent,
                       IO_NO_INCREMENT,
                       FALSE);
        }
        __finally
        {
            //-f--> Finally, releases the mutex and runs for the hug.
            KeReleaseMutex(&g_EventMtx,
                           FALSE);
        }
    }

    When the event is signaled, the application wakes up from its deep sleep and finds out that the driver has data for it. So it sends an IOCTL to get such data. This IOCTL will execute the routine below, removing the first element of the list and checking whether there is still more data to be collected by the application. If the list empties in this call, the driver resets the event so that the application goes back to sleep waiting for the records of newly mapped images.

    NTSTATUS
    OnGetImageDetail(PIMG_IMAGE_DETAIL  pImageDetail)
    {
        NTSTATUS        nts;
        PLIST_ENTRY     pEntry;
        PIMG_EVENT_NODE pNode;
     
        //-f--> Acquires the mutex
        nts = KeWaitForMutexObject(&g_EventMtx,
                                   UserRequest,
                                   KernelMode,
                                   FALSE,
                                   NULL);
        ASSERT(NT_SUCCESS(nts));
     
        //-f--> Checks whether the list is empty. Always
        //      use this routine before trying to remove
        //      an element from the list.
        if (!IsListEmpty(&g_ListHead))
        {
            //-f--> Gets the address of the Entry
            pEntry = RemoveHeadList(&g_ListHead);
     
            //-f--> Gets the address of the node
            pNode = CONTAINING_RECORD(pEntry,
                                      IMG_EVENT_NODE,
                                      Entry);
     
            //-f--> Copies to the application buffer.
            RtlCopyMemory(pImageDetail,
                          &pNode->ImageDetail,
                          sizeof(IMG_IMAGE_DETAIL));
     
            //-f--> Frees the node and that's that
            ExFreePool(pNode);
            nts = STATUS_SUCCESS;
        }
        else
            nts = STATUS_NO_MORE_ENTRIES;
     
        //-f--> It may be that in this call the list has
        //      become empty. So we check again
        //      and reset the event so that the application
        //      does not come back here.
        if (IsListEmpty(&g_ListHead))
            KeResetEvent(g_pEvent);
     
        //-f--> Releases the mutex and that's it.
        KeReleaseMutex(&g_EventMtx,
                       FALSE);
        return nts;
    }

    The result of so much blah-blah-blah

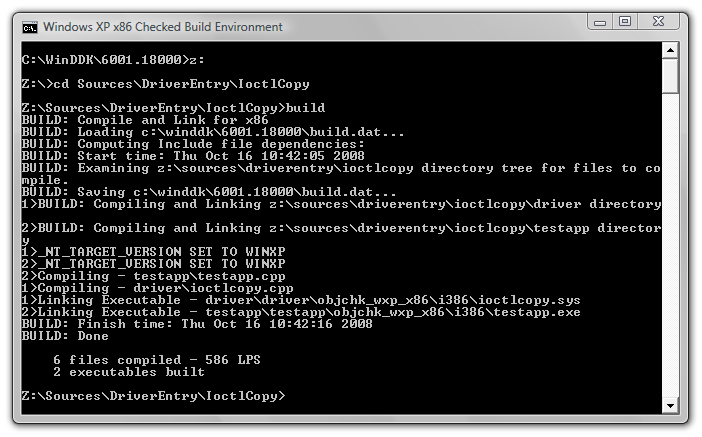
    After the driver is compiled, installed and started, we will be able to run our test application and wait for something to be executed. When a process is created, both its module and the DLLs it depends on are mapped in the system. This will trigger our callback routine in the driver and make the whole thing work. If you do not know how to compile, install and start a driver, this post may help you.


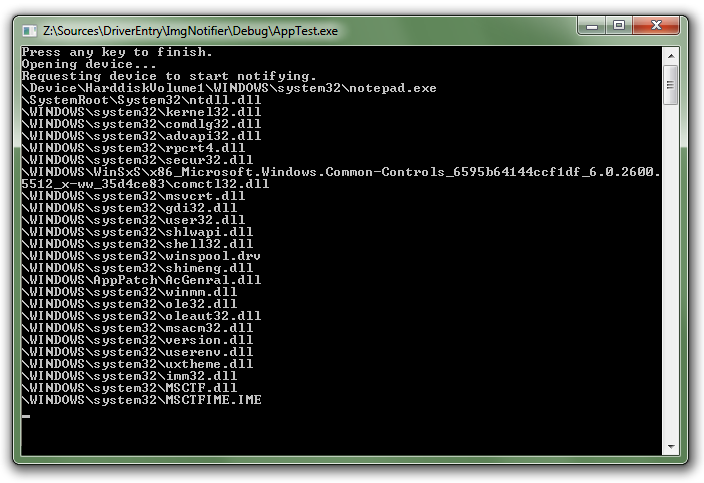
    The image above is the result of running notepad.exe while our test application was waiting for events, but any other process could trigger such events. This post, besides providing us with this example of an inverted call, also shows us how to play with Mutex Objects, which was the question of another reader, Ismael Rocha (Brasília – DF).

    Now let me get back to my college project.
    See you!

    ImgNotifier.zip

  • Strings in the Kernel

    Is there anything more trivial than manipulating strings? I believe the correct answer would be “It depends“. When I had finished my technical course in Industrial Computing in 1995, I thought I knew a lot about the C language. After all, I already knew how to manipulate strings. Copy, concatenate, reverse, search for words… What else should a programmer know? When I started my internship and began dealing with real-world programs, I found out that I knew nothing. But one thing is certain, I knew how to manipulate strings. This post should help a lot the C++ programmers who know everything about Templates, Smart Pointers, STL and magical things that abstract reality, making the programmer’s life easier. With all these reference-counting resources and overloading of every operator there is, things start to get hazy and you begin to wonder: “But where is the buffer, really?”. Today we are just going to take a light stroll through the UNICODE_STRING and ANSI_STRING structures and some functions for converting between them. It may seem silly, but if you do not know how to play with strings, why learn the rest? It is all going to end in a blue screen anyway.

    And back in kindergarten…

    We learned from the teacher back in kindergarten that strings are chains of characters. So we could tell the story of our lives just by placing one character in front of another.

    CHAR    szExemplo[] = "Tava ruim lá na Bahia, profissão de bóia-fria\n"
                          "Trabalhando noite e dia, num era isso que eu queria\n"
                          "Eu vim-me embora pra \"Sum Paulo\",\n"
                          "Eu vim no lombo dum jumento com pouco conhecimento\n"
                          "Enfrentando chuva e vento e dando uns peido fedorento (vish)\n"
                          "Até minha bunda fez um calo\n"
                          "Chegando na capital, uns puta predião legal\n"
                          "As mina pagando um pau, mas meu jumento tava mal\n"
                          "Precisando reformar\n"
                          "Fiz a pintura, importei quatro ferradura\n"
                          "Troquei até dentadura e pra completar a belezura\n"
                          "Eu instalei um Road-Star!";

    Jumento Celestino / Mamonas Assassinas

    There are two things you must know so that you can keep reading this post. One of them is that these characters need to be stored somewhere, whether in a local variable, allocated on the heap or even in the initialized data segment. The other thing is that strings are normally terminated by a NULL character, but the absence of it does not disqualify a string. This means we can have strings without terminators where their size is indicated by another variable. I leave here a hook for the Slug to explain these things to the interested boys and girls.

    Another important characteristic is that a character is not always equal to a Byte. There are strings composed of wide characters. Wide characters, contrary to what people think, are not lucky characters, but rather characters formed by 16-bit values. With strings formed by such characters, one can express words in any language. This explains how Windows manages to deal with alien file names when you try to install the drivers for the HiPhone you bought in Chinatown.

    Besides, imagine that an error occurs during the encryption process of your hard drive. It would be vital that a detailed error message be displayed to you regardless of the nationality of the product. Whether the information is going to help is another matter.

    Four types of strings

    Of these, we have two strings that we are already used to seeing in user-Mode, both terminated with a NULL character.

    CHAR    szString[] = "Uma string de CHAR";
    WCHAR   wzString[] = L"Uma string de WCHAR";

    The other two strings are the ones we normally see in kernel-mode.

    typedef struct _UNICODE_STRING {
      USHORT  Length;
      USHORT  MaximumLength;
      PWSTR  Buffer;
    } UNICODE_STRING, *PUNICODE_STRING;
     
    typedef struct _STRING {
      USHORT  Length;
      USHORT  MaximumLength;
      PCHAR  Buffer;
    } ANSI_STRING, *PANSI_STRING;

    These strings are defined by structures with three members, which I describe below. The behavior of the routines and macros that manipulate them is very similar. For this reason I am going to concentrate my examples on UNICODE_STRING, since the Win32 subsystem converts everything to unicode when it passes a call to the kernel.

    • Buffer: It is a pointer to the region of memory where the characters are stored.

    • Length: Indicates the number of valid bytes of the string. This size is always expressed in bytes, even if this is a WCHAR string.

    • MaximumLength: Indicates the maximum size this string can have.

    To understand how these members are interpreted, take a look at the example below:

    void OsTresMembros(void)
    {
        WCHAR           wsUmArray[200];
        UNICODE_STRING  usString;
     
        //-f--> I indicate where the characters of this string
        //      will be stored.
        usString.Buffer = wsUmArray;
     
        //-f--> We have not written anything in the buffer yet,
        //      so nothing that is in the buffer
        //      is valid.
        usString.Length = 0;
     
        //-f--> Even though the buffer is not initialized
        //      it is still there and can hold a string
        //      of at most its size in bytes.
        usString.MaximumLength = sizeof(wsUmArray);
    }

    Here we see an empty unicode string, since it has zero valid bytes, but its storage capacity is up to 200 characters. Note that the characters are stored in an array that is on the stack. This means that no memory leak will be caused by the ending of this routine.

    Initializing Strings

    We can also use some macros that do the initialization of these structures.

    void InitString(void)
    {
        UNICODE_STRING  usOutraConstante;
        UNICODE_STRING  usVazia;
        WCHAR           wzBuffer[30] = L"Isso não será considerado.";
     
        //-f--> Initializes a string at its creation.
        UNICODE_STRING  usConstante = RTL_CONSTANT_STRING(L"Uma string.");
     
        //-f--> Initializes a constant string.
        RtlInitUnicodeString(&usOutraConstante,
                             L"Uma outra string constante que não muda.");
     
        //-f--> Initializes an empty string for later use
        RtlInitEmptyUnicodeString(&usVazia,
                                  wzBuffer,
                                  sizeof(wzBuffer));
    }

    Note the values of these structures.

    kd> ?? usConstante
    struct _UNICODE_STRING
     "Uma string."
       +0x000 Length           : 0x16
       +0x002 MaximumLength    : 0x18
       +0x004 Buffer           : 0xf8cd8600  "Uma string."
     
    kd> db 0xf8cd8600 L0x18
    f8cd8600  55 00 6d 00 61 00 20 00-73 00 74 00 72 00 69 00  U.m.a. .s.t.r.i.
    f8cd8610  6e 00 67 00 2e 00 00 00                          n.g.....

    Although the maximum capacity of this string is 0x18 characters, only 0x16 bytes are valid. That is because the macro disregards the NULL terminator that the C/C++ compiler left as a bonus.

    The RTL_CONSTANT_STRING() macro lets us initialize the string at its creation, but another notable feature of it is that it screws up the IntelliSense of Visual Studio (2008 at least). So if you really like IntelliSense, prefer to use the RtlInitUnicodeString() macro.

    kd> ?? usVazia
    struct _UNICODE_STRING
     "Isso não será considerado."
       +0x000 Length           : 0
       +0x002 MaximumLength    : 0x3c
       +0x004 Buffer           : 0xf8ae5c34  "Isso não será considerado."

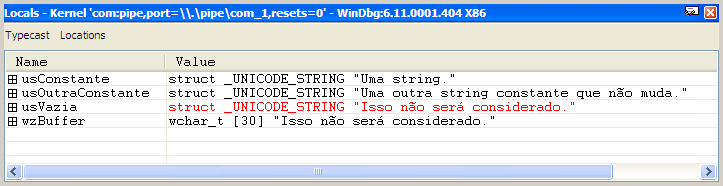
    Oops! How can a string with zero valid bytes be displayed by WinDbg? Actually, what happens is that WinDbg takes the UNICODE_STRING structure apart and shows each of the members here. In this case, there is an array of WCHAR with well-behaved values here. Do not blame the poor thing. You are the one who is spoiled by Visual Studio.

    kd> db 0xf8ae5c34 L0x3c
    f8ae5c34  49 00 73 00 73 00 6f 00-20 00 6e 00 e3 00 6f 00  I.s.s.o. .n...o.
    f8ae5c44  20 00 73 00 65 00 72 00-e1 00 20 00 63 00 6f 00   .s.e.r... .c.o.
    f8ae5c54  6e 00 73 00 69 00 64 00-65 00 72 00 61 00 64 00  n.s.i.d.e.r.a.d.
    f8ae5c64  6f 00 2e 00 00 00 00 00-00 00 00 00              o...........

    But this data is only there by chance. It is not considered part of a valid unicode string. This gets in the way a bit when debugging, because even the local variables window also shows this invalid content.


    The !ustr extension shows only the valid data of a unicode string.

    kd> !ustr usConstante
    String(22,24) at f899fc6c: Uma string.
     
    kd> !ustr usVazia
    String(0,60) at f8ae5c1c:

    Is the terminator necessary?

    Not at all! You can well observe that in the previous examples, the macro left the terminator out of the valid bytes. Considering the terminator as a valid byte is a mistake and can cause confusion. Imagine comparing two distinct strings that carry the same content, but one of them considers the terminator as valid information. Such strings will be different, since they have a different length.

    I believe what really matters is not to count on the terminator in the strings you receive from other components. It is a fact that most of the time, the buffer has a terminator, and that even though it is not considered valid information, the terminator is still there. Never count on that unless there is some note in the documentation. I have seen people use the Buffer member as a parameter for a call to the wcslen() routine, for example. Besides the risk of getting incorrect information, there is also a bonus of possibly generating a blue screen.

    “But Fernando, I have already tested this on several operating systems and it always worked.”

    That does not justify anything; you cannot rely on tests, but on documentation. When your product spreads across the market, it faces many different environments, with the most diverse filters, anti-viruses, monitors and so on. You cannot be sure of the implementation of any software. The best we can hope from them is that they rely on the documentation.

    Manipulating Strings

    The members of the UNICODE_STRING structure are basically used by manipulation routines in order to check whether the existing buffer is enough for the desired operation. Therefore, before using a string, make sure it was initialized correctly. In the case of a string copy, the destination string will need to be initialized even if empty.

    void CopyString(void)
    {
        UNICODE_STRING  usSource;
        UNICODE_STRING  usTarget;
        WCHAR           wzTarget[10];
     
        //-f--> Here we initialize our source string.
        RtlInitUnicodeString(&usSource,
                             L"12345678901234567890");
     
        //-f--> Here we initialize our destination string.
        RtlInitEmptyUnicodeString(&usTarget,
                                  wzTarget,
                                  sizeof(wzTarget));
     
        //-f--> Performs the copy
        RtlCopyUnicodeString(&usTarget,
                             &usSource);
    }

    Here we see the example of a string copy where the source string is larger than the destination one. In that situation we will not have an access violation, but the destination buffer will be filled completely. Note that the routine did not leave us the comfortable terminator.

    kd> !ustr usTarget
    String(20,20) at f89a3c6c: 1234567890
     
    kd> ?? usTarget
    struct _UNICODE_STRING
     "1234567890"
       +0x000 Length           : 0x14
       +0x002 MaximumLength    : 0x14
       +0x004 Buffer           : 0xf89a3c54  "1234567890"
     
    kd> db 0xf89a3c54 L0x20
    f89a3c54  31 00 32 00 33 00 34 00-35 00 36 00 37 00 38 00  1.2.3.4.5.6.7.8.
    f89a3c64  39 00 30 00 98 5d 5f 00-14 00 14 00 54 3c 9a f8  9.0..]_.....T<..

    Unlike the RtlCopyUnicodeString() routine, some other routines return STATUS_BUFFER_TOO_SMALL to us when the buffer is insufficient.

    VOID 
      RtlCopyUnicodeString(
        IN OUT PUNICODE_STRING  DestinationString,
        IN PCUNICODE_STRING  SourceString
        );
     
    NTSTATUS 
      RtlAppendUnicodeStringToString(
        IN OUT PUNICODE_STRING  Destination,
        IN PUNICODE_STRING  Source
        );

    There is a series of string manipulation routines in the WDK, but there is always some routine missing compared to the broad library of routines of the C/C++ standard library. Routines like strrchr() for example. When necessary we will have to build a version that manipulates UNICODE_STRING structures in the same way. Here is a basic list of string routines that the WDK supports. Other functions are listed here, but we will talk about them later.

    But where is the buffer, really?

    The UNICODE_STRING structure does not store a buffer, but rather a pointer to it. This way, the manner of discarding a string varies depending on the way you obtained it. In the examples we have seen so far, the buffers used are in initialized data or in local arrays of the example function. There are routines that initialize and allocate strings as a way of returning the desired information. In these cases, it is necessary to free the buffer you received. This is the case of the routines that do the conversion from ANSI_STRING to UNICODE_STRING and vice versa. They are RtlUnicodeStringToAnsiString() and RtlAnsiStringToUnicodeString().

    NTSTATUS 
      RtlAnsiStringToUnicodeString(
        IN OUT PUNICODE_STRING  DestinationString,
        IN PANSI_STRING  SourceString,
        IN BOOLEAN  AllocateDestinationString
        );
     
    NTSTATUS 
      RtlUnicodeStringToAnsiString(
        IN OUT PANSI_STRING  DestinationString,
        IN PUNICODE_STRING  SourceString,
        IN BOOLEAN  AllocateDestinationString
        );

    The example below does a conversion from ANSI to UNICODE with allocation of the result, and then frees the received buffer.

    void ConvertString(void)
    {
        ANSI_STRING     asString;
        UNICODE_STRING  usString;
     
        //-f--> Here we initialize our source string.
        RtlInitAnsiString(&asString,
                          "Um exemplo simples.");
     
        //-f--> In this case we will not need to initialize the
        //     destination string. The routine will do that for us.
        RtlAnsiStringToUnicodeString(&usString,
                                     &asString,
                                     TRUE);
     
        //-f--> Prints the resulting string
        DbgPrint("String convertida: %wZ\n",
                 &usString);
     
        //-f--> We free the buffer allocated in the conversion.
        RtlFreeUnicodeString(&usString);
    }

    You yourself can write a routine that generates UNICODE_STRINGs by allocating the buffer dynamically. The buffer can be allocated dynamically using ExAllocatePoolWithTag() or one of its sisters. However, when freeing the buffer of this string, use the appropriate function, which in this example would be ExFreePoolWithTag(). Do not go around using RtlFreeUnicodeString() left and right. Enjoy in moderation. Only use that routine to free strings that were obtained by functions like RtlAnsiStringToUnicodeString(), whose documentation indicates the use of RtlFreeUnicodeString().

    “…, the caller must deallocate the buffer by calling RtlFreeUnicodeString.”

    Safe Strings in Kernel

    A portion of the string manipulation routines of the C/C++ standard library, such as strcpy() and sprintf(), are also available in the kernel, but the growing concern with security in buffer manipulation caused the safe functions to be made available both for user-mode and for kernel-mode. For details on the use of these functions consult this link.

    One more example driver

    This other post brings the example of a driver that keeps a list of strings in memory. In this other post, that same example was evolved so that different lists were kept under different contexts. Now I am going to evolve that example again. The application will keep sending NULL-terminated strings during the write, the driver will create ANSI_STRINGs from them and convert them into UNICODE_STRINGs before placing them in the list.

    Most of the modifications are in the read and write routines, so I am just going to show the code of these routines here. In any case, the whole project including the driver and a test application are available for download at the end of this post. Let us start with the write routine that sends the strings to the driver. As always, all the relevant information is in the comments.

    /****
    ***     OnWrite
    **
    **      The application is sending a string.
    */
    NTSTATUS
    OnWrite(IN PDEVICE_OBJECT  pDeviceObj,
            IN PIRP            pIrp)
    {
        PIO_STACK_LOCATION  pStack;
        ANSI_STRING         asString;
        PSTRING_LIST        pStringList;
        PSTRING_REG         pStringReg;
        ULONG               ulBytes;
        KIRQL               kIrql;
        NTSTATUS            nts;
     
        //-f--> We get the current Stack Location.
        pStack = IoGetCurrentIrpStackLocation(pIrp);
     
        //-f--> Gets the head of the list.
        pStringList = (PSTRING_LIST)pStack->FileObject->FsContext;
     
        //-f--> What we have in the system buffer here is an array
        //      of NULL-terminated bytes. We are going to initialize
        //      an ANSI_STRING with this buffer.
        RtlInitAnsiString(&asString,
                          (PCSZ)pIrp->AssociatedIrp.SystemBuffer);
     
        //-f--> Here we allocate the node that will be placed in the list
        pStringReg = (PSTRING_REG) ExAllocatePoolWithTag(NonPagedPool,
                                                         sizeof(STRING_REG),
                                                         STR_LST_TAG);
     
        //-f--> To do the conversion to UNICODE_STRING, we are going to
        //      ask the routine to make the allocation of the resulting
        //      buffer. For this reason, we will not need to initialize
        //      the output string.
        nts = RtlAnsiStringToUnicodeString(&pStringReg->usString,
                                           &asString,
                                           TRUE);
        if (!NT_SUCCESS(nts))
        {
            //-f--> Oops! We probably did not have memory for that.
            //      We will signal the failure and inform the IoManager
            //      that zero bytes were copied.
            ExFreePoolWithTag(pStringReg, STR_LST_TAG);
            pIrp->IoStatus.Information = 0;
        }
        else
        {
            //-f--> We will hold the spinlock to avoid contention
            //      on access to the list.
            KeAcquireSpinLock(&pStringList->SpinLock,
                              &kIrql);
     
            //-f--> Inserts the node into the list.
            InsertTailList(&pStringList->ListHead,
                           &pStringReg->Entry);
     
            //-f--> Releases the spinlock.
            KeReleaseSpinLock(&pStringList->SpinLock,
                              kIrql);
     
            //-f--> Here we inform the IoManager that all the bytes
            //      sent by the application were received
            //      successfully by the driver.
            pIrp->IoStatus.Information = pStack->Parameters.Write.Length;
        }
     
        //-f--> The Information field was already filled in, we will just
        //      copy the status of the operation and complete the IRP.
        pIrp->IoStatus.Status = nts;
        IoCompleteRequest(pIrp, IO_NO_INCREMENT);
        return nts;
    }

    Now let us look at the retrieval of the strings on the read.

    /****
    ***     OnRead
    **
    **      The application wants to receive the strings sent
    **      by it.
    */
    NTSTATUS
    OnRead(IN PDEVICE_OBJECT  pDeviceObj,
           IN PIRP            pIrp)
    {
        ANSI_STRING         asString;
        PIO_STACK_LOCATION  pStack;
        PSTRING_LIST        pStringList;
        PSTRING_REG         pStringReg;
        PLIST_ENTRY         pEntry;
        KIRQL               kIrql;
        NTSTATUS            nts;
     
        //-f--> We will leave this field at zero until we are
        //      sure that the copy was made to the application
        //      buffer
        pIrp->IoStatus.Information = 0;
     
        //-f--> We get the current Stack Location.
        pStack = IoGetCurrentIrpStackLocation(pIrp);
     
        //-f--> Gets the head of the list.
        pStringList = (PSTRING_LIST)pStack->FileObject->FsContext;
     
        //-f--> We will return to the application only an array of CHAR
        //      with a NULL terminator. The strings are stored as
        //      UNICODE_STRING. We will convert them to ANSI_STRING.
        //      Here we will initialize the ANSI_STRING that will receive
        //      the result of the UNICODE_STRING conversion.
     
        //-f--> We will offer Length-1 to reserve a byte for
        //      the null terminator after conversion.
        RtlInitEmptyAnsiString(&asString,
                               (PCHAR)pIrp->AssociatedIrp.SystemBuffer,
                               (USHORT)pStack->Parameters.Read.Length - 1);
     
        //-f--> Here we will acquire the spinlock to avoid contention
        //      on access to the list.
        KeAcquireSpinLock(&pStringList->SpinLock,
                          &kIrql);
     
        //-f--> Checks whether the list is empty.
        if (IsListEmpty(&pStringList->ListHead))
        {
            //-f--> Signals an error on the read and releases the spinlock right away.
            nts = STATUS_NO_MORE_ENTRIES;
            KeReleaseSpinLock(&pStringList->SpinLock,
                              kIrql);
        }
        else
        {
            //-f--> Removes the record from the list and releases the spinlock right away.
            pEntry = RemoveHeadList(&pStringList->ListHead);
            KeReleaseSpinLock(&pStringList->SpinLock,
                              kIrql);
     
            pStringReg = CONTAINING_RECORD(pEntry,
                                           STRING_REG,
                                           Entry);
     
            //-f--> Here we convert the string. Note that we do not request
            //      the allocation of the buffer. We are using the system
            //      buffer to receive the result of the conversion. In this
            //      case the destination string must be initialized.
            nts = RtlUnicodeStringToAnsiString(&asString,
                                               &pStringReg->usString,
                                               FALSE);
            if (NT_SUCCESS(nts))
            {
                //-f--> Here we use that byte we reserved and thus
                //      the null terminator is also copied by the IoManager
                //      from the SystemBuffer to the application buffer
                asString.Buffer[asString.Length] = 0;
     
                //-f--> We need to tell the IoManager the number of
                //      bytes that will be copied to the application buffer.
                //      That size is the size of the converted string plus
                //      one byte taken by the NULL terminator we placed.
                pIrp->IoStatus.Information = asString.Length+1;
            }
     
            //-f--> In this example, we are not handling the error case
            //      in the conversion, which can happen if the application sends
            //      a small buffer for the string. If any error occurs
            //      during the conversion, we will simply discard the string
     
            //-f--> Frees the string's buffer and then the record it
            //      occupied in the list.
            RtlFreeUnicodeString(&pStringReg->usString);
            ExFreePoolWithTag(pStringReg, STR_LST_TAG);
        }
     
        //-f--> The Information field was already filled in, we will just
        //      copy the status of the operation and complete the IRP.
        pIrp->IoStatus.Status = nts;
        IoCompleteRequest(pIrp, IO_NO_INCREMENT);
        return nts;
    }

    With this driver running, I can already think of some filter examples. I have been thinking about filter examples for some time, besides receiving post suggestions on this subject. The fact is that we did not have a basis for it. The important thing is to have a driver simple enough for the easy understanding of things. There is no point in me making a post with a hard-disk filter, a network filter or any other driver with plug-and-play and power management. Those would need a lot of accumulated knowledge and would not fit in a post.

    Anyway, once again I hope I have helped. And if any doubt arises, just send me an e-mail.

    Have fun!

    StringList.zip

  • Taking the blue screen home

    Nothing better than a nice bit of whining to start off this post. My pace is low because the university is sucking up all my vital energies. If you have been following my blog in the latest posts, you already know what I am talking about. In my free time I have been running around with my project, my internship and my job. My blog is also on that to-do list, but the poor little thing has less priority here. Some of you may know that I am a model-helicopter hobbyist, but as I told my friend Heldai the other day: “Hobby is the name we give to what we do to fill the time we have free, but I have yet to discover the name we would give to what we would like to do if we had free time…”. Anyway, since this has nothing to do with today’s post, let us change the subject.

    Between one thing and another, I was trying to think of something simple for a small post. It was then that the question from reader Ismael Rocha (Brasília – DF) gave rise to this post.

    “Is there a way to save the BSODs to later check for possible problems?”

    Save a blue screen? Save what? The machine is already dead, my friend! It is gone! It is over! What you can still try to save is your job.

    Joking aside, yes there is.

    The operating system is pre-configured to restart automagically when a critical failure happens. Critical failure is the polite way of saying that the house fell down, the cow went to the swamp, the alligator hugged you, the drum spun, the iron screamed, the weather closed in, it got too small for you… anyway, a blue screen happened. Not that I do not like blue screens, but rather the side effect they bring us. By the worldwide standard of third-party driver consumers, if you are the author of a driver installed on a machine at the moment of the failure, whether it is running or not, then the failure is your fault until proven otherwise. It is sad, but it is reality. From the moment a blue screen happens, you are the default culprit and you will have to keep putting up with little jokes for the rest of eternity. I would like to take advantage of the context to send a hug to my friend Heldai.

    Displaying the blue screen

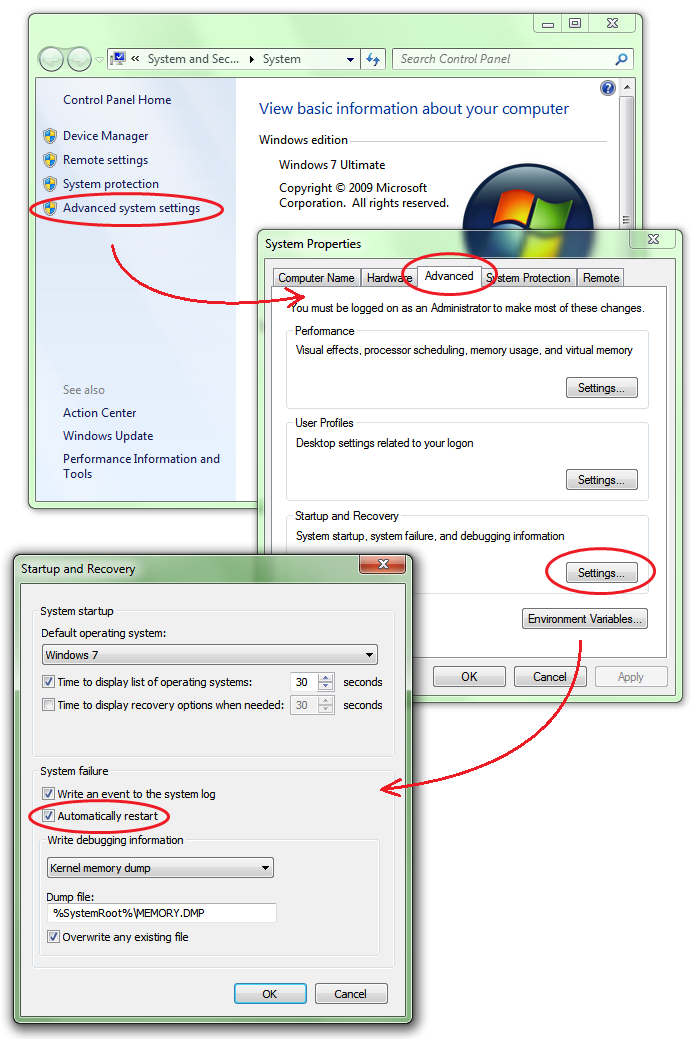
    In an attempt to save your dignity, you try to prove the fault is not yours. Saying that the machine reset is a feature of your driver and that fortunately it worked very well is not going to stick, not the second time. But what can you do if the blue screen is just a flash of information while the machine restarts? Fortunately you can change that. By right-clicking on “My Computer”, selecting “Properties”. From there just take a look at the figure below to find out that you can prevent the machine from restarting automagically.


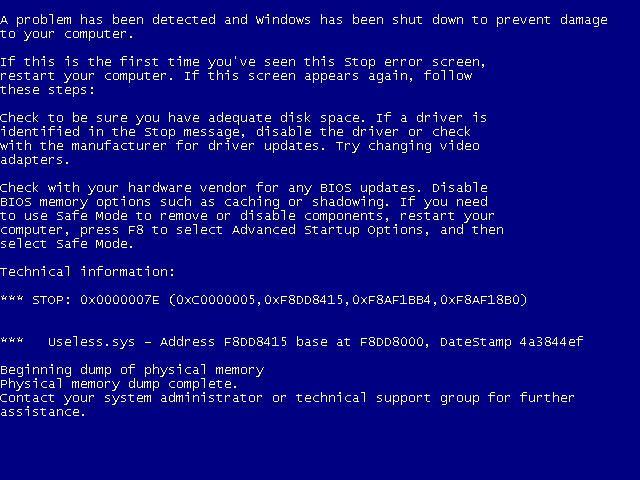
    You will have to uncheck the “Automatically restart” option, and thus have all the time you need to show everyone that the problem is not yours. Most of the time the system manages to detect the driver that is probably the cause of all this headache and display the file name on the blue screen as we can see in the figure below.

    Taking a blue screen apart


    “Wow! So Windows has an artificial intelligence algorithm that probably uses nanotechnology somehow to find the guilty driver?”

    Actually it is a bit simpler than that; Windows simply takes the image of the driver that threw an unhandled exception or that voluntarily brought down the system upon detecting some inconsistency. For this reason, the name of the driver displayed is not always in fact the name of the guilty driver. If we think of the simple example where the driver MetralhadoraGiratoria.sys writes where it should not, corrupting some allocation Pool, this error can later be detected by the driver Laranja.sys which, when making a memory allocation, calls a system routine that in turn calls the KeBugCheckEx() routine upon detecting such an inconsistency. Can you guess the name of the driver that will appear on the BSOD?

    Other information can still be obtained from the blue screen. If it is the name of your driver that appears on the screen, then you can also get the address of the instruction where the disaster occurred. In our example the address is 0xF8DD8A415; from there we can reach the function that was executing at the moment of the failure if we have the map file generated by the linker. It is also possible to obtain the date of the file image and clear up that doubt about whether it really was the right version that was running. The file date is obtained from the DateStamp field and is expressed as a 32-bit hexadecimal value representing the number of seconds since midnight of January first, 1970. What is really hard is finding someone with enough patience to calculate that in front of a blue screen. There are far less laborious ways to find out that the fault was indeed yours.

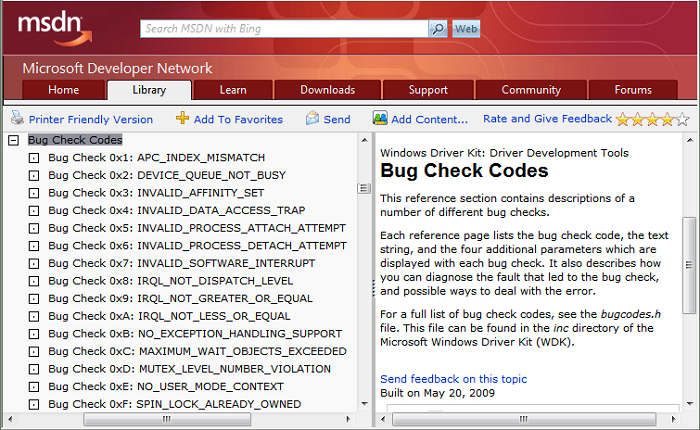
    In my opinion, the most relevant information the blue screen offers is the Stop Code. As the name suggests, Stop Code is a code that will indicate the reason for the system failure. You can consult the list of Stop Codes at this link or take a look at the C:\WinDDK\6001.18002\inc\api\BugCodes.h file that comes with the WDK.


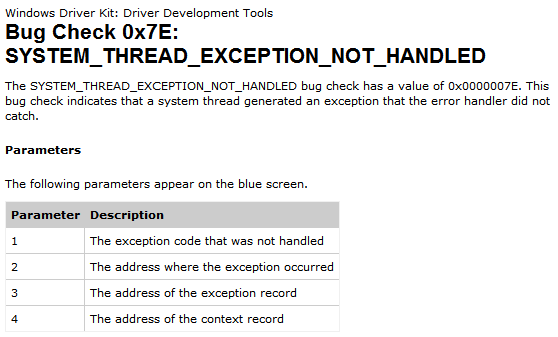
    Stop Codes come with up to four parameters that bring additional information to the stop code. The interpretation of these values will depend on the failure code, which in our example is 0x7E. Consulting the link I mentioned a moment ago, we will have the following interpretation for the values presented to us.


    But is there a way to save the BSOD or not?

    Yeah yeah yeah… It is just that I start writing and end up getting carried away. But anyway, when a critical failure occurs, the system creates a file known as a Crash Dump. There are three options of crash dumps that can be generated.

    • Complete Dump: In this option, the entire contents of physical memory at the moment of the failure will be copied into a file. Obviously the size of this file will be the amount of memory present on the machine plus an extra 1MB of header. This option does not appear on machines that have more than 2GB of physical memory, but it is still possible to configure the complete dump without using this graphical interface by writing directly to the registry. This method is also known as “configuring it by hand”. The complete dump is very useful when the information present in memory pages in User Space is relevant to the problem, such as Dead Lock situations. If you do not know what User Space means, this post may help.

    • Kernel Dump: Here only the pages in System Space will be copied to disk. The size of this file will vary depending on how much physical memory the machine has installed, but there is no exact proportion. Much of the page balancing used by the virtual memory manager will determine the size of this file, but it is on the order of 200MB on a system with 4GB of total memory (you can already carry it on a pen drive). This option is normally the most viable, since it only carries the most relevant information for a system crash.

    • Minimal Dump: Here a 64KB file will be generated for 32-bit systems (128KB for 64-bit systems). In this file we have only the Stop Code and its parameters, the list of drivers loaded at the moment of the failure, information about the current process and thread, and the Call Stack of the thread that caused the failure.

    In the same window where you configure the automatic system restart, there are two other fields that will configure the type of dump desired and the path where it will be generated. Now you can already take your blue screen in your heart and debug it wherever you want. At home, at work, on the train, on the subway… You can also ask clients to send you their crash dumps so that you can diagnose the problem without having to travel across rivers and mountains in the cold and the rain.

    I have the Crash Dump, now what?

    Now that you are the happy owner of a wonderful Crash Dump file, what more could you want from life? Maybe being able to find out the cause of the problem would already be a good start. For that we are going to use the operating system’s native debugger. If you do not know WinDbg yet, then take a look at this post so you know what we are talking about here.

    Assuming you have Windbg installed on your development machine, and that it has the symbol server configured, all we have to do now is open WinDbg, select the “Open Crash Dump…” item in the “File” menu and point to the path of the dump file you copied from the poor machine that dared to run your driver. The text below is the result shown in the command window when the Crash Dump is opened.

    Microsoft (R) Windows Debugger Version 6.11.0001.404 AMD64
    Copyright (c) Microsoft Corporation. All rights reserved.
     
     
    Loading Dump File [Z:\Sources\MEMORY.DMP]
    Kernel Summary Dump File: Only kernel address space is available
     
    Symbol search path is: srv*
    Executable search path is: 
    Windows XP Kernel Version 2600 (Service Pack 3) UP Free x86 compatible
    Product: WinNt, suite: TerminalServer SingleUserTS
    Built by: 2600.xpsp.080413-2111
    Machine Name:
    Kernel base = 0x804d7000 PsLoadedModuleList = 0x80553fc0
    Debug session time: Thu Jun 18 14:46:24.969 2009 (GMT-3)
    System Uptime: 0 days 0:03:20.375
    Loading Kernel Symbols
    ...............................................................
    .........................................................
    Loading User Symbols
     
    Loading unloaded module list
    ...........
    *******************************************************************************
    *                                                                             *
    *                        Bugcheck Analysis                                    *
    *                                                                             *
    *******************************************************************************
     
    Use !analyze -v to get detailed debugging information.
     
    BugCheck 7E, {c0000005, f8d9f415, f8af1bb4, f8af18b0}
     
    Probably caused by : Useless.sys ( Useless!DriverEntry+5 )
     
    Followup: MachineOwner
    ---------

    Now if we simply run the suggested command, we will already have a good description of what happened to the machine that suffered the critical failure.

    kd> !analyze -v
    *******************************************************************************
    *                                                                             *
    *                        Bugcheck Analysis                                    *
    *                                                                             *
    *******************************************************************************
     
    SYSTEM_THREAD_EXCEPTION_NOT_HANDLED (7e)
    This is a very common bugcheck.  Usually the exception address pinpoints
    the driver/function that caused the problem.  Always note this address
    as well as the link date of the driver/image that contains this address.
    Arguments:
    Arg1: c0000005, The exception code that was not handled
    Arg2: f8d9f415, The address that the exception occurred at
    Arg3: f8af1bb4, Exception Record Address
    Arg4: f8af18b0, Context Record Address
     
    Debugging Details:
    ------------------
     
     
    EXCEPTION_CODE: (NTSTATUS) 0xc0000005 - The instruction at 0x%08lx referenced
    memory at 0x%08lx. The memory could not be %s.
     
    FAULTING_IP: 
    Useless!DriverEntry+5 [z:\sources\driverentry\useless\useless.c @ 7]
    f8d9f415 c7050000000000000000 mov dword ptr ds:[0],0
     
    EXCEPTION_RECORD:  f8af1bb4 -- (.exr 0xfffffffff8af1bb4)
    ExceptionAddress: f8d9f415 (Useless!DriverEntry+0x00000005)
       ExceptionCode: c0000005 (Access violation)
      ExceptionFlags: 00000000
    NumberParameters: 2
       Parameter[0]: 00000001
       Parameter[1]: 00000000
    Attempt to write to address 00000000
     
    CONTEXT:  f8af18b0 -- (.cxr 0xfffffffff8af18b0)
    eax=07263867 ebx=00000000 ecx=bb40e64e edx=1be10003 esi=e19feea8 edi=81eb41d0
    eip=f8d9f415 esp=f8af1c7c ebp=f8af1c7c iopl=0         nv up ei ng nz na po nc
    cs=0008  ss=0010  ds=0023  es=0023  fs=0030  gs=0000             efl=00010282
    Useless!DriverEntry+0x5:
    f8d9f415 c7050000000000000000 mov dword ptr ds:[0],0  ds:0023:00000000=????????
    Resetting default scope
     
    PROCESS_NAME:  System
     
    ERROR_CODE: (NTSTATUS) 0xc0000005 - The instruction at 0x%08lx referenced memory
    at 0x%08lx. The memory could not be %s.
     
    EXCEPTION_PARAMETER1:  00000001
     
    EXCEPTION_PARAMETER2:  00000000
     
    WRITE_ADDRESS:  00000000 
     
    FOLLOWUP_IP: 
    Useless!DriverEntry+5 [z:\sources\driverentry\useless\useless.c @ 7]
    f8d9f415 c7050000000000000000 mov dword ptr ds:[0],0
     
    BUGCHECK_STR:  0x7E
     
    DEFAULT_BUCKET_ID:  NULL_DEREFERENCE
     
    LAST_CONTROL_TRANSFER:  from 8057677f to f8d9f415
     
    STACK_TEXT:  
    f8af1c7c 8057677f 81eb41d0 81d46000 00000000 Useless!DriverEntry+0x5
     [z:\sources\driverentry\useless\useless.c @ 7]
    f8af1d4c 8057688f 80000360 00000001 00000000 nt!IopLoadDriver+0x66d
    f8af1d74 80534c02 80000360 00000000 823c68b8 nt!IopLoadUnloadDriver+0x45
    f8af1dac 805c6160 b29accf4 00000000 00000000 nt!ExpWorkerThread+0x100
    f8af1ddc 80541dd2 80534b02 00000001 00000000 nt!PspSystemThreadStartup+0x34
    00000000 00000000 00000000 00000000 00000000 nt!KiThreadStartup+0x16
     
     
    FAULTING_SOURCE_CODE:  
         3: NTSTATUS DriverEntry(IN PDRIVER_OBJECT  pDriverObject,
         4:                      IN PUNICODE_STRING pusRegistryPath)
         5: {
         6:     //-f--> Diga olá à BSOD e vá se acostumando com ela...
    >    7:     *(PVOID*)0x00000000 = 0;
         8:
         9:     //-f--> Não vamos viver para ver isso.
        10:     return STATUS_SUCCESS;
        11: }
     
     
    SYMBOL_STACK_INDEX:  0
     
    SYMBOL_NAME:  Useless!DriverEntry+5
     
    FOLLOWUP_NAME:  MachineOwner
     
    MODULE_NAME: Useless
     
    IMAGE_NAME:  Useless.sys
     
    DEBUG_FLR_IMAGE_TIMESTAMP:  4a3844ef
     
    STACK_COMMAND:  .cxr 0xfffffffff8af18b0 ; kb
     
    FAILURE_BUCKET_ID:  0x7E_Useless!DriverEntry+5
     
    BUCKET_ID:  0x7E_Useless!DriverEntry+5
     
    Followup: MachineOwner
    ---------

    If the machine that is opening the dump file is your driver’s development machine, Windbg will be able to automagically find your driver’s sources and point out the cause of the failure in great detail. So make sure your manager is not nearby at that moment. This is already much more information than you could get simply by looking at the computer’s blue screen. In this example I used the example driver from the Getting Started post to reproduce the blue screen. But do not worry about that; even being a novice driver programmer, one of the first things you will learn is how to generate blue screens.

    Once again I hope I have helped.
    Have fun!

  • Enumerating devices

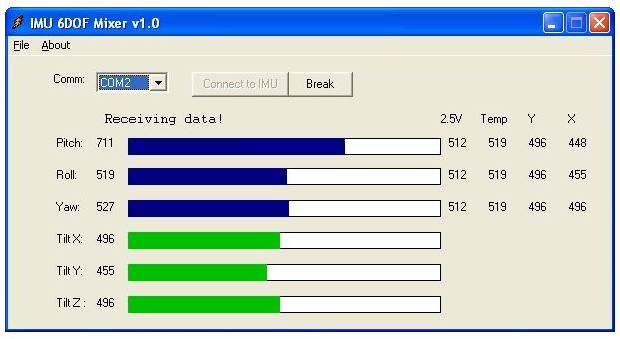
    Among my current tasks was reading the samples from a gyroscope using a serial port and generating a file with them. This file would be read by a driver similar to the one demonstrated in the post before this one. In the gyroscope’s datasheet there is a description of the protocol, not to mention the example made in Visual Basic that exists on the manufacturer’s site, which demonstrates the angular acceleration on each axis as well as their linear accelerations as shown below.


    The entire interface for configuring and obtaining the gyroscope’s data is done through the serial port. Even without a dedicated application you can use any program, like HyperTerminal, to access the menus offered by the device. Using a serial port, any microcontroller kit that has no display and not even a keyboard can offer a quite friendly interface.

    Writing serial protocols is not something that scares me. What is hard is having to remember how to program a User-Mode application that has windows, buttons and other controls, but nothing that a little MSDN does not solve. Driver programmers usually test everything they can using console applications, so I developed a small terminal software to deal directly with the device. Its source follows below and is a bonus for anyone who needs to play with serial ports some day.

    /****
    ***     main
    **
    **      And off we go...
    */
    int _tmain(int argc, _TCHAR* argv[])
    {
        DWORD           dwBytes,
                        dwError = ERROR_SUCCESS;
        HANDLE          hCom;
        ULONG           i;
        UCHAR           ucByteIn[512], ucByteOut;
        DCB             dcb;
        COMMTIMEOUTS    CommTimeouts;
     
        //-f--> Here we open the desired serial port
        hCom = CreateFile(L"COM3",
                          GENERIC_READ | GENERIC_WRITE,
                          0,
                          NULL,
                          OPEN_EXISTING,
                          0,
                          NULL);
     
        //-f--> Checks whether we succeeded
        if (hCom == INVALID_HANDLE_VALUE) 
        {
            //-f--> Oops!
            dwError = GetLastError();
            printf("CreateFile failed with error %d.\n",
                    dwError);
            return dwError;
        }
     
        //-f--> There are 7 kilos of serial port settings.
        //      Instead of configuring each one of them, we will just
        //      get the system default settings and modify
        //      only the ones we care about.
        if (!GetCommState(hCom, &dcb))
        {
            //-f--> Oops!
            dwError = GetLastError();
            printf ("GetCommState failed with error %d.\n",
                    dwError);
            CloseHandle(hCom);
            return dwError;
        }
     
        //-f--> Here we modify the settings to set the
        //      settings required by the gyroscope.
        //      57600, 8 N 1 (no flow control)
        dcb.DCBlength = sizeof(DCB);
        dcb.BaudRate = CBR_57600;
        dcb.ByteSize = 8;
        dcb.Parity = NOPARITY;
        dcb.StopBits = ONESTOPBIT;
        dcb.fDtrControl = DTR_CONTROL_DISABLE;
        dcb.fRtsControl = RTS_CONTROL_DISABLE;
     
        //-f--> Here we apply the settings we modified
        if (!SetCommState(hCom, &dcb))
        {
            //-f--> Oops!
            dwError = GetLastError();
            printf ("SetCommState failed with error %d.\n",
                    dwError);
            CloseHandle(hCom);
            return dwError;
        }
     
        //-f--> I am going to configure the timeouts so that a
        //      read is completed after 100ms even if
        //      no character is received by the application.
        //      This prevents the application from getting stuck in ReadFile
        //      until a byte is received by the serial port
        CommTimeouts.ReadIntervalTimeout = 0;
        CommTimeouts.ReadTotalTimeoutMultiplier = 0;
        CommTimeouts.ReadTotalTimeoutConstant = 100;
        CommTimeouts.WriteTotalTimeoutConstant = 0;
        CommTimeouts.WriteTotalTimeoutMultiplier = 0;
     
        //-f--> Applies the timeout settings
        if (!SetCommTimeouts(hCom, &CommTimeouts))
        {
            //-f--> Oops!
            dwError = GetLastError();
            printf ("SetCommTimeouts failed with error %d.\n",
                    dwError);
            CloseHandle(hCom);
            return dwError;
        }
     
        //-f--> Here begins the infinite loop that will run
        //      forever and ever until the end of days.
        //      Actually, if you press [ESC] it ends.
        while(1)
        {
            //-f--> Checks whether there is a byte to be received by the
            //      application in the keyboard buffer.
            if (_kbhit())
            {
                //-f--> Gets the key
                ucByteOut = _getch();
     
                //-f--> Checks whether the received key is [ESC]
                if (ucByteOut == 27)
                    break;
     
                //-f--> Sends the received byte to the serial port
                if (!WriteFile(hCom,
                               &ucByteOut,
                               1,
                               &dwBytes,
                               NULL))
                {
                    //--> Oops!
                    dwError = GetLastError();
                    break;
                }
            }
     
            //-f--> Checks whether any byte was received by the
            //      serial port. Note that in this loop there is no
            //      typical Sleep() to keep from driving the CPU
            //      to 100%. This wait is performed inside the
            //      call to ReadFile(). The function waits for a
            //      byte for up to 100ms, as configured in the
            //      timeouts.
            if (!ReadFile(hCom,
                          ucByteIn,
                          sizeof(ucByteIn),
                          &dwBytes,
                          NULL))
            {
                //-f--> Oops!
                dwError = GetLastError();
                break;
            }
     
            //-f--> Prints the received character sequence on the screen
            for (i=0; i<dwBytes; i++)
            {
                if (ucByteIn[i] == 0x0d)
                    puts("");
                else
                    printf("%c", ucByteIn[i]);
            }
        }
     
        //-f--> Well, if we got to this point it is because we reached
        //      the end of days or the ESC key was pressed.
        //      Let us close the serial port and run away.
        CloseHandle(hCom);
        return dwError;
    }

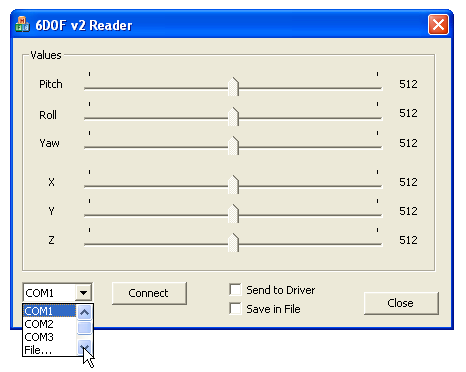
    Opening a serial port is the simplest part of this story; the problem is deciding which port to open. Like any decent program, there should be a combo list with the serial ports available on the computer, where the user would choose one and that is it. From there it is just a matter of getting the port selected by the user and building a call to the CreateFile() routine as illustrated in the code above.

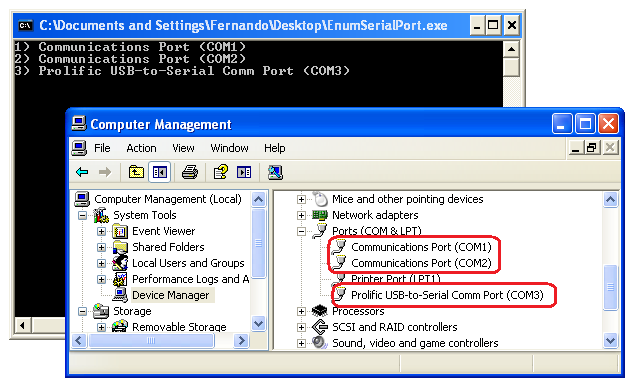
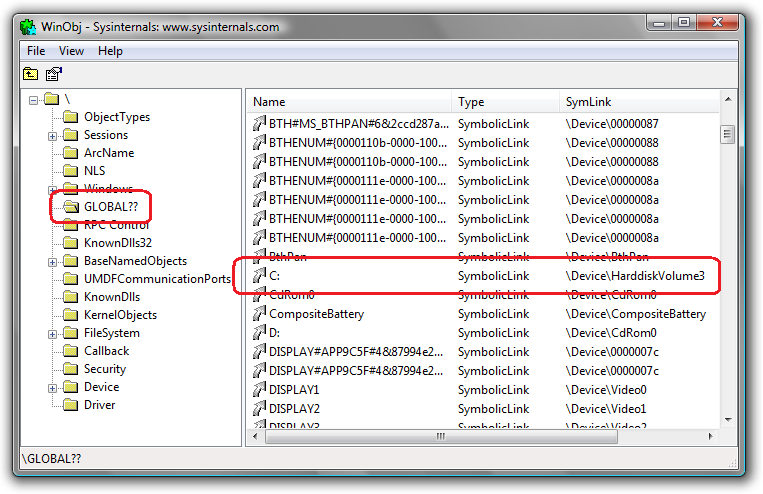
    All right, I dragged the control onto the window I was programming and now I just have to fill it in. So I thought: “There must be some function like EnumerateCommPorts() in the API”, but that is not what the reference page showed me. – What do you mean there is not one? Google must know something about it. – I ended up finding out that this is a pretty common question out there. Some solve this problem by making a loop that tries to open the serial ports in sequence (COM1, COM2,… ), others use the QueryDosDevice() function and filter the Symbolic Links that start with “COM(n)”, but the method I am going to show here is capable of enumerating any type of interface using the SetupAPI.

    Setup who?

    The SetupAPI is a part of Plug-And-Play that provides services to User-Mode applications. One of the objectives of Plug-And-Play is to unify the configuration, use and enumeration of similar devices and services. This way all manufacturers of boards that offer serial port services can have their devices configured in a single way. Devices that offer serial port services must implement a predefined interface, that is, they must show themselves willing to receive IOCTLs and respond to them in a manner foreseen in the documentation.

    The driver that wants to create devices that implement the serial port interface must declare this through the call to the IoRegisterDeviceInterface() routine. Here a device is associated with a device interface class, which is identified by a GUID. There are several predefined device interface classes in the system, as listed here, and the serial ports class is one of them. From there, your device will be enumerated by Plug-and-Play routines as a provider of a given interface.

    All right then. What we have to do is use these interface enumeration functions to find out which devices implement the serial port interface. The SetupAPI is going to help us with that task. But before we take a look at the source, let us settle one little thing. I have seen different ways of using GUID_DEVINTERFACE_COMPORT, some include the Kernel-Mode header Ntddser.h, others define the GUID by hand, but what would be the correct way?

    Defining the interface GUID

    It all starts with the call to the SetupDiGetClassDevs() routine that will gather information about the group of devices that match the search criteria adopted in the parameters. We are going to want devices that implement the interface identified by GUID_DEVINTERFACE_COMPORT, but if we simply make the call as shown below…

    hDevInfoSet = SetupDiGetClassDevs(&GUID_DEVINTERFACE_COMPORT,
                                      NULL,
                                      NULL,
                                      DIGCF_PRESENT | DIGCF_INTERFACEDEVICE);

    …we will get the error shown next.

    1>z:\sources\samples\enumserialport.obj : error LNK2001: unresolved external
     symbol _GUID_DEVINTERFACE_COMPORT

    This happens because GUID_DEVINTERFACE_COMPORT is declared in WinIoCtl.h. Remember that this header is indirectly included by Windows.h when the WIN32_LEAN_AND_MEAN symbol is not defined, as I already commented on in this other post. But even including this header we still have the same problem. Let us look at this a little more closely.

    In the WinIoCtl.h header we have:

    DEFINE_GUID(GUID_DEVINTERFACE_COMPORT, 0x86e0d1e0L, 0x8089, 0x11d0,
                0x9c, 0xe4, 0x08, 0x00, 0x3e, 0x30, 0x1f, 0x73);

    But what is DEFINE_GUID anyway?

    In GuidDef.h we have:

    #ifdef INITGUID
    #define DEFINE_GUID(name, l, w1, w2, b1, b2, b3, b4, b5, b6, b7, b8) \
            EXTERN_C const GUID DECLSPEC_SELECTANY name \
                    = { l, w1, w2, { b1, b2,  b3,  b4,  b5,  b6,  b7,  b8 } }
    #else
    #define DEFINE_GUID(name, l, w1, w2, b1, b2, b3, b4, b5, b6, b7, b8) \
        EXTERN_C const GUID FAR name
    #endif // INITGUID

    So now comes the resounding “Aaaah, right!”. GUID_DEVINTERFACE_COMPORT is a constant that is defined when the INITGUID symbol is defined; otherwise, this constant is only declared. The INITGUID symbol is defined in the InitGuid.h header. So, when you want to use the GUIDs declared with DEFINE_GUID, you will have to, in one of your modules, include the Initguid.h header before Windows.h. Since our example has only one module, it is easy. As usual, all the source code is contained in an example available for download.

    //-f--> We will have to put these includes in the right order
    //      so that the GUID that identifies the
    //      GUID_DEVINTERFACE_COMPORT interface gets defined.
    #include <InitGuid.h>
    #include <Windows.h>
    #include <SetupApi.h>

    Enumerating interfaces

    /****
    ***     EnumSerialInterfaces
    **
    **      Routine that enumerates devices that
    **      implement the serial port interface
    */
     
    DWORD EnumSerialInterfaces(void)
    {
        CHAR                        szFriendlyName[100];
        HDEVINFO                    hDevInfoSet = NULL;
        SP_DEVICE_INTERFACE_DATA    DevInterfaceData;
        SP_DEVINFO_DATA             DevInfoData;
        DWORD                       dwReturn,
                                    dwInterfaceIndex = 0;
        try
        {
            //-f--> Gathering information about devices that implement
            //      the desired interface that are present at the
            //      moment this routine is called.
            hDevInfoSet = SetupDiGetClassDevs(&GUID_DEVINTERFACE_COMPORT,
                                              NULL,
                                              NULL,
                                              DIGCF_PRESENT | DIGCF_INTERFACEDEVICE);
     
            if (hDevInfoSet == INVALID_HANDLE_VALUE)
                throw GetLastError();
     
            DevInterfaceData.cbSize = sizeof(SP_DEVICE_INTERFACE_DATA);
     
            //-f--> Now enumerates each of the interfaces
            while (SetupDiEnumDeviceInterfaces(hDevInfoSet,
                                               0,
                                               &GUID_DEVINTERFACE_COMPORT,
                                               dwInterfaceIndex++,
                                               &DevInterfaceData))
            {
                DevInfoData.cbSize = sizeof(SP_DEVINFO_DATA);
     
                //-f--> For each of the interfaces, we get the
                //      device that implements it.
                if (SetupDiGetDeviceInterfaceDetail(hDevInfoSet,
                                                    &DevInterfaceData,
                                                    NULL,
                                                    0,
                                                    NULL,
                                                    &DevInfoData))
                    throw GetLastError();
     
                //-f--> Now we just get the friendly name of the device
                if (!SetupDiGetDeviceRegistryProperty(hDevInfoSet,
                                                      &DevInfoData,
                                                      SPDRP_FRIENDLYNAME,
                                                      NULL,
                                                      (PBYTE)szFriendlyName,
                                                      sizeof(szFriendlyName),
                                                      NULL))
                    throw GetLastError();
     
                //-f--> Printf them...
                printf("%d) %s\n",
                       dwInterfaceIndex,
                       szFriendlyName);
            }
        }
        catch(DWORD dwError)
        {
            //-f--> Oops!
     
            printf("Error %d on trying enumerate device interfaces.\n",
                   dwError);
     
            dwReturn = dwError;
        }
     
        //-f--> Frees the obtained information
        if (hDevInfoSet)
            SetupDiDestroyDeviceInfoList(hDevInfoSet);
     
        return dwReturn;
    }

    With this implementation, we will have the following output.


    Cool, but that was not quite it…

    Very well. The ports were enumerated, but how would I pass a string like that to the CreateFile() function? Will I have to keep interpreting that string to get the “COM1” part that is between parentheses?

    Actually there are ways for you to obtain the Symbolic Link of the devices also using SetupAPI functions, but I imagine that what you wanted is the same as what I want. To fill a Combo Box with the simple name of the serial ports, like any normal program.

    The port name, which is the “COMx” string we are looking for, is written as a registry value in the device’s key. Every serial port driver has to have this value as shown on this page. To obtain the registry key regarding the device, we will use another SetupAPI routine. The source below will enumerate the serial ports the way we want.

    /****
    ***     EnumSerialPorts
    **
    **      Routine that enumerates devices that
    **      implement the serial port interface and
    **      prints a name that is not friendly but that
    **      still serves some purpose.
    */
     
    DWORD EnumSerialPorts(void)
    {
        CHAR                        szPortName[10];
        HDEVINFO                    hDevInfoSet = NULL;
        SP_DEVICE_INTERFACE_DATA    DevInterfaceData;
        SP_DEVINFO_DATA             DevInfoData;
        DWORD                       dwReturn,
                                    dwSize,
                                    dwInterfaceIndex = 0;
        HKEY                        hKey;
     
        try
        {
            //-f--> Gathering information about devices that implement
            //      the desired interface that are present at the
            //      moment this routine is called.
     
            hDevInfoSet = SetupDiGetClassDevs(&GUID_DEVINTERFACE_COMPORT,
                                              NULL,
                                              NULL,
                                              DIGCF_PRESENT | DIGCF_INTERFACEDEVICE);
     
            if (hDevInfoSet == INVALID_HANDLE_VALUE)
                throw GetLastError();
     
            DevInterfaceData.cbSize = sizeof(SP_DEVICE_INTERFACE_DATA);
     
            //-f--> Now enumerates each of the interfaces
            while (SetupDiEnumDeviceInterfaces(hDevInfoSet,
                                               0,
                                               &GUID_DEVINTERFACE_COMPORT,
                                               dwInterfaceIndex++,
                                               &DevInterfaceData))
            {
                DevInfoData.cbSize = sizeof(SP_DEVINFO_DATA);
     
                //-f--> For each of the interfaces, we get the
                //      device that implements it.
                if (SetupDiGetDeviceInterfaceDetail(hDevInfoSet,
                                                    &DevInterfaceData,
                                                    NULL,
                                                    0,
                                                    NULL,
                                                    &DevInfoData))
                    throw GetLastError();
     
                //-f--> Here we get the registry key of the
                //      device that implements the interface.
                hKey = SetupDiOpenDevRegKey(hDevInfoSet,
                                            &DevInfoData,
                                            DICS_FLAG_GLOBAL,
                                            0,
                                            DIREG_DEV,
                                            KEY_QUERY_VALUE);
     
                if (hKey == INVALID_HANDLE_VALUE)
                    throw GetLastError();
     
                //-f--> Here we get the PortName value from the Registry
                dwSize = sizeof(szPortName);
                dwReturn = RegQueryValueEx(hKey,
                                           "PortName",
                                           NULL,
                                           NULL,
                                           (LPBYTE)szPortName,
                                           &dwSize);
                RegCloseKey(hKey);
     
                if (dwReturn != ERROR_SUCCESS)
                    throw dwReturn;
     
                //-f--> Printf them...
                printf("%d) %s\n",
                       dwInterfaceIndex,
                       szPortName);
            }
        }
        catch(DWORD dwError)
        {
            //-f--> Oops!
            printf("Error %d on trying enumerate device interfaces.\n",
                   dwError);
     
            dwReturn = dwError;
        }
     
        //-f--> Frees the obtained information
        if (hDevInfoSet)
            SetupDiDestroyDeviceInfoList(hDevInfoSet);
     
        return dwReturn;
    }

    Now yes…


    Putting this in a combo box is already a subject for another blog. For a driver developer, the window below is not so bad after all.


    See you! 😉

    EnumSerialPort.zip

  • Reading Files

    As you saw in my last post, my graduation project will use a tool called LabView to receive and handle data from a USB board. This data will be collected from a device called a gyroscope using TTL 232, which is an RS 232 with voltages of 0 and 5 volts. But as a proof of concept, we would have to make the driver simulate the reception of data to send to LabView. We used a circuit that turns TTL 232 into RS 232 just to allow the data to be read from a conventional serial port. Then I made a silly little program that writes to a file everything it receives through the serial port. Since the firmware had not even been started, I decided to make a driver that would read this file and pass the data on to the application layer. Questions about how to manipulate files are especially frequent. Many readers would like to know how to create, read, write and even delete files in Kernel Mode. Maybe I will disappoint you a little by saying that it is not so different from User Mode, but since we are here doing nothing, why not demonstrate?

    I believe the biggest difference is in the step where we get the handle to the file. Let us start by taking a look at the ZwCreateFile() routine.

    NTSTATUS  
      ZwCreateFile(
        OUT PHANDLE  FileHandle,
        IN ACCESS_MASK  DesiredAccess,
        IN POBJECT_ATTRIBUTES  ObjectAttributes,
        OUT PIO_STATUS_BLOCK  IoStatusBlock,
        IN PLARGE_INTEGER  AllocationSize  OPTIONAL,
        IN ULONG  FileAttributes,
        IN ULONG  ShareAccess,
        IN ULONG  CreateDisposition,
        IN ULONG  CreateOptions,
        IN PVOID  EaBuffer  OPTIONAL,
        IN ULONG  EaLength
        );

    The interesting part of this step is that the routine does not have the classic FileName parameter that we saw in the equivalent CreateFile() API for User Mode. The file name is described in the OBJECT_ATTRIBUTES structure described below.

    typedef struct _OBJECT_ATTRIBUTES {
        ULONG  Length;
        HANDLE  RootDirectory;
        PUNICODE_STRING  ObjectName;
        ULONG  Attributes;
        PVOID  SecurityDescriptor;
        PVOID  SecurityQualityOfService;
     
    } OBJECT_ATTRIBUTES, *POBJECT_ATTRIBUTES;
     
    typedef CONST OBJECT_ATTRIBUTES *PCOBJECT_ATTRIBUTES;

    To fill in this structure we use the InitializeObjectAttributes() macro.

    VOID 
      InitializeObjectAttributes(
        OUT POBJECT_ATTRIBUTES  InitializedAttributes,
        IN PUNICODE_STRING  ObjectName,
        IN ULONG  Attributes,
        IN HANDLE  RootDirectory,
        IN PSECURITY_DESCRIPTOR  SecurityDescriptor
        );

    The file path is described in the ObjectName parameter, which is a pointer to a UNICODE_STRING. In Kernel, the full path to a file would be described as “\Device\HarddiskVolume0\Directory\File.ext” for example. This happens because the “C:” part, which we normally use in the file path in User Mode, is a Symbolic Link. Symbolic who? A Symbolic Link would be like a shortcut to the name in Kernel Mode. User Mode applications cannot open just any Kernel object right off the bat. So each driver creates Symbolic Links for the objects it wants to make available to User Mode. When an application wants to open the file “C:\Temp\Test.txt”, the Win32 subsystem prefixes this path with “\??\”, which is the starting directory of this search, resulting in “\??\C:\Temp\Test.txt”. When this name reaches the Object Manager, the prefix indicates that the search must start in the “\DosDevices” directory, the same one we used in the call to the IoCreateSymbolicLink() API. Anyway, skipping some details to finish this post still in this lifetime, the prefix will take us to the “\GLOBAL??\” directory. After the “\??” prefix was processed, the next part to be processed is “C:”. Using the WinObj tool from Sysinternals illustrated in the figure below, we see that here on my machine “C:” will be replaced by “\Device\HarddiskVolume3”, which in this case is the path to the device that will receive the rest of the string to be processed. After this substitution is done, the string is now “\Device\HarddiskVolume3\Temp\Test.txt”. The Object Manager now starts processing the string again and finds the device described in it.


    After that, knowing that it is a data volume device, the system consults a structure called the Volume Parameter Block (VPB). It creates a link that will tell us whether the indicated volume was mounted by some File System driver. In my case, NTFS would be this driver. The device it created would do the rest of the string handling to find the desired file. You will not have to go through this whole path to open the file. Just put the “\??\” prefix in the path of the file you want to open and all your problems are over and done with. If you want more details about the name translations that occur during the opening of a file, this article from OSR Online is great. This is the link to the reference that talks about this.

    After it is open, reading the file becomes easy with the ZwReadFile() routine.

    NTSTATUS 
      ZwReadFile(
        IN HANDLE  FileHandle,
        IN HANDLE  Event  OPTIONAL,
        IN PIO_APC_ROUTINE  ApcRoutine  OPTIONAL,
        IN PVOID  ApcContext  OPTIONAL,
        OUT PIO_STATUS_BLOCK  IoStatusBlock,
        OUT PVOID  Buffer,
        IN ULONG  Length,
        IN PLARGE_INTEGER  ByteOffset  OPTIONAL,
        IN PULONG  Key  OPTIONAL
        )

    The steps needed to open and read a file can be summarized in this little example that follows.

    /****
    ***     ReadTestFile
    **
    **      Routine that demonstrates in a simple way how to open and
    **      read a file.
    */
     
    NTSTATUS ReadTestFile(PVOID     pBuffer,
                          ULONG     cbBuffer,
                          PULONG    pulBytesRead)
    {
        UNICODE_STRING      usFileName;
        OBJECT_ATTRIBUTES   ObjAttributes;
        IO_STATUS_BLOCK     IoStatusBlock;
        HANDLE              hFile = NULL;
        NTSTATUS            nts = STATUS_SUCCESS;
     
        //-f--> We build the UNICODE_STRING containing the path
        //      of the file we want to open
        RtlInitUnicodeString(&usFileName,
                             L"\\??\\C:\\Temp\\Test.txt");
     
        //-f--> Here the macro helps us with the
        //      OBJECT_ATTRIBUTES structure
        InitializeObjectAttributes(&ObjAttributes,
                                   &usFileName,
                                   OBJ_KERNEL_HANDLE | OBJ_CASE_INSENSITIVE,
                                   NULL,
                                   NULL);
     
        //-f--> Here we open the file.
        nts = ZwCreateFile(&hFile,
                           GENERIC_READ | SYNCHRONIZE,
                           &ObjAttributes,
                           &IoStatusBlock,
                           NULL,
                           FILE_ATTRIBUTE_NORMAL,
                           FILE_SHARE_READ,
                           FILE_OPEN,
                           FILE_SYNCHRONOUS_IO_NONALERT,
                           NULL,
                           0);
     
        //-f--> Returns the error in case of failure.
        if (!NT_SUCCESS(nts))
            return nts;
     
        //-f--> A simple read from the file.
        nts = ZwReadFile(hFile,
                         NULL,
                         NULL,
                         NULL,
                         &IoStatusBlock,
                         Buffer,
                         cbBuffer,
                         NULL,
                         NULL);
     
        //-f--> In case of failure, closes the file, returns the
        //      error and pretends it is not your problem.
        if (!NT_SUCCESS(nts))
        {
            ZwClose(hFile);
            return nts;
        }
     
        //-f--> Here we get the number of bytes read
        *pulBytesRead = IoStatusBlock.Information;
     
        //-f--> Closes the file handle
        ZwClose(hFile);
        return nts;
    }

    The proof of concept

    Now that we all know how to read a file, it becomes easier to explain how I made a driver that would simulate the readings of a gyroscope just by reading the content of a file. During the existence of this blog, we have already seen how to create a little project from scratch, how to compile drivers using Visual Studio, we have also seen what an IRP is, how to offer read and write services, how to use the FsContext to keep the context between different operations, and since debugging is part of development, we also saw how to debug drivers even on a virtual machine. We are going to use all this junk to build a driver that opens a file, stores its handle in a context area, and that as we perform reads on the device it creates and exports, returns the data from a file on disk. This will serve nicely to simulate the continuous readings that LabView will make to my USB driver.

    Opening the Device and File

    The driver will receive an IRP_MJ_CREATE call when a handle to the device is opened. I am going to take advantage of this event to already open the file and store its resulting handle in the FsContext of the FILE_OBJECT that I will receive. If you are lost, take a look at the posts indicated earlier.

    And what if the file does not exist?

    Well, in case such unfortunate events occur, I am going to return the error through the IRP received itself. So, in case the file does not exist or you do not have permission to open it, the error code can be checked through the GetLastError() routine in case we get INVALID_HANDLE_VALUE as the return from opening the device handle.

    Take a look at how the opening of the device handle turned out, which in the same operation opens the handle to the file. Attention, do not mix things up. The application will get the handle to the device, and through it, will perform reads on the device. The device in turn will use the file handle to perform reads and return the data to the application.

    /****
    ***     OnCreate
    **
    **      The application is calling CreateFile with the path
    **      of our device.
    */
     
    NTSTATUS OnCreate(PDEVICE_OBJECT    pDeviceObj,
                      PIRP              pIrp)
    {
        UNICODE_STRING      usFileName;
        OBJECT_ATTRIBUTES   ObjAttributes;
        IO_STATUS_BLOCK     IoStatusBlock;
        PIO_STACK_LOCATION  pStack;
        NTSTATUS            nts = STATUS_SUCCESS;
        HANDLE              hFile = NULL;
     
        //-f--> We build the UNICODE_STRING containing the path
        //      of the file we want to open
        RtlInitUnicodeString(&usFileName,
                             L"\\??\\C:\\Temp\\Test.txt");
     
        //-f--> Here the macro helps us with the
        //      OBJECT_ATTRIBUTES structure
        InitializeObjectAttributes(&ObjAttributes,
                                   &usFileName,
                                   OBJ_KERNEL_HANDLE | OBJ_CASE_INSENSITIVE,
                                   NULL,
                                   NULL);
     
        //-f--> Here we open the file. Since we are going to pass any
        //      error on to the application, we can use the
        //      IO_STATUS_BLOCK structure of our IRP. Otherwise we could
        //      use one created as a local variable.
        nts = ZwCreateFile(&hFile,
                           GENERIC_READ | SYNCHRONIZE,
                           &ObjAttributes,
                           &pIrp->IoStatus,
                           NULL,
                           FILE_ATTRIBUTE_NORMAL,
                           FILE_SHARE_READ,
                           FILE_OPEN,
                           FILE_SYNCHRONOUS_IO_NONALERT,
                           NULL,
                           0);
     
        //-f--> We are going to store the file handle in our context
        //      area. This allows several test applications
        //      to run at the same time. For that we will have to
        //      get the current Stack Location.
        pStack = IoGetCurrentIrpStackLocation(pIrp);
        pStack->FileObject->FsContext = (PVOID)hFile;
     
        //-f--> Now we just read the file, but we will do that in the read
        //      IRP, just to...
        IoCompleteRequest(pIrp,
                          IO_NO_INCREMENT);
        return nts;
    }

    Note that the ZwCreateFile() API asks for a pointer to IO_STATUS_BLOCK. I used the same structure that is contained in the IRP we receive. That way I do not have to pass the status of one operation to the other. The application continues getting the handle to the device the same way it always has, but remember that if there is a failure in getting it, the error may have been generated by a problem opening the file handle. Check out how the application will use the driver.

    /****
    ***     main
    **
    **      Application entry point
    **
    */
     
    int __cdecl main(int argc,
                     char* argv[])
    {
        char    szBuffer[4096];
        HANDLE  hDevice = NULL;
        DWORD   dwError = ERROR_SUCCESS,
                dwBytes,
                i;
     
        //-f--> Getting a handle to the device
        printf("Opening the device \"\\\\.\\FileReader\"...\n");
     
        hDevice = CreateFile("\\\\.\\FileReader",
                             GENERIC_ALL,
                             0,
                             NULL,
                             OPEN_EXISTING,
                             0,
                             NULL);
     
        //-f--> Checks whether the handle was opened.
        if (hDevice == INVALID_HANDLE_VALUE)
        {
            //-f--> Oops!
            dwError = GetLastError();
            printf("Error #%d opening device...\n",
                   dwError);
            return dwError;
        }
     
        //-f--> Performs the reads on the device
        while (ReadFile(hDevice,
                        szBuffer,
                        sizeof(szBuffer),
                        &dwBytes,
                        NULL))
        {
            //-f--> Displays data on the screen
            //      Yeah yeah, I know it is not the most efficient way in the world.
            for (i = 0; i < dwBytes; i++)
                printf("%c", szBuffer[i]);
        }
     
        //-f--> Any failure of the ZwReadFile function call is passed on to
        //      the IO_STATUS_BLOCK structure of the IRP. That is why we see this
        //      error here.
        if ((dwError = GetLastError()) != ERROR_NO_MORE_ITEMS)
            printf("\n\n Error #%d reading device...\n");
     
        //-f--> Puts the house in order.
        printf("Closing device...\n");
        CloseHandle(hDevice);
     
        //-f--> Party's over! Enough!
        return dwError;
    }

    Reading the Device and the File

    We will read the file in a way similar to the opening. We are going to get the file handle from the FsContext. This pointer was originally made available so that the driver could store in it the address of a structure defined by the developer. This pointer will always be the same for all operations that use the same FILE_OBJECT until the IRP_MJ_CLOSE operation is called. Since a handle is something very small, we can store its value instead of a pointer to a structure allocated in memory that contains the handle value.

    Here too we are going to use the passing of the IO_STATUS_BLOCK structure to transfer the status of the file read operation to the application.

    /****
    ***     OnRead
    **
    **      Routine that reads from the already
    **      opened file.
    */
     
    NTSTATUS OnRead(PDEVICE_OBJECT    pDeviceObj,
                    PIRP              pIrp)
    {
        NTSTATUS            nts = STATUS_SUCCESS;
        PIO_STACK_LOCATION  pStack;
        HANDLE              hFile;
     
        //-f--> We get the current stack location
        pStack = IoGetCurrentIrpStackLocation(pIrp);
     
        //-f--> Here we retrieve the file handle.
        ASSERT(pStack->FileObject->FsContext != NULL);
        hFile = (HANDLE)pStack->FileObject->FsContext;
     
        //-f--> A simple read from the file.
        nts = ZwReadFile(hFile,
                         NULL,
                         NULL,
                         NULL,
                         &pIrp->IoStatus,
                         pIrp->AssociatedIrp.SystemBuffer,
                         pStack->Parameters.Read.Length,
                         NULL,
                         NULL);
     
        //-f--> STATUS_END_OF_FILE is not passed on to the application layer
        //      as a read failure, so we will use an error that is easier
        //      to detect.
        if (pIrp->IoStatus.Status == STATUS_END_OF_FILE)
            nts = pIrp->IoStatus.Status = STATUS_NO_MORE_ENTRIES;
     
        //-f--> Completes the IRP.
        IoCompleteRequest(pIrp,
                          IO_NO_INCREMENT);
        return nts;
    }

    If our driver returns STATUS_END_OF_FILE to the application, the ReadFile() API will not signal a failure, but will only report that zero bytes were read. To make it easier to detect the end of file over in the application, I am going to return a different error code, so the ReadFile() routine will return FALSE and the read loop will be interrupted.

    Closing the Device and File handle

    Now it becomes very easy. We are going to close the file handle when the device handle is closed. Nothing much new here.

    /****
    ***     OnCleanup
    **
    **      The handle to our device was closed. Let us
    **      take the chance and close the file handle too.
    */
     
    NTSTATUS OnCleanup(PDEVICE_OBJECT    pDeviceObj,
                       PIRP              pIrp)
    {
        PIO_STACK_LOCATION  pStack;
        HANDLE              hFile;
     
        //-f--> We get the current stack location
        pStack = IoGetCurrentIrpStackLocation(pIrp);
     
        //-f--> Here we retrieve the file handle.
        ASSERT(pStack->FileObject->FsContext != NULL);
        hFile = (HANDLE)pStack->FileObject->FsContext;
     
        //-f--> Closes the handle
        ZwClose(hFile);
     
        //-f--> Completes the IRP normally
        pIrp->IoStatus.Status = STATUS_SUCCESS;
        pIrp->IoStatus.Information = 0;
        IoCompleteRequest(pIrp,
                          IO_NO_INCREMENT);
     
        return STATUS_SUCCESS;
    }

    If you have been a reader of this blog for a while, you will see that the rest of the driver contains elementary code that has already been commented on in other posts. In any case, both the driver source and the test application source are available for download. In case you have any doubt, just send an e-mail. I usually say that you will only need to hope that I know the answer, but lately you will also have to hope that I also have time to answer.

    As always, I hope I have helped.
    Have fun!

    FileReader.zip

  • 110% CPU

    I did not want to post something starting with whining about being out of time, that I had to pick up my aunt at the airport and so on, but I can see there is no way around it. I even started writing a few posts to answer readers’ questions, but then they start taking up time when I have to put together an example, make a figure, and so on. In the end, I already have two posts started that were abandoned during their conception for lack of time. I have been getting some e-mails like “Are you still alive out there?” from some readers. Things are really complicated for me this year, but I am not going to stop posting. I just need to find a little time to sit down. I have already tried writing posts while having lunch or taking a shower, but it did not work out very well. In fact I managed to write a post while sleeping, but when I woke up, for some reason, the post was not published. Note: “Complain to the blogger people”. But anyway, for lack of enough time to write something that helps you develop something, in this post I will just report on what I have been doing. Maybe you will need something similar and want to ask me for some help or reference.

    The Final Year…

    It may seem hard to believe, but this is my final year of my Computer Engineering degree, and because it is the final year, three aggravating factors show up to compete for my time (as if I had any), namely: Dependencies, the Graduation Project (TG) and the Internship.

    The Dependencies…

    For those who do not remember or do not know what dependencies are, they are subjects that you did not manage to pass in the year you studied them, but you still move up a year anyway, except that you will have to study these subjects separately, whether on a Saturday or at a time you have free (it even makes you want to laugh…). Anyway, I reached the sixth year with three subjects to take in my free time. So, part of my Saturday has been and will be dedicated to this activity. To take a dependency, the university needs to group students with the same subject to form a class. Two of the three dependencies have already formed classes, but I still need to pray that the third class forms. That way I will be able to enroll. Otherwise, I will have to come to the university for another year to study the remaining subject. Knock on wood… (knock, knock, knock) it will all work out.

    The Internship…

    In parallel with this adventure of studying three additional subjects and still having to pass everything, I will have to do the internship. The internship is one of the subjects I need to complete in order to graduate. I will have to complete 192 hours of internship to pass this subject. Fortunately, my course can have the internship with an emphasis either on software or on hardware, since Computer Engineering develops both specialties in the student.

    But Fernando, if I remember well, you work at IBM and your internship could come through without you having to move a single muscle. Someone just has to sign off on your internship and that is it.

    Yeah, I think I have serious tendencies toward wanting to get myself tangled up. It is like my friend Heldai told me once: “Oh, Mr. Fernando, you are like me. You cannot see a rope without already wanting to wrap it around your neck”. The fact is that I would immensely like to develop my weaker side, and knowing that I have already been playing at making blue screens for a reasonable while, my goal would be to get an internship in hardware. But how would that be possible if I already work at a software company during the week?

    Well, a year ago, I gave a course on developing drivers for Windows at a company that designs hardware. A company like that is not found on just any corner. Commodity is a company that develops a piece of hardware that does a USB interface, whose firmware is written in C and runs on a Freescale chip, and as if that were not enough, the hardware also does audio compression using an Altera chip with an FPGA. Anyone who understands electronics knows that this would be an excellent place to do an internship and learn a lot. The problem is that I could not do the internship on Sunday, which is my only available day, since I have classes on Saturdays and work all week. Since I cannot do the internship on Sunday, then I can work on Sunday. Another great advantage of doing Home Office. The solution was to offer to do the internship that would be fulfilled only on Mondays. These days would be compensated by working on Sunday. I asked permission from my managers in Brazil and the United States and that was it. Knowing that an intern who shows up once a week hinders more than helps, I eased my entry into the company by requesting an unpaid internship. Since they already knew me, it was easy.

    Even though I do not receive a single cent and still pay for my gas and meals, I am sure I made the right choice. My internship started two weeks ago and I have been in contact with quite interesting things. To speed up the accumulation of hours, I will work at the internship on every day of the week while I am on vacation from IBM. Putting it all together, my internship will end at the beginning of August.

    The Graduation Project…

    Well, I already did not have Saturdays and now I no longer have Sundays. I just need to find a way to finish off any fragment of free time I can find. For that, the university blessed us with the graduation project. We will have to put together a project that uses the specialties we saw during the computer engineering course. As a personal goal, no matter what the project does, there will have to be a driver. After all, it is the only thing I know how to do properly. I cannot miss this opportunity. Our project has the goal of stabilizing a model helicopter in flight.


    Oh, right, and where does the driver come into the story again?

    To sum up a lot (but really a lot), we will take readings from a gyroscope mounted on a model helicopter from a distance using the ZigBee protocol. Such readings will be performed by a development kit with a microcontroller that will interface via USB with a computer. The driver will forward the motion readings to a tool called LabView. In response to the perception of the movements, the system will react by sending commands via USB to the board. The same board will interface with the model helicopter’s radio control in order to correct its course.

    In general terms, that is what we will do. I could write a lot about how we are doing this. We started working on the project last year because we already knew it would not be easy at all. I took advantage of one of my trips to the United States to buy the necessary sensors and kits. The important thing is that the project is going well so far, but we are still going to take a beating. I am writing the microcontroller’s firmware and obviously the driver that will interface with it, but our main challenge will be to close the control loop and make the model helicopter stay still in the air.

    Still? Are you not ashamed to say that you are doing all this to make a model helicopter stay still?

    Our golden dream is to define two distinct points and make the complete route with takeoff, travel and landing, but anyone who is a model-helicopter enthusiast like me knows that making a model helicopter stay still is an excellent first step. Our advisor has already told us that our project is the most challenging of the engineering fields and that if we did only the remote-reading part it would already be a good graduation project.

    I would write much more about the project, but that will be for later. This post is already getting long for yet another Off-Topic. My thanks to the municipal government of São Paulo for having created the municipal vehicle rotation, and consequently, for having brought me to college two hours early. That gave me the opportunity to start this post. It is now 1:45 in the morning and I still have to review and publish this post.

    I will try to write more. Maybe my adventures with the TG or with the internship will bring me interesting topics, short enough to publish here.

    See you around. 🙂

  • Managing driver paging

    After talking so much about virtual memory and paging, I received a question that coincidentally has everything to do with the subject of the last posts. “What are the pragma alloc_text that we see in the WDK examples for?” (Thiago Cardoso, Recife-PE). This question must have already crossed the minds of many who have taken a look at the WDK examples. Since all the WDK examples I know use this pragma, it actually took a while for someone to ask about it. But anyway, let us get to what matters.

    As we have already seen, memory pages can be either in the RAM chips or on disk. We have also already seen that threads that are at a high execution priority cannot access data that is pageable. But how would we know which data is pageable or not?

    Controlling Data Paging

    When we allocate memory dynamically, we can choose whether the area of memory to be allocated will be pageable or not. The ExAllocatePool function, and its sisters (ExAllocatePoolWithTag, ExAllocatePoolWithQuota, ExAllocatePoolWithQuotaTag and ExAllocatePoolWithTagPriority), receive a parameter of type POOL_TYPE that defines whether the memory to be allocated will be pageable or not.

    typedef enum _POOL_TYPE {
      NonPagedPool,
      PagedPool,
      NonPagedPoolMustSucceed,
      DontUseThisType,
      NonPagedPoolCacheAligned,
      PagedPoolCacheAligned,
      NonPagedPoolCacheAlignedMustS
    } POOL_TYPE;
     
     
    PVOID 
      ExAllocatePool(
        IN POOL_TYPE  PoolType,
        IN SIZE_T  NumberOfBytes
        );

    You will have to manage which allocations will be accessed at different execution priorities. For example: A certain linked list is consulted only by functions that run at low IRQL, so all of its elements can be allocated in pageable memory (PagedPool). On the other hand, a linked list that is consulted by functions that run at high IRQLs must have its elements allocated in non-pageable memory (NonPagedPool).

    Nice, Fernando, but not everything is allocated dynamically. What about static variables?

    By default, all global variables are non-pageable. This is bad if your driver has many global variables, which would require more non-pageable memory for your driver to be loaded, and, as has also already been seen, non-pageable memory should be conserved. Fortunately, we can define that a set of global variables can be pageable, as long as they are only accessed by threads at low IRQL.

    Within a module, be it an application, a DLL or even a driver, memory paging control is applied to the sections that compose them. For a group of variables to be defined in a pageable section, we can use the data_seg pragma. However, not every compiler allows us to do this. To know whether the compiler we are using supports the use of this pragma, we count on the WDK headers, which define the ALLOC_DATA_PRAGMA symbol when the compiler offers support for this feature. This, obviously, has become less significant, since the advisable thing is to use the WDK’s own compiler, but it does not hurt to anticipate that your code might be compiled by some other compiler. See the example below that defines both non-pageable and pageable variables.

    //-f--> These are variables defined in a non-pageable section
    PDEVICE_OBJECT  g_pControlDeviceObj;
    PDRIVER_OBJECT  g_pDriverObj;
     
    //-f--> Here I check whether the compiler I am using
    //      supports the use of #pragma data_seg.
    //      If so, I open the PAGEDATA section, which is a
    //      pageable data section.
    #ifdef ALLOC_DATA_PRAGMA
        #pragma data_seg("PAGEDATA")
    #endif
     
    //-f--> All the variables declared here will be pageable.
    //      So, only threads that run at a low
    //      priority level will be able to access these variables
     
    //-f--> We define a giant buffer. Good thing it is pageable
    UCHAR   g_Buffer[100000];
     
    //-f--> Here we mark the end of the pageable section. The variables
    //      defined after this #pragma will be non-pageable.
    #ifdef ALLOC_DATA_PRAGMA
        #pragma data_seg()
    #endif

    Controlling Code Paging

    Memory is memory, whether to store data or code. We can also control where the functions you write will be defined. So, we can put all the functions that execute at low priority in pageable code sections. Here we will use the pragma that gave rise to Thiago’s question, the alloc_text pragma.

    This pragma has two limitations. The first of them is that the pragma must be applied after the declaration of the function, but before its definition. The other is that this pragma is not applicable to C++ functions, that is, class methods or functions with overloads will not have this luxury of being pageable. If you are like me, who prefers to use the strong typing of C++ in drivers, even if you only write simple functions, you must use the extern “C” modifier in the function declarations.

    This pragma is not necessarily supported by all compilers, and just like data_seg, the WDK headers define the ALLOC_PRAGMA symbol to signal that the compiler used supports this feature. Here is one more example.

    //-f--> Normally this declaration is made in a header
    //      file. Note that if we are compiling in C++,
    //      we will have to use extern "C" to be able to define the
    //      section where the functions declared here will be defined.
    #ifdef __cplusplus
    extern "C"
    {
    #endif
        //-f--> Declares one
        ULONG SumOne(IN ULONG ulParam);
     
        //-f--> Declares another
        ULONG SumTwo(IN ULONG ulParam);
     
    #ifdef __cplusplus
    }
    #endif
     
     
    //-f--> The following part goes in the same module where the function is
    //      defined, and must come before the function's definition.
    //      Note that here we test whether this pragma is supported, and
    //      if so, each function must receive its alloc_text pragma
    #ifdef ALLOC_PRAGMA
        #pragma alloc_text(PAGE, SumOne);
        #pragma alloc_text(PAGE, SumTwo);
    #endif
     
     
    //-f--> After that, we can define the functions normally
     
    ULONG SumOne(IN ULONG ulParam);
    {
        //-f--> SumOne function that was written by someone.
     
        //-f--> This comment is only funny in English.
        //
        //      Function SumOne that has been written by someone
     
        PAGED_CODE();
     
        return ulParam + 1;
    }
     
    ULONG SumTwo(IN ULONG ulParam);
    {
        //-f--> Damn function. (which is not funny at all)
        PAGED_CODE();
     
        return SumOne(SomeOne(ulParam));
    }

    Fernando, what are these PAGED_CODE macros that you used in the example for?

    Well, here comes the little story. An uncomfortable thing is that problems with memory paging will only occur when the page you are accessing is on disk. This means that you can write a driver with a problem, test it, and if by “luck” the pages are all in RAM during the test, you will not see any problem. One of the things that helps a lot is this PAGED_CODE macro. In Checked Build, this macro is translated into a function that will check whether the current priority is low enough to execute pageable code. If it is not, a breakpoint exception will be thrown. I hope you have the debugger attached to see that happen. Otherwise, do not worry, a lovely blue screen will appear and you will end up connecting the debugger sooner or later. When compiled in Free Build, this macro is translated into nothing, avoiding a performance loss. In conclusion, this prevents you from calling a pageable function at high IRQL and everything working by “luck”.

    ...
     
    #elif DBG
     
    #define PAGED_CODE() {                                                       \
        if (KeGetCurrentIrql() > APC_LEVEL) {                                    \
            KdPrint(("EX: Pageable code called at IRQL %d\n", KeGetCurrentIrql())); \
            NT_ASSERT(FALSE);                                                    \
        }                                                                        \
    }
     
    ...
     
    #else
     
    #define PAGED_CODE()        NOP_FUNCTION;
     
    ...
     
    #endif

    An excellent way to catch code paging problems is to use the Driver Verifier with the Force IRQL Checking option enabled. This option, besides checking whether you are calling the API functions at the correct priorities, also forces the paging of everything that is pageable in your driver every time the IRQL rises to DISPATCH_LEVEL or higher. This puts an end to that “luck” of using a pageable resource at high IRQL when the resource is already in RAM.

    Discardable Section

    Besides the PAGE pageable code section we saw, another section is also seen very frequently in the WDK examples. The INIT section is discarded when the call to your driver’s DriverEntry function returns to the system, and, if it is the case for your driver, after any reinitialization function has finished. If you do not know what a reinitialization function is, then take a pass through this post. So, if you have functions that are only used during the initialization of your driver (which in this case means: functions called by DriverEntry, or functions called by functions that were called by DriverEntry, or even functions called by functions that were called by functions… Ah! I think you got it), you can use the same procedure to define them in the INIT section in the same way as was done earlier. But it does not hurt to leave an example.

    //-f--> The functions declared here will be removed from RAM when
    //      the call to the DriverEntry function returns. Do not try to call them
    //      after that, because they have already gone to the heaven of
    //      initialization functions.
     
    #ifdef ALLOC_PRAGMA
        #pragma alloc_text(INIT, DriverEntry);
        #pragma alloc_text(INIT, FunctionCalledByDriverEntry);
        #pragma alloc_text(INIT, AnotherFunctionCalledByDriverEntry);
     
        #pragma alloc_text(PAGE, SumOne);
        #pragma alloc_text(PAGE, SumTwo);
    #endif

    This is especially useful in Legacy Drivers, which perform many steps during initialization. Legacy drivers, besides searching for the hardware they are going to control, also need to do the association of the available resources (ports, interrupts, DMA channels, etc.), and this ends up consuming a significant amount of code. On the other hand, WDM drivers receive everything all chewed up from the Plug-and-Play Manager. The hardware was detected and the resource association was already negotiated. A beautiful thing of God!

    Pageable or non-pageable, that is the question

    Supposing that you have many functions that run at high IRQL, and that therefore must be in non-pageable memory, this would cause a large amount of non-pageable memory to be used to keep such functions, even if nobody is using the driver. We can also define our own sections and thus make them pageable or non-pageable when it is convenient for us. This would allow all those non-pageable functions to be pageable while nobody obtains a reference to our driver. This way, when we receive an IRP_MJ_CREATE or when we program the hardware to fire interrupts, we can tell the system that now we will need to make the section where such functions were defined non-pageable.

    First of all, we will have to create our own custom sections, and we will do this using the alloc_text pragma to define sections that must have their name in the format PAGExxxx, where xxxx is a unique name in your driver. See the little example, just to ease the conscience.

    //-f--> The functions declared here will be defined in a section
    //      that can be non-pageable when it is convenient for us.
     
    #ifdef ALLOC_PRAGMA
        #pragma alloc_text(PAGEABCD, FunctionOne);
        #pragma alloc_text(PAGEABCD, FunctionTwo);
    #endif
     
     
    //-f--> The functions declared here will be defined in another
    //      section that can be non-pageable. This way we can define
    //      different groups of functions in different sections.
     
    #ifdef ALLOC_PRAGMA
        #pragma alloc_text(PAGE1234, FunctionThree);
        #pragma alloc_text(PAGE1234, FunctionFour);
    #endif

    Now that we have defined which functions will be defined in that section, we can make it non-pageable only when such functions are used. For that we must use the MmLockPagableCodeSection function.

    PVOID 
      MmLockPagableCodeSection(
        IN PVOID  AddressWithinSection
        );

    To identify which section will be marked as non-pageable, we will have to pass an address that is inside the section. A name of a function defined in the section already solves the problem, but remember that all the functions inside the same section will be marked as non-pageable.

    The MmLockPagableCodeSection function returns to us an opaque address that can be used as a parameter for the call to the MmUnlockPagableImageSection function, which marks the section as pageable again. This function is normally called before the driver is unloaded. Following the line of our example, we could call this function upon receiving an IRP_MJ_CLOSE. The same address returned by MmLockPagableCodeSection can be used as a parameter for the calls to the MmLockPagableSectionByHandle function to make a section non-pageable again, which is much faster than the call to MmLockPagableCodeSection. So, we must call MmLockPagableCodeSection at least once to obtain the opaque pointer, and after that, we can call MmLockPagableSectionByHandle and MmUnlockPagableImageSection.

    VOID 
      MmLockPagableSectionByHandle(
        IN PVOID  ImageSectionHandle
        );
     
    VOID 
      MmUnlockPagableImageSection(
        IN PVOID  ImageSectionHandle
        );

    The same can be done in custom sections that define data, but we must use the MmLockPagableDataSection function to obtain the opaque pointer that identifies the section.

    Can my function be pageable?

    Fernando, if my function is called at PASSIVE_LEVEL, then can it be pageable?

    It is not quite like that. Your function, even being called at PASSIVE_LEVEL, may contain intervals of code that need to be non-pageable. If you call functions that raise the IRQL, such as KeAcquireSpinLock, your function cannot be defined in a pageable section.

    But Fernando, follow my reasoning. If the function was called and is executing at the moment, is it not obvious that the page it is contained in is in RAM?

    You may not believe it, but a function is composed of a chain of bytes that may be on page boundaries. This means that the beginning of your function may be at the end of a page, which in fact was paged to RAM when the call was made, but we do not know where a new page may begin. This new page may be on disk, and if it is accessed at high IRQL, the paging will cause a blue screen. Look at the code below to get an idea of what I am talking about, and do not forget to read the comments.

    /****
    ***     FunctionCalledAtPassiveLevel
    **
    **      Routine that is called at PASSIVE_LEVEL,
    **      but has an IRQL elevation during the call.
    */
     
    PLIST_ENTRY
    FunctionCalledAtPassiveLevel(VOID)
    {
        KIRQL       Irql;
        PLIST_ENTRY pEntry = NULL;
     
        PAGED_CODE();
     
        //-f--> Here our IRQL goes sky-high; if the code that
        //      comes after this call is on the next memory page
        //      that happens to be on disk, then (BOOM !!!)
        KeAquireSpinLock(&g_SpinLock, &Irql);
     
     
        //-f-->    -------======= Page boundary =======-------
     
     
        //-f--> The code here runs at DISPATCH_LEVEL, which
        //      prevents this function from being defined in a
        //      pageable section.
     
        if (!IsListEmpty(&g_NonPagedList))
        {
            pEntry = RemoveHeadList(&g_NonPagedList);
        }
     
        //-f--> It is fine for you to access only non-pageable data,
        //      but the code you use for such access also needs
        //      to be in non-pageable memory. After all, this code is
        //      running at high IRQL and retrieving a page of
        //      code from disk would result in horrible things.
     
        //-f--> We are back at PASSIVE_LEVEL
        KeReleaseSpinLock(Irql);
     
        return pEntry;
    }

    If you have functions that are large, but that contain occasional intervals with IRQL elevation, then separate such intervals into isolated functions that can be defined in non-pageable sections, thus allowing you to define your large and complex function in a pageable section.

    Phew! I could still write a few more comments on this subject, but if I am already tired of writing, I can imagine how you are. The subject is dealt with in full detail in the reference. But if you have any doubt about it, just send me an e-mail and hope that I know how to answer.

    See you!

  • Buffered, Direct or Neither in IOCTLs

    After a pinch of virtual memory to understand the most relevant concepts and take a good stroll through the data-transfer methods between application and driver, today we are going to close this trilogy talking about the data-transfer methods in IOCTLs. If you do not know how to create or use IOCTLs, this other post may help.

    Flags do not help here

    In the post about the data-transfer methods it was seen that we define the transfer method through a bit mask located in the Flags field in a DEVICE_OBJECT. The method chosen here defines how the I/O Manager will handle the data in the driver’s read (IRP_MJ_READ) and write (IRP_MJ_WRITE) operations. The chosen method is applied to both operations. We cannot have writes using one method while reads are performed using another. In the case of IOCTLs, the story is different. The transfer method is chosen when you define the control code using the CTL_CODE macro.

    #define IOCTL_Device_Function CTL_CODE(DeviceType, Function, Method, Access)

    For a more detailed explanation about the use of this macro, visit this post, or take a look at the reference. Here I will only comment on the data-transfer methods, which is selected by the Method parameter of this macro. The use of this macro to define IOCTLs is normally done in a header file that will be shared between the application and the driver. The definition of this macro is obtained from the Windows.h header for User-Mode and Ntddk.h for Kernel-Mode. Below is the definition of the IOCTLs we will implement in this post.

    //-f--> Here we define the copy IOCTLs using the
    //      different data-transfer methods between
    //      application and driver.
    
    
    //-f--> Using system copy
    #define IOCTL_COPY_BUFFERED CTL_CODE(FILE_DEVICE_UNKNOWN,   \
                                         0x800,                 \
                                         METHOD_BUFFERED,       \
                                         FILE_ANY_ACCESS)
    
    
    //-f--> Locking the application pages
    #define IOCTL_COPY_DIRECT   CTL_CODE(FILE_DEVICE_UNKNOWN,   \
                                         0x801,                 \
                                         METHOD_OUT_DIRECT,     \
                                         FILE_ANY_ACCESS)
    
    
    //-f--> Come what may
    #define IOCTL_COPY_NEITHER  CTL_CODE(FILE_DEVICE_UNKNOWN,   \
                                         0x802,                 \
                                         METHOD_NEITHER,        \
                                         FILE_ANY_ACCESS)

    As you can observe, we can have different data-transfer methods for different IOCTLs. In this post I will create a driver that offers three IOCTLs that simply copy the data received in the input buffer to the output buffer. What we will have to do initially is use the CTL_CODE macro to create the IOCTLs for the services that our example driver will offer. The complete code of the example driver is available for download at the end of this post.

    Come on, Fernando, I included Windows.h in my test application, but the definition of the CTL_CODE macro is still missing and I get the error message below. Am I using an incomplete Windows.h?

    Z:\sources\testapp.cpp(45) : error C3861: 'CTL_CODE': identifier not found

    The thing is this: The Wizard of the more recent versions of Visual Studio creates the StdAfx.h file containing, among others, the following lines:

    #define WIN32_LEAN_AND_MEAN             // Exclude rarely-used stuff from Windows headers
    // Windows Header Files:
    #include

    Notice that the WIN32_LEAN_AND_MEAN symbol is defined before the inclusion of the Windows.h file. In order to gain compilation speed, this symbol avoids the declaration of some tons of definitions that are rarely used by applications. What is happening is that the CTL_CODE macro is one of these rarely used things. Yep, man, interacting with drivers is not for just anyone. Anyway, to solve this problem you just comment out the definition of this symbol and everyone will live happily ever after.

    Hold on there, Fernando! Everyone except me, who did not use the Visual Studio Wizard. I am using the SOURCES file to compile my application. The fact is that in my source there is no definition of that so-called “Win32 Lemming“. What is the little excuse now?

    If you are using the SOURCES file to compile your test application, just as I am doing in this post’s example, you will need to add the highlighted line below so that the WIN32_LEAN_AND_MEAN symbol is not defined by the WDK’s default makefile.

    TARGETNAME=TestApp
    TARGETTYPE=PROGRAM
    USE_LIBCMT=1
    UMTYPE=console
    NOT_LEAN_AND_MEAN=1
    
    
    SOURCES=TestApp.cpp

    Using a system buffer

    The first method we will see here is Buffered I/O, defined by using the METHOD_BUFFERED value as a parameter of the CTL_CODE macro. Here we will not have any big news for those who read the previous post. The big difference here is that in the same call to the driver, two buffers are passed to the DeviceIoControl function, one for input and another for output. Here the I/O Manager will allocate a single system buffer with a size equal to the larger of the two. Confusing? An example helps. In a call where the application offers the input buffer with 50 bytes and an output buffer with 100 bytes, the system buffer will be allocated with 100 bytes. The I/O Manager will copy the 50 bytes of the application’s input buffer to the system buffer. The IRP is sent to the driver, and when it is completed, the I/O Manager copies the content of the system buffer to the application’s output buffer. The number of bytes copied back to the application is determined by the pIrp->IoStatus.Information field, just as in the previous post.

    An important thing to be noted here is that, since the system buffer is a single one for both the input and the output of the data, the driver needs to read the input data before starting to write the output data, which would overwrite the input buffer.

    As I have already mentioned, our example driver is going to copy the input buffer to the output buffer. Let us take a look at the implementation of our routine that will handle the IOCTL that will use a system buffer. Read the comments.

    /****
    ***     OnCopyBuffered
    **
    **      IOCTL handler routine responsible for
    **      copying the input buffer to the output
    **      buffer. (using METHOD_BUFFERED)
    */
    
    
    NTSTATUS
    OnCopyBuffered(IN PDEVICE_OBJECT    pDeviceObj,
                   IN PIRP              pIrp)
    {
        NTSTATUS            nts;
        PIO_STACK_LOCATION  pStack;
    
    
        //-f--> We get a pointer to the current stack
        //      location.
        pStack = IoGetCurrentIrpStackLocation(pIrp);
    
    
        //-f--> Output of the obtained values.
        //      Notice that the input buffer and the output
        //      buffer are the same. This means that you
        //      cannot write to the output buffer until you
        //      have read all the bytes of the input buffer.
        DbgPrint("========== OnCopyBuffered ===========\n"
                 "Input buffer address: 0x%p\n"
                 "Input buffer size:    %d\n"
                 "Output buffer addres: 0x%p\n"
                 "Output buffer size:   %d\n\n",
                 pIrp->AssociatedIrp.SystemBuffer,
                 pStack->Parameters.DeviceIoControl.InputBufferLength,
                 pIrp->AssociatedIrp.SystemBuffer,
                 pStack->Parameters.DeviceIoControl.OutputBufferLength);
    
    
        //-f--> Let us check whether the input buffer fits in the output
        //      buffer before doing the copy.
        if (pStack->Parameters.DeviceIoControl.OutputBufferLength <
            pStack->Parameters.DeviceIoControl.InputBufferLength)
        {
            //-f--> Oops!
            nts = STATUS_BUFFER_TOO_SMALL;
            pIrp->IoStatus.Information = 0;
        }
        else
        {
            //-f--> Copy what for?
            //      Since the input buffer and the output buffer
            //      offered by the application are copied into a
            //      single system buffer, we do not need to make
            //      any copy. The I/O Manager will already do that for
            //      us. We will just tell the application how many
            //      bytes are valid in the output buffer.
            nts = STATUS_SUCCESS;
            pIrp->IoStatus.Information =
                pStack->Parameters.DeviceIoControl.InputBufferLength;
        }
    
    
        //-f--> Close the bill and draw the line.
        pIrp->IoStatus.Status = nts;
        IoCompleteRequest(pIrp, IO_NO_INCREMENT);
        return nts;
    }

    Locking the Application’s memory

    Although the IOCTL is a request normally used for control, nothing stops us from using this means of communication to obtain or send data to the driver. If, in these reads or writes, large volumes of data are exchanged, the Buffered method becomes not very efficient. Using the Direct method there will be no intermediate copies into a system buffer. Nothing very different from what we already saw in the previous post, but here we have two buffers in a single call. The input buffer missed school on the very day of the lesson about MDLs, and for that reason it still reaches the driver using a system buffer. That is right! Just like the buffered method. For this reason, we will not use the input buffer to send large amounts of data to the driver.

    But what if I want to send a large amount of data to the driver through an IOCTL? Here the conversation bends a little. Note that to use the Direct method in IOCTLs, we can use either the METHOD_IN_DIRECT or the METHOD_OUT_DIRECT parameter. With the Direct method, you can use the output buffer as input for the driver. Huh? All right, let us go slower. Both options create an MDL to describe the pages that make up the output buffer offered by the application. When the IRP reaches the driver, you use the MmGetSystemAddressForMdlSafe function to obtain a System Space pointer that maps the same physical pages offered by the application. This means that the pointer you receive will write directly to the pages offered by the application. I know! If the pointer points to the same pages as the application, then can we read the data contained in these pages? That is exactly it. We can send data to the driver by filling the output buffer before calling the DeviceIoControl function. So, when the driver receives the IRP, it can read this data. This allows the driver to receive large amounts of input data, but using the output buffer. The METHOD_IN_DIRECT parameter signals to the I/O Manager that the buffer that will be used to build the MDL will be used for reading, so the buffer is tested for reads in the process of creating the MDL. Alternatively, the METHOD_OUT_DIRECT parameter indicates that the buffer will receive reads and writes from the driver.

    Remember that METHOD_IN_DIRECT or METHOD_OUT_DIRECT only defines the type of test that will be done on the output buffer, allowing the driver to read the output buffer. The input buffer will always come by means of a system buffer. Yeah yeah yeah, can we get to the code please?

    /****
    ***     OnCopyDirect
    **
    **      IOCTL handler routine responsible for
    **      copying the input buffer to the output
    **      buffer. (using METHOD_DIRECT_XXX)
    */
    
    
    NTSTATUS
    OnCopyDirect(IN PDEVICE_OBJECT  pDeviceObj,
                 IN PIRP            pIrp)
    {
        NTSTATUS            nts;
        PIO_STACK_LOCATION  pStack;
        PVOID               pOutputBuffer;
    
    
        //-f--> We get a pointer to the current stack
        //      location.
        pStack = IoGetCurrentIrpStackLocation(pIrp);
    
    
        //-f--> The output pointer comes from an MDL created
        //      by the I/O Manager.
        pOutputBuffer = MmGetSystemAddressForMdlSafe(pIrp->MdlAddress,
                                                     LowPagePriority);
    
    
        if (!pOutputBuffer)
        {
            //-f--> Oops! We are out of resources to map the
            //      pages described by the MDL in System Space.
            pIrp->IoStatus.Status = STATUS_INSUFFICIENT_RESOURCES;
            pIrp->IoStatus.Information = 0;
            IoCompleteRequest(pIrp, IO_NO_INCREMENT);
            return STATUS_INSUFFICIENT_RESOURCES;
        }
    
    
        //-f--> The input pointer, on the other hand, always comes through a
        //      system buffer as in the Buffered method
        DbgPrint("=========== OnCopyDirect ============\n"
                 "Input buffer address: 0x%p\n"
                 "Input buffer size:    %d\n"
                 "Output buffer addres: 0x%p\n"
                 "Output buffer size:   %d\n\n",
                 pIrp->AssociatedIrp.SystemBuffer,
                 pStack->Parameters.DeviceIoControl.InputBufferLength,
                 pOutputBuffer,
                 pStack->Parameters.DeviceIoControl.OutputBufferLength);
    
    
        //-f--> Let us check whether the input buffer fits in the output buffer
        //      buffer before doing the copy.
        if (pStack->Parameters.DeviceIoControl.OutputBufferLength <
            pStack->Parameters.DeviceIoControl.InputBufferLength)
        {
            //-f--> Oops!
            nts = STATUS_BUFFER_TOO_SMALL;
            pIrp->IoStatus.Information = 0;
        }
        else
        {
            //-f--> In this case we will have to make the copy, since the input
            //      buffer and the output buffer are physically distinct
            RtlCopyMemory(pOutputBuffer,
                          pIrp->AssociatedIrp.SystemBuffer,
                          pStack->Parameters.DeviceIoControl.InputBufferLength);
    
    
            //-f--> Signals success to the I/O Manager and tells the application the
            //      number of valid bytes in the output buffer.
            nts = STATUS_SUCCESS;
            pIrp->IoStatus.Information =
                pStack->Parameters.DeviceIoControl.InputBufferLength;
        }
    
    
        //-f--> Close the bill and draw the line.
        pIrp->IoStatus.Status = nts;
        IoCompleteRequest(pIrp, IO_NO_INCREMENT);
        return nts;
    }

    Neither Buffered I/O nor Direct I/O

    This may seem repetitive to you, but in this method, indicated by the METHOD_NEITHER parameter, the I/O Manager will not do anything for you. So, you will have to test the process context and also test access to the buffers as we saw in the previous post. Once again, the big difference here is that we will have two buffers. The input buffer will come through pStack->Parameters.DeviceIoControl.Type3InputBuffer and the output buffer is obtained through pIrp->UserBuffer. The input buffer must be tested with ProbeForRead, since the driver will perform reads on this buffer, and the output buffer must be tested with ProbeForWrite. I think the rest the example code is able to explain. To test the process context, we use the function that was already explained in the previous post.

    /****
    ***     OnCopyNeither
    **
    **      IOCTL handler routine responsible for
    **      copying the input buffer to the output
    **      buffer. (using METHOD_NEITHER)
    */
    
    
    NTSTATUS
    OnCopyNeither(IN PDEVICE_OBJECT pDeviceObj,
                  IN PIRP           pIrp)
    {
        NTSTATUS            nts;
        PIO_STACK_LOCATION  pStack;
    
    
        //-f--> We get a pointer to the current stack
        //      location.
        pStack = IoGetCurrentIrpStackLocation(pIrp);
    
    
        //-f--> Output of the obtained values.
        DbgPrint("=========== OnCopyNeither ===========\n"
                 "Input buffer address: 0x%p\n"
                 "Input buffer size:    %d\n"
                 "Output buffer addres: 0x%p\n"
                 "Output buffer size:   %d\n\n",
                 pStack->Parameters.DeviceIoControl.Type3InputBuffer,
                 pStack->Parameters.DeviceIoControl.InputBufferLength,
                 pIrp->UserBuffer,
                 pStack->Parameters.DeviceIoControl.OutputBufferLength);
    
    
        //-f--> Since we are using the Neither method, we have to
        //      be running in the same context of the process that
        //      generated the IRP, because we will access User Space in Kernel-Mode.
        if (!EstouNoContextoDoProcessoQueGerouEssaIrp(pIrp))
        {
            //-f--> Oops!
            pIrp->IoStatus.Status = STATUS_INVALID_ADDRESS;
            pIrp->IoStatus.Information = 0;
            IoCompleteRequest(pIrp, IO_NO_INCREMENT);
            return STATUS_INVALID_ADDRESS;
        }
    
    
        //-f--> Here we already know we are in the right context, but we still
        //      need to test the buffers offered by the application.
        //      We do not want an unfortunate application to send an invalid
        //      pointer and the system to end up in a blue screen because of it.
        __try
        {
            //-f--> The driver will perform reads on the input buffer
            ProbeForRead(pStack->Parameters.DeviceIoControl.Type3InputBuffer,
                         pStack->Parameters.DeviceIoControl.InputBufferLength,
                         1);
    
    
            //-f--> And will perform writes on the output buffer
            ProbeForWrite(pIrp->UserBuffer,
                          pStack->Parameters.DeviceIoControl.OutputBufferLength,
                          1);
        }
        __except(EXCEPTION_EXECUTE_HANDLER)
        {
            //-f--> Ahaaa!!
            nts = GetExceptionCode();
    
    
            //-f--> Completes the IRP and curses the mother of the guy who wrote
            //      the application (unless it was you yourself).
            pIrp->IoStatus.Status = nts;
            pIrp->IoStatus.Information = 0;
            IoCompleteRequest(pIrp, IO_NO_INCREMENT);
            return nts;
        }
    
    
        //-f--> Let us check whether the input buffer fits in the output buffer
        //      buffer before doing the copy.
        if (pStack->Parameters.DeviceIoControl.OutputBufferLength <
            pStack->Parameters.DeviceIoControl.InputBufferLength)
        {
            //-f--> Oops!
            nts = STATUS_BUFFER_TOO_SMALL;
            pIrp->IoStatus.Information = 0;
        }
        else
        {
            //-f--> Close your eyes, say "The blood of Jesus has power",
            //      believe in Saint Walter Oney and copy the input
            //      buffer to the output buffer.
            RtlCopyMemory(pIrp->UserBuffer,
                          pStack->Parameters.DeviceIoControl.Type3InputBuffer,
                          pStack->Parameters.DeviceIoControl.InputBufferLength);
    
    
            //-f--> Phew! Everyone alive?
            //      Signals success to the I/O Manager and tells the application the
            //      number of valid bytes in the output buffer.
            nts = STATUS_SUCCESS;
            pIrp->IoStatus.Information =
                pStack->Parameters.DeviceIoControl.InputBufferLength;
        }
    
    
        //-f--> Close the bill and draw the line.
        pIrp->IoStatus.Status = nts;
        IoCompleteRequest(pIrp, IO_NO_INCREMENT);
        return nts;
    }

    Compiling the example

    To compile the example available for download, you can use the environment shortcut installed by the WDK and call Build from the example’s root directory. Note that in a single step we compile the driver and the test application. The figure below illustrates this. Or you can use DDKBUILD as I already explained in this other post to compile from Visual Studio.


    Fernando, one more question before you vanish into the mist. In the table of Dispatch Routines, which we fill in the DRIVER_OBJECT structure, there is only one entry for IRP_MJ_DEVICE_CONTROL. How did you create a routine for each method? That one I am going to let the example code below answer, but if even so you still have some doubt, just send me an e-mail, which is in my Blogger profile, and then we settle it with our fists.

    /****
    ***     OnDeviceControl
    **
    **      Here we receive all the DeviceIoControl
    **      sent to the driver and split them into
    **      routines specific to the handling of each IOCTL.
    **      The handling of all the IOCTLs could
    **      be in a single function, but it does not hurt to be
    **      organized once in a while.
    */
    
    
    NTSTATUS
    OnDeviceControl(IN PDEVICE_OBJECT   pDeviceObj,
                    IN PIRP             pIrp)
    {
        PIO_STACK_LOCATION  pStack;
    
    
        //-f--> We get a pointer to the current stack
        //      location.
        pStack = IoGetCurrentIrpStackLocation(pIrp);
    
    
        //-f--> Gets the IOCTL code to forward it
        //      to the right routine, or not. :-)
        switch(pStack->Parameters.DeviceIoControl.IoControlCode)
        {
        case IOCTL_COPY_BUFFERED:
            return OnCopyBuffered(pDeviceObj,
                                  pIrp);
    
    
        case IOCTL_COPY_DIRECT:
            return OnCopyDirect(pDeviceObj,
                                pIrp);
    
    
        case IOCTL_COPY_NEITHER:
            return OnCopyNeither(pDeviceObj,
                                 pIrp);
        }
    
    
        //-f--> Oops! We received an IOCTL different from the ones
        //      we were expecting.
        pIrp->IoStatus.Status = STATUS_NOT_IMPLEMENTED;
        pIrp->IoStatus.Information = 0;
        IoCompleteRequest(pIrp, IO_NO_INCREMENT);
    
    
        return STATUS_NOT_IMPLEMENTED;
    }

    Today I am going to say goodbye (in Portuguese) in the style of mr4nd3r50n, who is a friend that worked with me at SCUA.

    Intel mais, já vou Windows!

    IoctlCopy.zip