Blog

  • Bug on my Boot driver! Now what?

    Writing drivers is a task that must be done with little care. After all, any unresolved situation between your code and the operating system will result in a beautiful blue screen. But everything in this life has a cure and fortunately God has created the debugger to deal with these situations. After fixing the problem, it is just to change the .sys file and that’s it. Just changing the file means that the machine is expected to be in a stable condition: then, replace the file on the system and reboot the machine. But life is a surprising box and you may not believe, but most drivers are automagically started. Well, in this case, the only think we can do is to pray that the error does not happen until the driver is replaced. Otherwise, we would have to use some resources, such as putting the hard drive of victim’s machine on another computer to replace the sick driver. When there is no one else’s computer, use the Recovery Console in XP to avoid the sick driver being loaded. With some luck, this driver is not a filter attached to something important like disk, video or File System. You know, if a filter is not able to be loaded, then the main driver, either. In summary, there is a lot of juggling you can invent to replace a buggy driver that is automatically loaded. Is there anything that does not depend much on luck or even on the creativity? Today, I will talk a bit about the replacing driver system with WinDbg.

    Mapping driver files

    You can map the driver files so the WinDbg can replace it at the time it’d be loaded. Is not that beautiful? For this, you must use the .kdfiles command. With this command, you make a link between the driver that runs on the Target machine and the one that has been fixed on the Host side. One way to do this is to initially create a file that lists these two drivers. This file should be a simple text file where the syntax is shown below. This file can have any name and extension.

    map 
    \??\C:\Windows\System32\drivers\MyDriver.sys 
    C:\My_Driver_Project_Folder\MyDriver.sys

    The word map marks the beginning of a mapping; this does not change. Next line is the driver file path to be replaced from. This line should have the same format used in the ImagePath value under the driver key that is on registry. The last line is another driver path. This path could point at a driver in the Host machine itself or on the network.

    This mapping works only in Windows XP or higher, in the Target machine, obviously. If you’re not familiar with terms like Host and Target, check this post out.

    Once created the file, you will use WinDbg to launch the following command:

    kd>.kdfiles C:\Any_Folder\MyFileMap.txt

    Thereafter, whenever the driver is loaded by the system, the kernel checks whether this file is mapped in the debugger, and if so, WinDbg sends the new driver through the debugger connection, such as serial, USB or firewire. For large files, I recommend using firewire. You must understand that the file on Target system’s disk is replaced by the new version. This means that in the forthcoming launches of our driver, the new version will still be loaded, even if the debugger is not connected to the system.

    Does this really work?

    To make things a little clearer, let’s see a practical example. To do this, we need a very simple driver source, or even useless, which can be found here. Let’s change its DriverEntry function, so that it will be as shown below:

    NTSTATUS DriverEntry(IN PDRIVER_OBJECT  pDriverObject,
                         IN PUNICODE_STRING pusRegistryPath)
    {
        //-f--> Let's use __DATE__ and __TIME__ to change this message
        //      each time this driver is built.
        DbgPrint("This driver was built on "__DATE__" "__TIME__"\n");
     
    ...

    So, we build an initial version of the driver and we install it on the Target machine in the way you best think, but we’ll assume that after the driver has been installed, the registry will be as shown below.
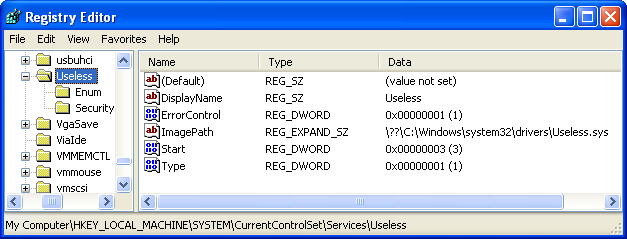
    If we start the driver, we will have something like the following string in the debugger output:

    This driver was built on Jul 16 2007 00:04:03

    Now, we’ll create the mapping file. Here I will save it as Z:\Sources\DriverEntry\Useless\map.txt. Following the same format the driver was registered in the registry, our mapping file should have the following content:

    map
    \??\C:\Windows\System32\drivers\Useless.sys
    Z:\Sources\DriverEntry\Useless\objchk_wxp_x86\i386\Useless.sys

    Notice that the folder where I saved my file map.txt is the same where the driver sources are. This is just a matter of organization. The mapping file could be in any folder. Then, use the command .kdfiles as shown below. Notice that we list the existing maps simply using the same command without any parameters.

    kd> .kdfiles Z:\Sources\DriverEntry\Useless\map.txt
    KD file assocations loaded from 'Z:\Sources\DriverEntry\Useless\map.txt'
     
    kd> .kdfiles
    KD file assocations loaded from 'Z:\Sources\DriverEntry\Useless\map.txt'
    \??\C:\Windows\System32\drivers\Useless.sys ->
    Z:\Sources\DriverEntry\Useless\objchk_wxp_x86\i386\Useless.sys

    Afterwards, we’ll Rebuild the driver (that should change that time stamp) and we will restart it. If everything is right there by your side, you should have an output with a time stamp different from what we had before.

    kd> g
    But now? I did nothing so far...
    KD: Accessing 'Z:\Sources\DriverEntry\Useless\objchk_wxp_x86\i386\Useless.sys'
     (\??\C:\Windows\system32\drivers\Useless.sys)
      File size 2K.
    MmLoadSystemImage: Pulled \??\C:\Windows\system32\drivers\Useless.sys from kd
    This driver was built on Jul 16 2007 00:17:04

    Well, if this works for a driver with manual start value, then the automatic one also should work. To see this, change your driver start value to System or Automatic, do a Rebuild again in the driver, and finally, we will restart the Target machine. When the driver is loaded, we have the automatic replacement of its image. In WinDbg, we will have the following:

    Connected to Windows XP 2600 x86 compatible target, ptr64 FALSE
    Kernel Debugger connection established.
    Symbol search path is: SRV*c:\websymbols*http://msdl.microsoft.com/download/symbols
    Executable search path is: 
    Windows XP Kernel Version 2600 UP Free x86 compatible
    Built by: 2600.xpsp_sp2_gdr.070227-2254
    Kernel base = 0x804d7000 PsLoadedModuleList = 0x805533a0
    System Uptime: not available
    KD: Accessing 'Z:\Sources\DriverEntry\Useless\objchk_wxp_x86\i386\Useless.sys'
     (\??\C:\Windows\system32\drivers\Useless.sys)
      File size 2K.
    MmLoadSystemImage: Pulled \??\C:\Windows\system32\drivers\Useless.sys from kd
    This driver was built on Jul 16 2007 00:25:38

    Yeah, it really works! But what if was my driver a Boot driver? This means that the driver image will be loaded even before the connection is established with WinDbg. Have you heard that what has no remedy, it is remedied? Fortunately, this is not applied here yet. There is a way to make this work, even with Boot drivers.

    Mapping Boot drivers

    To establish a connection with WinDbg, we need to replace the system loader by a special version. This version makes this connection with the Kernel Debugger, even before the Boot.ini file is read. For this reason, the connection parameters are fixed with COM1 and baud rate of 115200. This loader version is located in the directory C:\winddk\3790\debug of the DDK with its ntldr_dbg name. This file should replace the original loader system version that is at the boot drive root with the ntldr name. The debug version must stay with the same name as the original loader.

    Before rebooting, we need to change the driver’s start value to Boot and remove the ImagePath value from the registry. As you may know, boot drivers do not have that luxury of using file paths that have drive letters. At the end of the changes, we should have the registry as shown below.
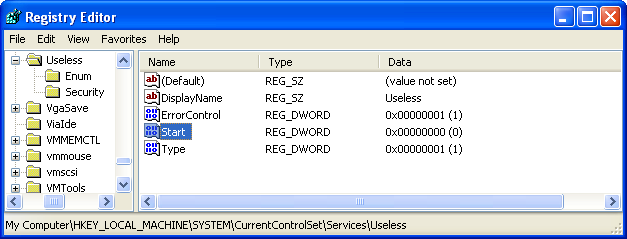
    As I said earlier, the driver file path format should be the same as it is on registry, but knowing that now there’s no file path in the registry, so we adopt the same forms adopted by the system. Oh! okay! The same format. And what would it be? To see this format, simply restart the system with the debug loader, which should give us the following screen at boot-up.

    This is the time to connect to Windbg using pre-determined parameters connection. This should result in the following output in the debugger.

    Microsoft (R) Windows Debugger  Version 6.7.0005.1
    Copyright (c) Microsoft Corporation. All rights reserved.
     
    Opened \\.\pipe\com_1
    Waiting to reconnect...
    BD: Boot Debugger Initialized
    BD: osloader.exe base address 00400000
    Connected to Windows Boot Debugger 3790 x86 compatible target, ptr64 FALSE
    Kernel Debugger connection established.
    Symbol search path is: SRV*c:\websymbols*http://msdl.microsoft.com/download/symbols
    Executable search path is: 
    Windows Boot Debugger Kernel Version 3790 UP Checked x86 compatible
    Primary image base = 0x00000000 Loaded module list = 0x00000000
    System Uptime: not available
    The call to LoadLibrary(bootext) failed, Win32 error 0n2
        "The system cannot find the file specified."
    Please check your debugger configuration and/or network access.

    Now you see the Boot.ini selection menu. Select your option and continue loading the system. A list of boot drivers should be presented, which are the ones loaded before the first breakpoint that the debugger can stop.

    BD: \WINDOWS\system32\ntoskrnl.exe base address 804EA000
    BD: \WINDOWS\system32\hal.dll base address 806FF000
    BD: \WINDOWS\system32\KDCOM.DLL base address 80720000
    BD: \WINDOWS\system32\BOOTVID.dll base address 80010000
    BD: \WINDOWS\system32\DRIVERS\ACPI.sys base address 80124000
    BD: \WINDOWS\system32\DRIVERS\WMILIB.SYS base address 80001000
    BD: \WINDOWS\system32\DRIVERS\pci.sys base address 80062000
    BD: \WINDOWS\system32\DRIVERS\isapnp.sys base address 80003000
    BD: \WINDOWS\system32\DRIVERS\compbatt.sys base address 8000C000
    BD: \WINDOWS\system32\DRIVERS\BATTC.SYS base address 80013000
    BD: \WINDOWS\system32\DRIVERS\intelide.sys base address 80017000
    BD: \WINDOWS\system32\DRIVERS\PCIIDEX.SYS base address 80019000
    BD: \WINDOWS\System32\Drivers\MountMgr.sys base address 80152000
    BD: \WINDOWS\system32\DRIVERS\ftdisk.sys base address 8015D000
    BD: \WINDOWS\System32\drivers\dmload.sys base address 80073000
    BD: \WINDOWS\System32\drivers\dmio.sys base address 8017C000
    BD: \WINDOWS\System32\Drivers\PartMgr.sys base address 801A2000
    BD: \WINDOWS\System32\Drivers\VolSnap.sys base address 801A7000
    BD: \WINDOWS\system32\DRIVERS\atapi.sys base address 801B4000
    BD: \WINDOWS\system32\DRIVERS\vmscsi.sys base address 801CC000
    BD: \WINDOWS\system32\DRIVERS\SCSIPORT.SYS base address 801CF000
    BD: \WINDOWS\system32\DRIVERS\disk.sys base address 801E7000
    BD: \WINDOWS\system32\DRIVERS\CLASSPNP.SYS base address 801F0000
    BD: \WINDOWS\system32\DRIVERS\fltMgr.sys base address 801FD000
    BD: \WINDOWS\system32\DRIVERS\sr.sys base address 8021D000
    BD: \WINDOWS\System32\Drivers\KSecDD.sys base address 8022F000
    BD: \WINDOWS\System32\Drivers\Ntfs.sys base address 80246000
    BD: \WINDOWS\System32\Drivers\NDIS.sys base address 802D3000
    BD: \WINDOWS\System32\Drivers\Useless.sys base address 8000F000
    BD: \WINDOWS\System32\Drivers\Mup.sys base address 80300000
    BD: \WINDOWS\system32\DRIVERS\agp440.sys base address 8031B000
    Shutdown occurred...unloading all symbol tables.
    Waiting to reconnect...

    Here the connection to the loader is closed. A new connection would be established if you had selected the Debug entry from Boot.ini, but what we have to note here, is the file path format used to load drivers during system boot. Notice that our test driver is among the drivers from the above list. Let us adopt this same file path format on our mapping file.

    map
    \WINDOWS\System32\Drivers\Useless.sys
    Z:\Sources\DriverEntry\Useless\objchk_wxp_x86\i386\Useless.sys

    After modifying the mapping file and save its contents to disk, we update the WinDbg, so it takes this change. Then, we will restart the system.

    kd> .kdfiles Z:\Sources\DriverEntry\Useless\map.txt
    KD file assocations loaded from 'Z:\Sources\DriverEntry\Useless\map.txt'
     
    kd> .reboot
    Shutdown occurred...unloading all symbol tables.
    Waiting to reconnect...
    BD: Boot Debugger Initialized
    Connected to Windows Boot Debugger 3790 x86 compatible target, ptr64 FALSE
    Kernel Debugger connection established.  (Initial Breakpoint requested)
    Symbol search path is: SRV*c:\websymbols*http://msdl.microsoft.com/download/symbols
    Executable search path is: 
    Module List address is NULL - debugger not initialized properly.
    WARNING: .reload failed, module list may be incomplete
    KdDebuggerData.KernBase < SystemRangeStart
    Windows Boot Debugger Kernel Version 3790 UP Checked x86 compatible
    Primary image base = 0x00000000 Loaded module list = 0x00000000
    System Uptime: not available
    The call to LoadLibrary(bootext) failed, Win32 error 0n2
        "The system cannot find the file specified."
    Please check your debugger configuration and/or network access.

    The same message sequence happens, but this time, the mapping is done as it should and we have the following output when the boot drivers are loaded.

    BD: osloader.exe base address 00400000
    BD: \WINDOWS\system32\ntoskrnl.exe base address 804EA000
    BD: \WINDOWS\system32\hal.dll base address 806FF000
    BD: \WINDOWS\system32\KDCOM.DLL base address 80720000
    BD: \WINDOWS\system32\BOOTVID.dll base address 80010000
    BD: \WINDOWS\system32\DRIVERS\ACPI.sys base address 80124000
    BD: \WINDOWS\system32\DRIVERS\WMILIB.SYS base address 80001000
    BD: \WINDOWS\system32\DRIVERS\pci.sys base address 80062000
    BD: \WINDOWS\system32\DRIVERS\isapnp.sys base address 80003000
    BD: \WINDOWS\system32\DRIVERS\compbatt.sys base address 8000C000
    BD: \WINDOWS\system32\DRIVERS\BATTC.SYS base address 80013000
    BD: \WINDOWS\system32\DRIVERS\intelide.sys base address 80017000
    BD: \WINDOWS\system32\DRIVERS\PCIIDEX.SYS base address 80019000
    BD: \WINDOWS\System32\Drivers\MountMgr.sys base address 80152000
    BD: \WINDOWS\system32\DRIVERS\ftdisk.sys base address 8015D000
    BD: \WINDOWS\System32\drivers\dmload.sys base address 80073000
    BD: \WINDOWS\System32\drivers\dmio.sys base address 8017C000
    BD: \WINDOWS\System32\Drivers\PartMgr.sys base address 801A2000
    BD: \WINDOWS\System32\Drivers\VolSnap.sys base address 801A7000
    BD: \WINDOWS\system32\DRIVERS\atapi.sys base address 801B4000
    BD: \WINDOWS\system32\DRIVERS\vmscsi.sys base address 801CC000
    BD: \WINDOWS\system32\DRIVERS\SCSIPORT.SYS base address 801CF000
    BD: \WINDOWS\system32\DRIVERS\disk.sys base address 801E7000
    BD: \WINDOWS\system32\DRIVERS\CLASSPNP.SYS base address 801F0000
    BD: \WINDOWS\system32\DRIVERS\fltMgr.sys base address 801FD000
    BD: \WINDOWS\system32\DRIVERS\sr.sys base address 8021D000
    BD: \WINDOWS\System32\Drivers\KSecDD.sys base address 8022F000
    BD: \WINDOWS\System32\Drivers\Ntfs.sys base address 80246000
    BD: \WINDOWS\System32\Drivers\NDIS.sys base address 802D3000
    KD: Accessing 'Z:\Sources\DriverEntry\Useless\objchk_wxp_x86\i386\Useless.sys'
     (\WINDOWS\System32\Drivers\Useless.sys)
      File size 2K.BD: Loaded remote file \WINDOWS\System32\Drivers\Useless.sys
     
    BlLoadImageEx: Pulled \WINDOWS\System32\Drivers\Useless.sys from Kernel Debugger
    BD: \WINDOWS\System32\Drivers\Useless.sys base address 8000F000
    BD: \WINDOWS\System32\Drivers\Mup.sys base address 80300000
    BD: \WINDOWS\system32\DRIVERS\agp440.sys base address 8031B000
    Shutdown occurred...unloading all symbol tables.
    Waiting to reconnect...

    And later, our proof that the driver file has been successfully replaced.

    Connected to Windows XP 2600 x86 compatible target, ptr64 FALSE
    Kernel Debugger connection established.  (Initial Breakpoint requested)
    Symbol search path is: SRV*c:\websymbols*http://msdl.microsoft.com/download/symbols
    Executable search path is: 
    Windows XP Kernel Version 2600 UP Free x86 compatible
    Built by: 2600.xpsp_sp2_gdr.070227-2254
    Kernel base = 0x804ea000 PsLoadedModuleList = 0x8056d620
    System Uptime: not available
    This driver was built on Jul 16 2007 01:18:53

    I assure you that this could still save your life if you had a File System filter with a bug in its DriverEntry on a customer's machine. The expression of panic when the customer sees his machine restarting in an endless loop is interesting, but keeping your job is a little more interesting.

    See you!
  • Installing and Using DSF

    You are probably already tired of reading that OSR has hardware kits for driver development training for USB and PCI. It’s really frustrating to want to learn how to develop drivers that control board without even having one around. But I am poor and I have no money to buy these imported toys. Actually, I also got some pain when I had to go to the post office to get two kits I had bought and paid a tax of U$ 183.59, not counting the kit’s cost. Well, this is a point.

    Assuming you are already an experienced programmer and knows how to make drivers for USB devices with one tied eye behind your back, imagine that you have to write a driver for a USB device that is not ready yet. That is, you have the specification, you know its characteristics, but in fact, the device is not ready for you to do all the tests you need. In this case, the training kit would not help much. This is another point.

    Joining these points, we can see that we are lost and the only way is just forget everything and go to sell coconut water at the beach.

    A considerable alternative

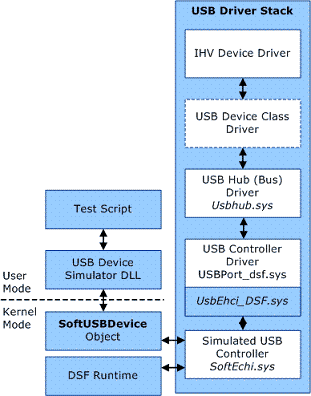
    Taking these same points, Microsoft has developed the Device Simulation Framework for USB Devices. This framework is composed of, among other components, a driver that is installed on your test machine that simulates an USB controller. This driver is Lower Filter Drivers for Windows USB controller drivers. It intercepts the interactions that Windows does with the actual hardware and simulate hardware interrupts. From driver’s viewpoint, there is no difference between DSF and real devices.

    But how can the framework simulate a USB device that it doesn’t know? Actually, the framework redirects these interactions to components in User-Mode that can be written by you in any language that can use COM. This way, you can control device behavior being simulated. Observe the figure borrowed from the MSDN page, so you can have a clearer picture of how these components are organized.

    Installing DSF

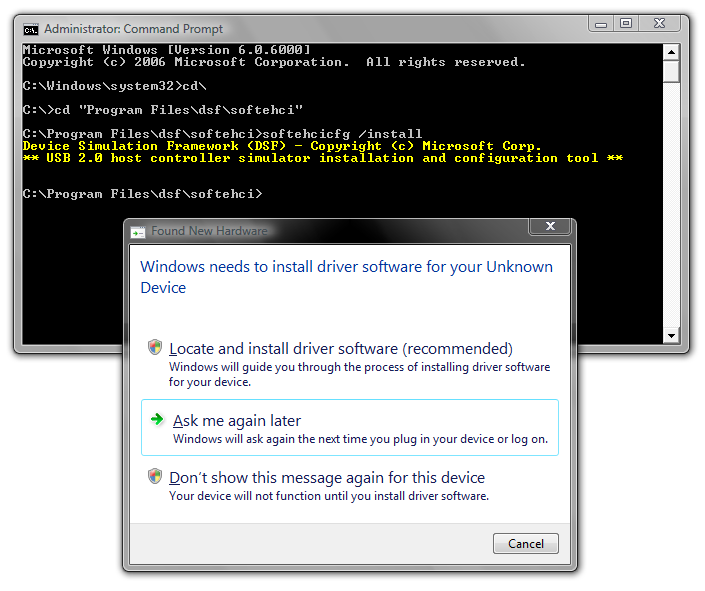
    The DSF comes in the WDK ISO that you can download from Microsoft. It can only be installed on Windows XP SP2 or higher (including x64 platforms). When you install WDK on your machine, the DSF is not installed. You need to install it separately. The dsfx86runtime.msi and dsfx64runtime.msi files, responsible for installation, are located in the \dsf of the ISO. The framework installation is extremely simple, but you can only see something when, after installed, you run “softehcicfg /install” command line at the “\Program Files\dsf\softehci” folder, as it is shown below.

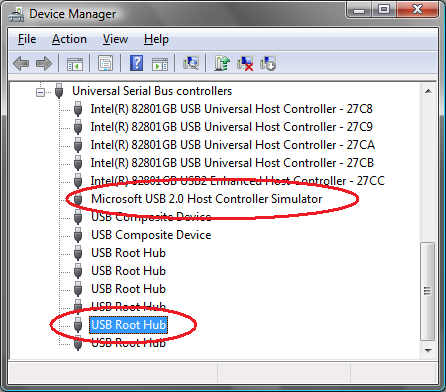
    This command creates a virtual USB controller in your device tree, which can be seen on Device Manager. Your system may ask the drivers for this new hardware that was added. If it does, enter the system directory (C:\Windows) for the search for drivers taking place. After the drivers have been installed, you should get two new devices. They are: Microsoft USB 2.0 EHCI Host Controller Simulator and USB Root Hub, as it is shown below.

    Using VBScript to write devices

    To simulate devices, DSF installs a group of components that implement COM objects, such as: Devices, Configurations, Interfaces, Endpoints, Descriptors, and so on. Who has already developed firmware for USB knows exactly what I mean. With these objects, you can write components that can simulate any USB device. Along the framework, three examples of devices that can be simulated are also installed. These devices’ sources are examples that come together in the WDK. They are located at \WinDDK6000\src\Test\DSF\USB. To use one of these examples, we just need a language script, or any language able to use COM interfaces.

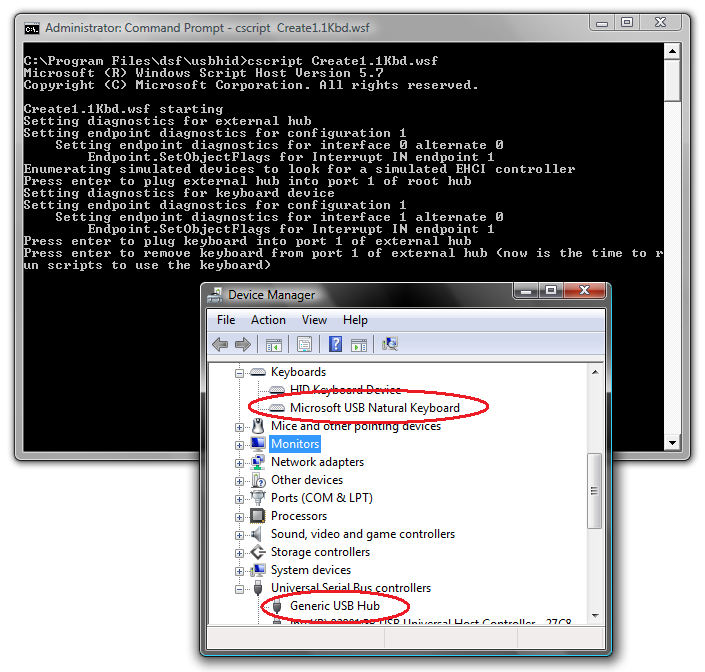
    Let’s take a look at the keyboard example and look for its IRPs. To make the keyboard work, go to the “\Program Files\dsf\usbhid” and run the following command line: “cscript Create1.1Kbd.wsf” and follow the steps. If this is the first time you are doing this, Windows may ask the drivers for new devices that will be created. The script will create a Generic USB Hub and a USB Microsoft Natural Keyboard, as it is shown below.

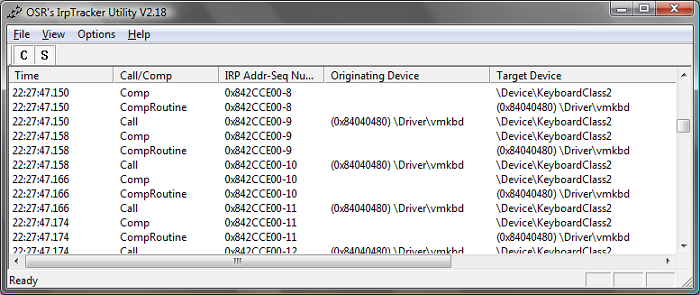
    Before removing these devices, let’s take a look using IRP Tracker, a software that I have mentioned in another post, and watch this simulated keyboard’s IRPs. Start the IRP Tracker and select all KbdClass driver. KbdClass is the driver responsible for centralizing and implementing interfaces for the keyboard device class. The IRPs from all keyboards are here.

    While the first command prompt is stopped, start another one and from the same directory, run the following command line: “cscript Use1.1Kbd.wsf”. This script simulates pressing keys on the simulated keyboard writing the phrase “Hello World!”. For each key the system gets, records are generated from monitored IRPs. Thus, the IRP Tracker should look as it is shown below.

    This is an excellent tool for using with virtual machines and it can anticipate a good amount of testing until the actual hardware is ready. In cases where the hardware and the driver are new, this could be a good way to discover which one is causing the issue. After all, hardware has bugs, too. Even if you’re a student and have no hardware, this could be useful to train your learning. At least, you will not burn anything.

    See you!
  • Let’s Start Again

    Some drivers need to start as soon as the system loads, I mean, while the system loads. When we set our driver with Start = 0 (Boot), our driver loads among very basic drivers such as File Systems, Bus Drivers and so on. Once, I needed a Boot driver to open a file to get some system information. Unfortunately things like partitions, volumes and File Systems were still not working, so I had to postpone the process a little. In this post, I will comment about how to continue your driver DriverEntry start-up process after the function having ended.

    To illustrate the case, I have written a driver that clearly illustrates this situation. The full project is on a link for downloading at the end of this post. Looking at out DriverEntry implementation, we have:

    /****
    ***     DriverEntry
    **
    **      Driver entry point, which will be called while
    **      the system Boots (like "I have just turned my computer on").
    */
    extern "C" 
    NTSTATUS DriverEntry(IN PDRIVER_OBJECT  pDriverObj,
                         IN PUNICODE_STRING pusRegistryPath)
    {
        NTSTATUS    nts;
     
        //-f--> We're back...
        KdPrint(("Starting DrvReinit...\n"));
     
        //-f--> Register the unload callback routine
        pDriverObj->DriverUnload = OnDriverUnload;
     
        //-f--> Try to open a file as early as possible, thereafter
        //      I was born within seven months.
        nts = TryOpenFile();
     
        //-f--> And as you can see...
        if (!NT_SUCCESS(nts))
        {
            //-f--> The file was not opened.
            KdPrint(("Scheduling reinitialization.\n"));
     
            //-f--> And as far as I can imagine, the reason is as it follows:
            ASSERT(nts == STATUS_OBJECT_PATH_NOT_FOUND);
     
            //-f--> Register OnReinitialize routine so it'll be called later.
            //      In this case, later means whenever all boot drivers have
            //      been loaded.
            IoRegisterBootDriverReinitialization(pDriverObj,
                                                 OnReinitialize,
                                                 NULL);
        }
        else
        {
            //-f--> Er... Are you sure you have installed that driver
            //      correctly? Well, your system is not booting now
            //      and you just started your driver manually.
        }
     
        //-f--> If the DriverEntry routine doesn't return STATUS_SUCCESS,
        //      OnReinitialize will not be called.
        return STATUS_SUCCESS;
    }

    IoRegisterBootDriverReinitialization() function (Phew! Some of these functions require a breath) registers a callback routine that will be called whenever all boot drivers have been loaded. That will give us a second chance to try to do what has been proposed. This routine is typically used in filters that attach on non-Plug-and-Play devices, and thus, they cannot rely on AddDevice() function calling to be notified that a new device was created.

    In our example, the goal is simply to read a file. Accordingly, the error we have received is STATUS_OBJECT_PATH_NOT_FOUND. To ensure that the file you’re about to read actually exists, we will use the actual file where the driver is implemented. Therefore, if our code is running, the file must be there.

    /****
    ***     TryOpenFile
    **
    **      This routine tries to open the file where this driver is implemented.
    **      If this code is running, then this file must be there.
    */
    NTSTATUS TryOpenFile(VOID)
    {
        NTSTATUS            nts;
        IO_STATUS_BLOCK     IoStatusBlock;
        HANDLE              hFile;
        OBJECT_ATTRIBUTES   ObjAttributes;
        UNICODE_STRING      usFilePath =
            RTL_CONSTANT_STRING(L"\\??\\C:\\Windows\\System32\\drivers\\DrvReinit.sys");
     
        //-f--> Hello debugger...
        KdPrint(("Trying open the file...\n"));
     
        //-f--> Filling the OBJECT_ATTRIBUTES structure.
        //      What can I do? It makes part of it.
        InitializeObjectAttributes(&ObjAttributes,
                                   &usFilePath,
                                   OBJ_CASE_INSENSITIVE,
                                   NULL,
                                   NULL);
     
        //-f--> Try to open the file.
        nts = ZwCreateFile(&hFile,
                           GENERIC_READ,
                           &ObjAttributes,
                           &IoStatusBlock,
                           NULL,
                           0,
                           FILE_SHARE_READ | FILE_SHARE_WRITE,
                           FILE_OPEN,
                           0,
                           NULL,
                           0);
     
        //-f--> Did it open or not?
        if (!NT_SUCCESS(nts))
        {
            //-f--> I'm sorry, maybe next time.
            KdPrint(("Error 0x%08x opening the file.\n", nts));
        }
        else
        {
            //-f--> So, it wasn't that hard.
            KdPrint(("File opened OK. Er... So, let's close it now.\n"));
     
            //-f--> Close the file handle. We want nothing from it anyway.
            ZwClose(hFile);
        }
        return nts;
    }

    Initially, when we had tried to open this file from DriverEntry function and the error returned, indicating that it does not exist, we can fall into an existential crisis. After all, if the file has not existed, how was the driver loaded? Doesn’t the driver exist? Don’t I exist? Other crises could be mentioned as the well-known ones:

    “God is love.
    The love is blind.
    Steve Wonder is blind.
    So, Steve Wonder is God.

    Someone told me I’m no one.
    No one is perfect.
    So, I am perfect.
    But only God is perfect.
    So, I am God.

    If Steve Wonder is God, I am Steve Wonder!
    My God, I am blind!”

    But back to the subject, if the re-initialization routine is executed and the service that the driver needs is not yet available, so we can re-schedule this routine calling once again (or as many times as necessary). One of the parameters that re-initialization routine receives is the one which tells you how many times it had been called by the system. This could be used to give up on the resource that never appears when the thousandth attempt has failed. Follow our routine sample:

    /****
    ***     OnReinitialize
    **
    **      This routine is registered by the IoRegisterBootDriverReinitialization 
    **      routine to be called later.
    */
    VOID OnReinitialize(IN PDRIVER_OBJECT     pDriverObj,
                        IN PVOID              pContext,
                        IN ULONG              ulCount)
    {
        NTSTATUS    nts;
     
        //-f--> This routine can be rescheduled as many times as necessary.
        //      Let's show how many it's been so far.
        KdPrint(("OnReinitialize was called %d times...\n", ulCount));
     
        //-f--> If this commentary did not exist, you would never know
        //      the following routine would try open a file.
        nts = TryOpenFile();
     
        //-f--> So, did it work?
        if (!NT_SUCCESS(nts))
        {
            //-f--> If the error code is different from the one below, so
            //      I know nothing about it. It is not my fault. I don't even know you.
            ASSERT(nts == STATUS_OBJECT_PATH_NOT_FOUND);
     
            //-f--> It can't be true. This is not actually happening.
            //      Let's try again a bit latter.
            IoRegisterBootDriverReinitialization(pDriverObj,
                                                 OnReinitialize,
                                                 NULL);
        }
    }

    Installing a Boot driver

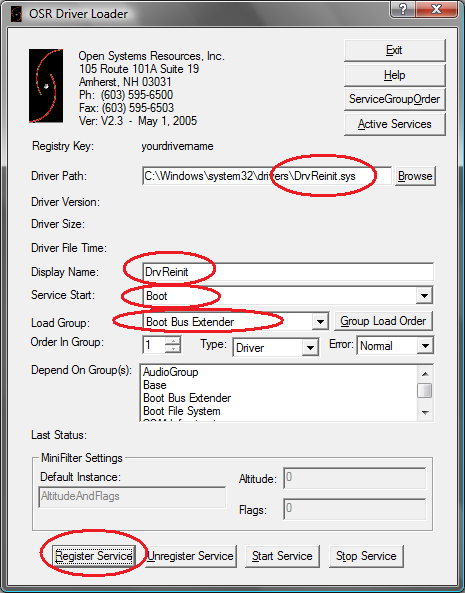
    To ensure that we have a need to delay our driver start-up, we will make our sample driver be the first one to be loaded. For this, we use the aforementioned DriverLoader to install it on a specific group.

    After compiling the sample code, copy the driver to the victim machine’s System32\drivers directory. Run DriverLoader, fill up the fields as demonstrated below and click on RegisterService.

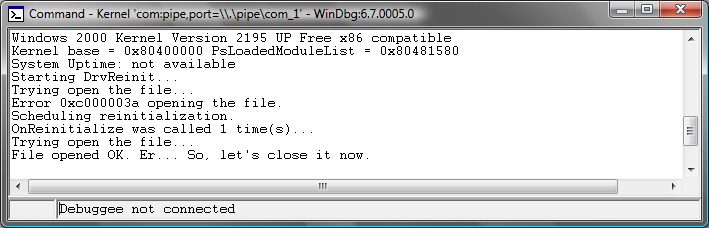
    To complete the experience, we will restart the system and connect the kernel debugger to follow ahead. We should have the following output.

    But couldn’t we use a work item for this? Actually, yes, but there are subtle differences between these alternatives. Using a Work Item cannot guarantee that the routine is not being executed before DriverEntry finishes, and obviously it does not ensure that it runs only after all the boot drivers has been loaded.

    See you next time… 😉

    DrvReinit.zip

  • We want samples

    A few months after my hiring into Open, they asked me to do a participation in a lecture about Secure Code. My part was about stack overflow and how to take advantage of that oversight programmer to break into the program. The major point to note was in addition to programmers, the audience was composed by software engineers and architects, the commercial staff, who had more contact with customers were there also, there were one or two people from administrative sector as well, in summary, an audience that few of them have heard about call stack. One of them said: “I sort of remember from when I got my .Net certification, which said that structures are created on the heap and objects are created on the heap, or vice versa.” Anyway, things became more complicated when I started to show the sample code I supplied, with PUSHs, MOVs and POPs. The result was: some slept, while others just drooled and spoke in that alien language while they sleep. I know that language very well because my wife always talks to me while she sleeps and I’m sitting in bed with the notebook. Despite her words being completely incomprehensible, she always responds when I make questions to her. She introduces the subject by saying: “Admivoza bumizav” then I ask: “Why do you think so?” And she replies: “Zumirag abmish mua”. But back to the subject, it became clear that the amount of technical detail was incompatible with the public. So, not long ago, in a talking about Windows drivers, I tried to pass a vision with little details, just to give an idea what drivers are and how they contribute to the system work. After all, the entire development department was there, including architects, engineers and .Net coders (nothing against them). To my surprise, at the end of the lecture, everyone was expecting more details, something like: “Hey, what about the remaining? Don’t you have any little example?”. So, okay… In this post, I will write a minimal driver, but one that has some interaction with a test application.

    At the beginning…

    Here I will assume that you have already known how to create a driver project from scratch and how to use Visual Studio to code drivers, going straight to the point where we must write the driver. The today’s example will be a very basic echo driver commands that will receive commands through reading and writing. So, it would be like that: you initially write buffers, which are strings in our example using the WriteFile() function and everything will be stored into the driver. The subsequent readings from the function ReadFile() will bring the same data from where were written. This example will be very useful in other posts, and will also serve as a starting point for those wanting to write their first driver.

    Knowing that we will store the strings in a list, and then we need to create a buffer list composed by nodes defined as shown below.

    //-f--> Type definition to be stored into
    //      our buffer list.
    typedef struct _BUFFER_ENTRY
    {
        PVOID       pBuffer;    //-f--> Sent buffer
        ULONG       ulSize;     //      Buffer size
        LIST_ENTRY  Entry;      //      List node
     
    } BUFFER_ENTRY, *PBUFFER_ENTRY;
     
     
    //-f--> List head and mutex for protection 
    LIST_ENTRY      g_BufferList;
    KMUTEX          g_Mutex;

    After defining the structure, we have to create a global variable that will be the list head and also a mutex, to protect our list from possible accesses in parallel. This would happen if we had two test applications running at the same time. If you want more details about the DDK linked lists, there is a post that explains about that, too.

    Writing DriverEntry routine

    The first point to notice here is that, since our example has been coded in a .CPP file, it’s necessary to put an extern “C” at the DriverEntry function definition. Otherwise, the linker will not find the driver entry point. Early in the implementation, we can see the message that will be launched to the debugger via KdPrint(). Next, I will initialize our linked list head and the mutex that protect it. Now let’s set some members in the DriverObject structure and the first will be DriverUnload member, which receives a pointer to a callback function that will inform the driver that it is being unloaded. The next few members are the routines that will be called when the driver receives requests about Create/Open, Close, Read and Write. I will talk about these routines with more details a little later. Continuing, the DeviceObject is created, which will be our way of communication way with the driver. As I said at the lecture, all requests a driver receives are through a device. IoCreateDevice() function makes this for us. Created the device, I will now configure it so that it should use intermediate buffers. For this, I have to set the bit DO_BUFFERED_IO in Flags field from DeviceObject you have just created. Intermediate buffers? We’ll talk about BufferedIo versus DirectIo in a future opportunity. There are so many new concepts in this post and I, unfortunately cannot go very deep into their details, otherwise nobody would read it that never seems ending up.

    Having a DeviceObject is cool, but it is not everything in driver’s life; for a User Mode application being able to communicate with a driver, you must create a Symbolic Link. This is done next with IoCreateSymbolicLink() function. The remaining function code should not cause great surprise to most of you, but if in doubt, just send me an e-mail and we can resolve this in a fight.

    /****
    ***     DriverEntry
    **
    **      This is the driver entry point.
    **      Knife in teeth and blood in eyes.
    */
     
    extern "C"
    NTSTATUS DriverEntry(IN PDRIVER_OBJECT pDriverObj,
                         IN PUNICODE_STRING pusRegistryPath)
    {
        NTSTATUS        nts;
        PDEVICE_OBJECT  pDeviceObj = NULL;
     
        __try
        {
            //-f--> Saying hello to the Kernel Debugger
            KdPrint(("Starting KernelEcho driver...\n"));
     
            //-f--> Initializing the buffer head list and mutex
            InitializeListHead(&g_BufferList);
            KeInitializeMutex(&g_Mutex, 0);
     
            //-f--> Setting the driver unload callback
            pDriverObj->DriverUnload = OnDriverUnload;
     
            //-f--> Setting the driver routines that
            //      will be supported.
            pDriverObj->MajorFunction[IRP_MJ_CREATE] = OnCreate;
            pDriverObj->MajorFunction[IRP_MJ_CLOSE] = OnClose;
            pDriverObj->MajorFunction[IRP_MJ_WRITE] = OnWrite;
            pDriverObj->MajorFunction[IRP_MJ_READ] = OnRead;
     
            //-f--> Creating the control device
            nts = IoCreateDevice(pDriverObj,
                                 0,
                                 &g_usDeviceName,
                                 FILE_DEVICE_UNKNOWN,
                                 0,
                                 FALSE,
                                 &pDeviceObj);
            if (!NT_SUCCESS(nts))
                ExRaiseStatus(nts);
     
            //-f--> Configuring I/O using intermediary buffer
            pDeviceObj->Flags |= DO_BUFFERED_IO;
     
            //-f--> Creating a symbolic link, so applications
            //      can reach this device.
            nts = IoCreateSymbolicLink(&g_usSymbolicLink,
                                       &g_usDeviceName);
            if (!NT_SUCCESS(nts))
                ExRaiseStatus(nts);
     
        }
        __except(EXCEPTION_EXECUTE_HANDLER)
        {
            //-f--> Getting the error code
            nts = GetExceptionCode();
     
            //-f--> That will force the debugger to stop here.
            //      But only when this code is built in Checked mode.
            ASSERT(FALSE);
            KdPrint(("An exception occurred at " __FUNCTION__ "\n"));
     
            //-f--> Since we had problems during the initialization, let's
            //      undo what was done.
            if (pDeviceObj)
                IoDeleteDevice(pDeviceObj);
        }
     
        return nts;
    }

    Writing Dispatch Functions

    I’ll also assume that you have already had an idea of what an IRP is. Now let’s write the functions to manipulate them. They are called Dispatch Functions. These functions are set at driver startup time as you have seen in the code above. In the DriverObject structure, the MajorFunction member is a function pointer array indexed for macros like IRP_MJ_READ. The function prototype is the same for all functions and it will be displayed below. Dispatch Function needs to handle IRPs following some rules, like everything else at DDK. A minimal function could be written as follows:

    /****
    ***     OnDispatch
    **
    **      A minimum Dispatch Function example
    */
     
    NTSTATUS
    OnDispatch(IN PDEVICE_OBJECT  pDeviceObj,
               IN PIRP            pIrp)
    {
        //-f--> Here I fill the IRP status.
        pIrp->IoStatus.Status = STATUS_SUCCESS;
        pIrp->IoStatus.Information = 0;
     
        //-f--> Completing the IRP. After that, touching the IRP structure
        //      is absolutely prohibited. That does not belong to you anymore.
        IoCompleteRequest(pIrp, IO_NO_INCREMENT);
     
        //-f--> Return status code to the IoManager.
        return STATUS_SUCCESS;
    }

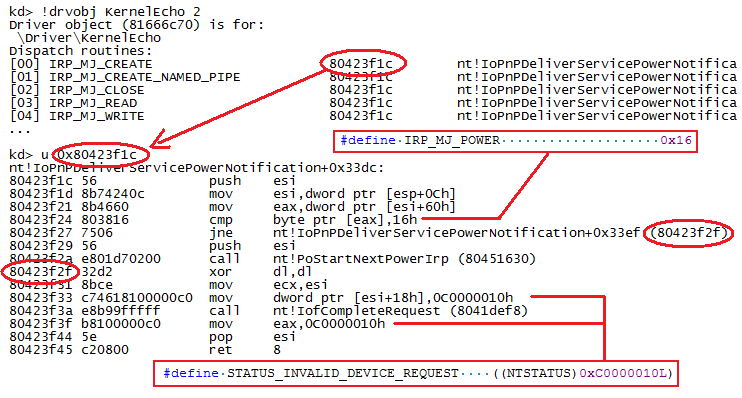
    But what if we had called the ReadFile() function with a handle to our device if we did not fill the position IRP_MJ_READ? Would we burn up forever in marble from hell? Indeed, if we take a look at MajorFunction table before filling it, we can see that there is the same address in all slots. Let’s put a break-point at DriverEntry entrance, take a look on the table slots before being filled out and see what’s there.

    As we saw, this table is all initialized with a function pointer that it’s in implementation; considering that the power management IRPs have a special treatment, it completes the IRP with status STATUS_INVALID_DEVICE_REQUEST.

    A Dispatch Function basically follows one of the three alternatives for dealing with an IRP. In cases of filters, our driver could pass the IRP to the driver which it was attached to. Okay, that was noted here… “Do a post providing a filter example”. The second alternative would retain the IRP to an asynchronous processing and the last but not least, simply complete the IRP. Notice that in our example, all that we do is to tell the application that the IRP was successfully performed and completed it. To complete the IRP, we use the IoCompleteRequest() function, which receives the IRP to be completed and the Priority Boost. What? Assuming your IRP had some interaction with hardware, it would consume some thread time in Kernel Mode. This time it would create a delay in the current thread and this would be compensated by this Boost. Because this is not our case, we use the macro to define no Boost. DDK has a list of constants that determines the boost that a thread should receive for each type of device. See the WDM.h excerpt (this definition may be in ntddk.h depending on your DDK version).

    //
    // Priority increment for completing CD-ROM I/O.  This is used by CD-ROM device
    // and file system drivers when completing an IRP (IoCompleteRequest)
    //
     
    #define IO_CD_ROM_INCREMENT             1

    At the end of this post, there will be a link to download all the files needed to build the application and driver. Notice, in the sample sources, that our OnCreate() and OnClose() Dispatch Functions are too similar to the example above. That’s because we don’t take no action when it opens or closes a handle to the device we had created.

    Getting parameters from IRP.

    In the other OnRead() and OnWrite() Dispatch Functions, we must get data that the driver needs to execute the IRP, such as buffer posted by the user and its size, both in writing and reading. These parameters are into a Stack Location within the IRP. Wow, the more I pray, the more weird names appear to me… Stack Locations structures are parameters that are allocated along with the IRP. There is a Stack Location for each device in the device stack that was called. This conversation can become quite fun, but we have a post to finish. Let’s leave this subject about Stack Locations to our future filter example. There, the matter makes more sense, but if you cannot take such a curiosity and want to know more about it, see what the reference says about Stack Locations. For now, let’s just consider that these parameters are there and to have access to this structure we need to use IoGetCurrentIrpStackLocation() macro. To have a more practical idea of all this bullshit, here it goes all the OnWrite() function code with tons of comments.

    /****
    ***     OnWrite
    **
    **      This routine is called, whenever an application calls WriteFile()
    **      using our device handle as a parameter.
    */
     
    NTSTATUS
    OnWrite(IN PDEVICE_OBJECT  pDeviceObj,
            IN PIRP            pIrp)
    {
        PIO_STACK_LOCATION  pStack;
        PVOID               pUserBuffer;
        ULONG               ulSize;
        PBUFFER_ENTRY       pBufferEntry = NULL;
        NTSTATUS            nts;
        BOOLEAN             bMutexAcquired = FALSE;
     
        __try
        {
            //-f--> Say hello to the debugger
            KdPrint(("Writing into EchoDevice...\n"));
     
            //-f--> The Buffer address is a parameter that comes
            //      from the IRP
            pUserBuffer = (PCHAR)pIrp->AssociatedIrp.SystemBuffer;
            ASSERT(pUserBuffer != NULL);
     
            //-f--> Get the current stack location address from the IRP
            pStack = IoGetCurrentIrpStackLocation(pIrp);
     
            //-f--> Get the buffer size
            ulSize = pStack->Parameters.Write.Length;
     
            //-f--> Here, the node and the string buffer
            //      are allocated all together
            pBufferEntry = (PBUFFER_ENTRY) ExAllocatePoolWithTag(
                PagedPool,
                sizeof(BUFFER_ENTRY) + ulSize,
                ECHO_TAG);
     
            //-f--> If there is no memory, forget it...
            if (!pBufferEntry)
                ExRaiseStatus(STATUS_NO_MEMORY);
     
            //-f--> Initializing the structure
            pBufferEntry->pBuffer = (pBufferEntry + 1);
            pBufferEntry->ulSize = ulSize;
     
            //-f--> Do the copy string from the buffer sent by the user
            //      to the buffer allocated here.
            RtlCopyMemory(pBufferEntry->pBuffer,
                          pUserBuffer,
                          ulSize);
     
            //-f--> Acquire the mutex that protect the list
            //      against simultaneous accesses.
            nts = KeWaitForMutexObject(&g_Mutex,
                                       UserRequest,
                                       KernelMode,
                                       FALSE,
                                       NULL);
            if (!NT_SUCCESS(nts))
                ExRaiseStatus(nts);
     
            //-f--> We need to remember this in case something
            //      really bad happens.
            bMutexAcquired = TRUE;
     
            //-f--> Insert the new node to the list's tail.
            InsertTailList(&g_BufferList,
                           &pBufferEntry->Entry);
     
            //-f--> Tell the IoManager that all data sent
            //      to the driver were read successfully.
            pIrp->IoStatus.Information = ulSize;
            nts = STATUS_SUCCESS;
        }
        __except(EXCEPTION_EXECUTE_HANDLER)
        {
            //-f--> Get the error code.
            nts = GetExceptionCode();
     
            //-f--> That will force the debugger to stop here.
            //      But only when compiled in Checked mode.
            ASSERT(FALSE);
            KdPrint(("An exception occurred at " __FUNCTION__ "\n"));
     
            //-f--> If something gets wrong and we have already allocated
            //      this buffer, so let's release it.
            if (pBufferEntry)
                ExFreePool(pBufferEntry);
     
            //-f--> Tell the IoManager the no data were transferred.
            pIrp->IoStatus.Information = 0;
        }
     
        //-f--> Release the mutex
        if (bMutexAcquired)
            KeReleaseMutex(&g_Mutex,
                           FALSE);
     
        //-f--> Complete the IRP.
        pIrp->IoStatus.Status = nts;
        IoCompleteRequest(pIrp, IO_NO_INCREMENT);
        return nts;
    }

    Another important point to notice here is about filling the Information member on IoStatus structure that is in the IRP. In those data transfer functions, this field informs IoManager the data amount that was transferred from the application to the driver and vice versa. This field directly reflects on the fourth parameter of WriteFile() API, which has exactly the same function. Once received and validated the parameters, we allocate a node that will receive the buffer. Notice that we are allocating in paged memory; after all, all our functions will be executed in PASSIVE_LEVEL. Although this function is a Dispatch Function, it does not mean that it runs in DISPATCH_LEVEL. Take it easy, these are very different things. Noting… “Post about IRQLs and POOL_TYPEs”. The OnRead() function is similar to OnWrite(), so I’ll spare you of putting all code here.

    When my driver is unloaded

    OnDriverUnload() function will be called when the driver is being unloaded. Here, in addition to empty the buffer list that may have been forgotten in the driver, let’s delete the Symbolic Link and DeviceObject that was created at startup time. Simple as that…

    /****
    ***     OnDriverUnload
    **
    **      The party is over, go home, regards for your wife
    **      and a kiss in your kids.
    */
     
    VOID OnDriverUnload(IN PDRIVER_OBJECT   pDriverObj)
    {
        PLIST_ENTRY     pEntry;
        PBUFFER_ENTRY   pBufferEntry;
     
        //-f--> Say good night
        KdPrint(("Terminating KernelEcho driver...\n"));
     
        //-f--> Here we remove all nodes that weren't read by
        //      the application. That would happen if the application call
        //      WriteFile() but not ReadFile().
        while(!IsListEmpty(&g_BufferList))
        {
            //-f--> Take the first list node.
            pEntry = RemoveHeadList(&g_BufferList);
     
            //-f--> Get the outer structure from its node address.
            pBufferEntry = CONTAINING_RECORD(pEntry, BUFFER_ENTRY, Entry);
     
            //-f--> Finally, release the memory used by
            //      this node.
            ExFreePool(pBufferEntry);
        }
     
        //-f--> Deleting DeviceObject and SymbolicLink
        //      created at startup time.
        IoDeleteSymbolicLink(&g_usSymbolicLink);
        IoDeleteDevice(pDriverObj->DeviceObject);
    }

    Wow, that horrible mistake! What if the driver is finished while some reading or writing operation is being performed? Does a dark future await us and our souls will be damned for eternity? Does the Little Mermaid have something to do with it?

    Well, better to let our beliefs aside and focus on the DDK. A driver cannot be terminated while there are some references to this device driver. Note that this routine has no return so, we cannot tell the system that the driver may or may not be unloaded. If an application still has an opened handle to any device while you ask to stop it, the system will respond that the driver cannot be terminated. In this condition, the OnDriverUnload() routine will not be called. But otherwise, if nothing prevents the driver from being unloaded and our routine is called, forget it… Your driver is already going to driver’s heaven.

    The wonderful world of Userland

    I will not put all the application source code in the post, but all sources are on a file available for downloading. I think one thing that’s worth showing here is the syntax of how to get the handle to the device we have created in our sample driver.

        //-f--> Here we open a handle to the device that
        //      was created by the driver. Remember that our
        //      sample driver must be installed and be working,
        //      in order the call bellow can work correctly.
        hDevice = CreateFile("\\\\.\\EchoDevice",
                             GENERIC_ALL,
                             0,
                             NULL,
                             OPEN_EXISTING,
                             0,
                             NULL);

    Once the handle to the device is obtained, the Read, Write and Close operations will follow exactly as if we were performing the same operations with files. You don’t need to be a Jedi master to be able to use these functions.

        //-f--> It sends the received string to the driver via
        //      WriteFile.
        if (!WriteFile(hDevice,
                       szBuffer,
                       dwBytes,
                       &dwBytes,
                       NULL))

    Installing and testing

    I have shown in another post how to install a driver by hand. However, there are more civilized ways to install a driver. One of them is using the OSR Driver Loader, a tool that is offered by OSR to install your driver without rebooting the machine. Actually, this is a very simple procedure to do, but not simple enough to comment about it yet in this post, so let’s use the tool for now.

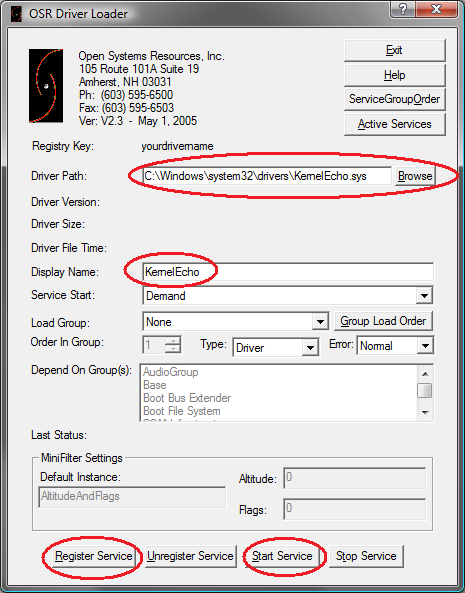
    After compiling the driver, put a copy of it in the System32\drivers of the victim machine. Then run the DriverLoader and fill in the fields as shown in the figure below.

    Then click on Register Service to install the new driver and then click on Start Service to start the driver. Okay, now you can use the test application. The application is very simple to use. Once started, enter the strings that should be sent to the driver. An empty string indicates the end of the strings and then it starts reading the same string queued in the driver.

    Phew! As we have seen, even a driver that does something simple requires a considerable amount of code and many different concepts. I know that some gaps are remained in the post, but I hope I have helped. If you have questions at some points at driver or even at test application, do not hesitate to ask or send your comments. The contacts are very helpful to define the next posts.
    Have fun!


    KernelEcho.zip

  • Step into Kernel (VmWare+WinDbg)

    It is enough with this idle talk and let’s go to what really matters. Speaking about Kernel Debugging, I have written a post describing the steps needed to Kernel Debugging with WinDbg, using two machines and a serial cable. But having two machines dedicated to this practice is a luxury that not everyone has. Thus, in another post, I have commented about installing and using SoftIce to debug drivers on a “single machine dedicated to debug”. I tell you “dedicated machine to debug” because using your development machine to debug drivers may not be one of your best ideas. The most courageous and confident people in their own code still risk themselves in this practice. Well, I cannot say much, I myself have already done that in lean times. Anyway, we have not fled the need for two machines to have a minimal environment for development and test drivers. An alternative to these scenarios is the use of a single machine, but the one that can have enough memory and CPU to run a virtual machine, in order to debug the kernel. In this post, I will take the steps to use a virtual machine as a guinea pig to test and debug drivers.

    Configuring a virtual machine

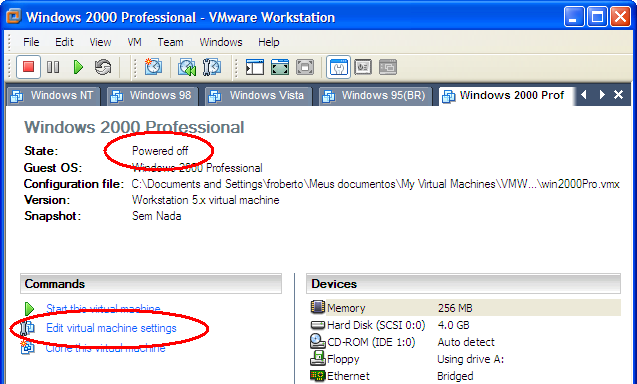
    The natural communication way between real machines using WinDbg to do Kernel Debugging is a serial port. To follow the same steps, we need to make your virtual machine to gain a serial port to make this communication possible. With your virtual machine turned off, click on the Edit vitual machine settings option.

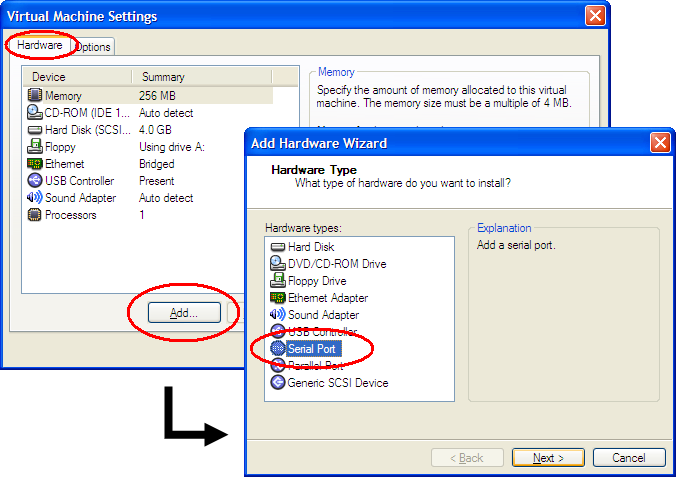
    A window will appear with the list of devices already installed on your machine in Hardware tab. Click Add… in order to add a new device and select Serial Port in the device list that is displayed on the screen below.

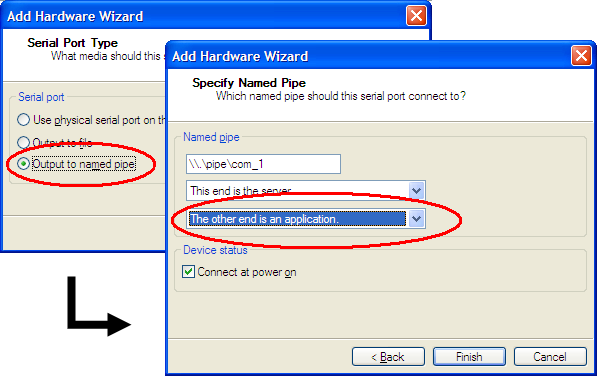
    After clicking on Next, select the Output named pipe. This will cause the serial port on the virtual machine to communicate with the real machine, via a named pipe. Clicking on OK, the specific settings of the named pipe will be presented. The pipe name will be used later in one of the WinDbg settings so, if you want to use a name other than the one suggested here, try to remember this same name later. Then, change the value of the second combo to indicate that the other communication ending will be an application, in this case WinDbg. After that, just click on Finish.

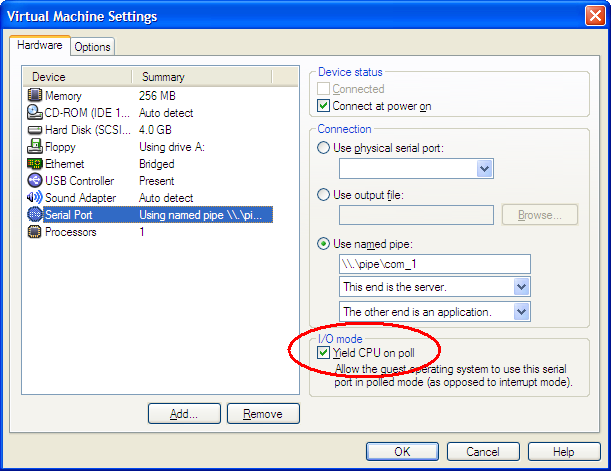
    At the end of these settings, select the Yield CPU on poll option as shown below.

    Configuring the TARGET machine

    Made all that “hocus-pocus”, now we have to set the TARGET machine system in the way it will able to make the Kernel Debugging. Remember that from Windows that runs inside the virtual machine point of view, the named pipe does not exist, it is just a serial port. If you still do not know what TARGET machine is a or how it can be set, then take a look in this post and follow the described steps in the part where a TARGET machine is configured .

    Configuring the HOST machine

    Assuming that your TARGET machine has been configured, now we have to configure WinDbg in a way it can be connected to a machine using named pipe, instead of a serial port. For that, I usually create a batch file that contains the following command line:

    start C:\Progra~1\Debugg~1\windbg.exe -b -k com:pipe,port=\\.\pipe\com_1,resets=0

    Creating a batch file is not a required step, you might want to retype everything in the Run… window, every time the debugging starts; but it’s all up to you. Notice that the pipe name appears here. I hope you still remember which name you have chosen.

    Connecting…

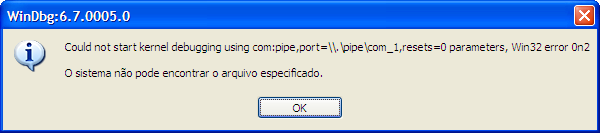
    Now we have everything already configured, it is just plug and debug. In this story, the virtual machine is the one that creates the named pipe that is opened by WinDbg. Thus, if you start WinDbg with the shown parameters before starting the virtual machine, you will see the window below stating the pipe was not found.

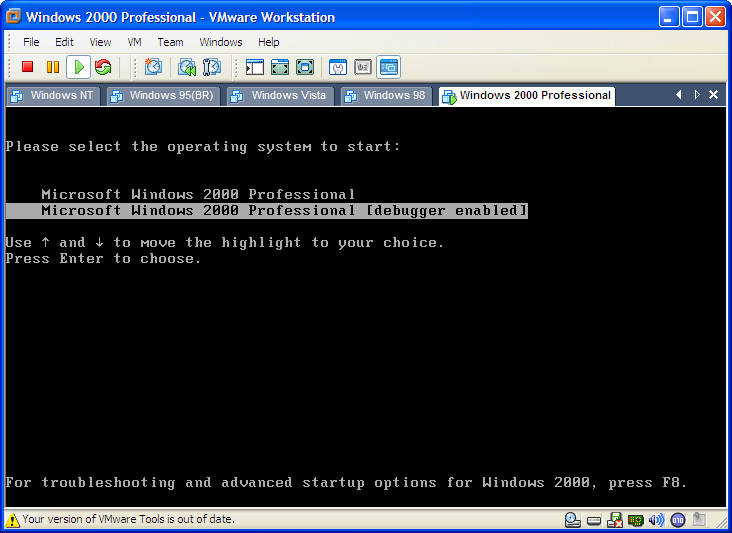
    So, the sequence is, firstly, to connect the virtual machine, select the debug option in the Boot as shown below, and only after that, you should start the WinDbg with the parameters described above.

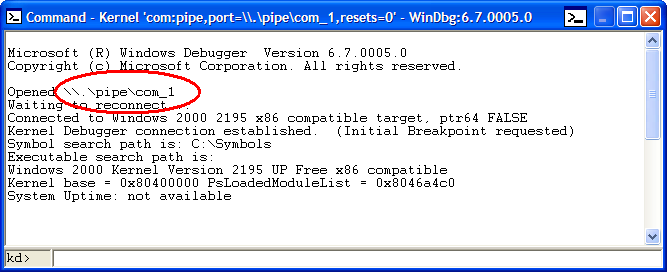
    When WinDbg is finally connected to the virtual machine, via the named pipe, we have the following messages in our Command Window within WinDbg.

    Thereafter, you know… You pick up the bugs.

    Once more I hope I have helped you.
    See you next time. 🙂

  • Now he only talks about that…

    Registration for Windows Drivers’ course has already started operating this weekend. Because of some delays, the course starting date was postponed and has also been confirmed for June 23.

    To see the complete list of extension courses offered by the university, select the item “Information technology” item from “Extension” on the University web site.

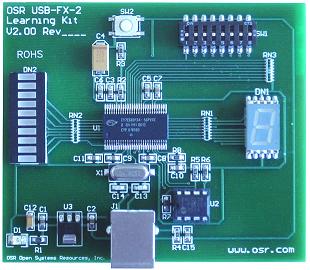
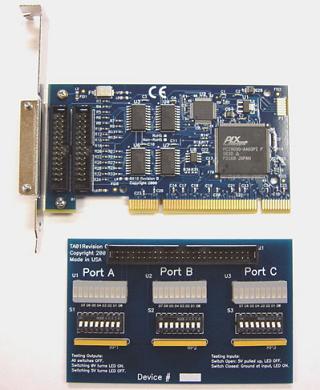
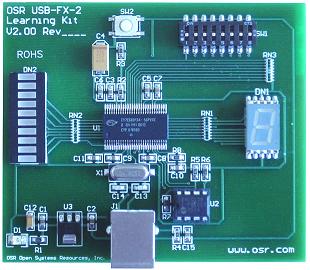
    For those who enjoy creating Penguins, my hard-coder friend William, will be giving a course about driver development for Linux at the same university. He will also use one of the OSR hardware training kits which appear in the photo above just to give you the opportunity to get your hands dirty. In the case of Linux course, the hardware is the USB one.

    See you…

  • Windows Drivers Course

    As some of you might read in another post, I was invited by Gama Filho University to give a course about Kernel Mode development for Windows. All the course details have already been determined and they would be producing material for publication; bu, as this post was being written, I was notified that there had been a delay in producing this material and it would be available for May 21. I already took a look in the Folder they were producing, and from what I got, they decided to summarize the course description that would be given. For this reason, I’ll put the full version of the description here. The following was the file I sent to the university.

    Aim:
    ========== 
    This course is intended for developers or students who need to understand
    the fundamental concepts on drivers' implementation for Windows. This course
    would not cover specific drivers' implementation, such as printers, video,
    SCSI, NDIS, USB, 1394 or UMDF. The aim of this course is to prepare students
    who want to understand, test, complement or build drivers for Windows, using
    general concepts involved in the process.
     
     
    Pre-requisites:
    ==================
    Knowledge in C Language 
    Windows API Basics
    Operating Systems Basics
     
     
    Covered Topics:
    =====================
    System Architecture Overview
            Processes and Threads     
            Virtual Memory and Paging
            Kernel Mode x User Mode
            Subsystem and Native API
            IoManager
            Driver Stack and Plug-and-Play
            Object Manager
                    Terminal Server
            Hardware Abstraction Layer (HAL)
     
    Environment (Getting, installing and using)
            Windows Device Driver Kit
            Microsoft Visual Studio Express
            Microsoft Windows Debugging Tools
            Symbols
     
    Writing a Driver
            Writing DriverEntry and DriverUnload
            Compiling a Driver
            Installing a Driver (Legacy)
                    Dependencies
                    Groups
                    Load Order
            Debugging a Driver
                    Checked Build Installations
                    Driver Verifier
                    Mapping an image for debugging
                    Using Virtual Machines
                    SoftIce
            Creating DeviceObject
            Symbolic Links
            I/O Request Packets
            IOCTLs and DeviceIoControl
            Implementing Dispatch Routines
                    Buffered I/O
                    Direct I/O
                    Neither I/O
            Objects, Handles and Pointers
            Arbitrary Context
            IRQLs, APCs, DPCs and WorkItems
            Synchronism
                    Mutex
                    FastMutex
                    ERESOURCE
                    Spin Lock
            Events and Timers
            Custom Queues
     
    Hardware Interaction
            Port I/O
            Interruptions and ISRs
            DMA
     
    Writing Filters
            Writing AddDevice routine
            Legacy Filter Drivers
            Forwarding IRPs
            Stack Locations
            Completion Routines
            Pending IRPs Handling
            IRPs Cancelation
            Creating IRPs for third Drivers
     
    Drivers Types
            Legacy drivers
            WDM Drivers
            Minidrivers
            Miniports
            Miniclass
     
    Installations
            Creating an .INF file
            The use of SetupApi
     
    References
            Web Sites
            Discussion Lists
            Books
     

    By the time this post was written, the university attendance was not able to provide details about the course, such as registration dates, contents or due date. But I can anticipate what I know so far.

    The course will be 40 hour-long and it is divided into 10 classes of four hours each. The classes will be on Saturdays from 1:00pm to 5:00pm.

    The course is scheduled to have its first class starting May 26. It will necessary, at least, five students to form one class, but by taking the amount of people who have already contacted the university seeking for details (without disclosure) my concern is now the upper limit of 10 students. We decided to limit the class of 10 students in order there would be a better time usage for the content.

    I agree that 40 hours is not enough to learn everything you need to develop drivers, but it will be an excellent starting point to have the first contact. If you are the type of person who needs to learn absolutely everything to start developing then I can antecipate that this course is not for you. The best kernel developers I know (from their Blogs, but I know) have been working with drivers for years and years, but they say they have never know everything. To get an idea, some developers focus on just certain issues within the kernel. One has been working only with disk drivers for about 10 years; another one, for about seven years, only with network drivers. Tony Mason, for example, has been working for 18 years, only with File System Drivers. Now, ask them if they know everything! And I used to feel myself bad for trying to focus only on working with Kernel, refusing to work in User Mode. Sometimes, with friends, I have heard comments about how to do this or that using .Net, and I, having no idea what they were talking about. I didn’t know that inside the Kernel issue have still existed a myriad of details and specialization. Is it possible to learn everything?

    I am preparing the content in a way that students may have some practical experience, such as writing and compiling a “Hello World” driver, install them in virtual machines and debug them. There is no way. It is necessary to get your hands dirty. Connect two real machines with a serial cable and do Kernel Debug. Generate and analyze Crash Dumps. I think we have to make the most possible to do things together in one classroom, and perform some experiments that the books attempt to describe only in words and pictures. This desire of putting things in practice was the responsible for contributing with me to get the training kit on sale at OSR Online. The kit that I’ll be taking to the course, and that appears in the photo above is basically a PCI Digital I/O. My goal is to make students’ drivers control this device.

    Well, as soon as I’m getting news, I will let you know.
    See you…

  • How was it in Boston?

    As I commented in my last post, I attended the seminar for Windows File System driver development produced by OSR in Boston. In this post, I will talk a bit about how things went there.

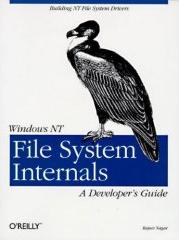
    To begin with, none other than Tony Mason to give this seminar that was very, very helpful. For those who are not familiar, Tony Mason is one of the four OSR partners. He has been working with drivers over 20 years, and particularly with File System drivers since, 1989. He began working with File Systems for Windows NT in 1993, but was already developing for Unix File Systems before that. Tony Mason is also the person responsible for reviewing and updating Windows NT File System Internals book contents by Rajeev Nagar, written and published in 1997. This book is now a reference in the subject and its revised edition, which still has no release date, will bring new issues that have been implemented in Windows 2000, XP and Vista. I have also commented a bit about this in this post.

    You people can call me a “super fan”, but it is nice to see how it just takes implementation details of File Systems Drivers (FSD) and File Systems Filters (FSF). I obviously asked him to sign up my book copy. Now I can keep that autograph on my calendar next to my first absorbent packaging. I’d love to show here, but it is about his signature, I don’t think it would be a good idea to put it on the Internet.

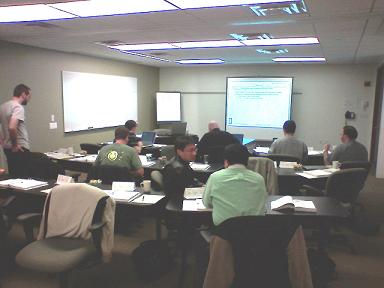
    We were fifteen students in the class, where twelve were Americans, one Romanian, one Canadian and one Brazilian. I had the opportunity to be the first Brazilian to take this course from OSR. There were people of various ages. The youngest was about 25 years-old, whereas the oldest had his hair completely white. I imagine that the class average age was about to 40-years old. I’m comfortable with the certainty that, in this development area, there is no risk of being replaced by kids who just got out of college, just by lower prices of labor. Tell me the truth! How many 40 years-old programmers do you know? I said programmers, not managers. Well, fortunately the driver development will still require a lot of experience.

    It’s hard to believe, but a woman (about 43 years-old and really looking like a woman!) was also part of the group. It is not sexism. You know how it is unusual to see a woman (who does not look like a man) programming, but programming kernel it is even more unusual. Another specimen of this rare species is Molly Brown, a programmer responsible for the NT Cache Manager. Check here.

    As it might be expected, the seminar rhythm was accelerated. After all, the content was quite dense. We had an overview of IoManager, virtual memory, multi-threaded, multi-processing and Object Manager just to begin with. These issues are still operating system part only and not specifically for FSD. We started to see File System contents itself at the middle of the second day. All content had been well distributed and for each point explained, we received comments focusing on the FSD, FSF and Redirectors. Interesting to see how each item was discussed, getting comments on the implementation differences among different Windows versions.

    In our group, there was at least one person who would develop a Redirector, one that would develop a File System, but the public in general would improve their knowledge to develop anti-virus, anti-malware, access control to systems and data replication. All implemented as FSF.

    Data replication? Would not it be better to develop data replication with a disk filter? Yeah, I think so either. The File System interface is much more complex than the disk interfaces, but try to explain that to that guy! My sincere wishes of good luck to him.

    I can say that the student’s level was medium. Well, I’ve read the book from Rajeev a few times and I already had the opportunity to work with FSF. I was aware of I would not waste this opportunity to be there learning things that a book could teach me, but part of the group didn’t think the same. Maybe they were thinking it would be easy. It was funny when we had our coffeebreaks and they sed to commente that the matter was very thorough and very detailed. No doubt it was! Some of them never had contact with FSD before. I can say who already had contact with the subject and was able to enjoy the details of interaction between the FSD and other system components such as the Cache Manager, Memory Manager or even the LAN Manager Server, really enjoyned the course. There were some people who got stuck on comments about IoMarkIrpPending and Completion Routines. Seriously? I’m saying this issue is trivial, but you should not leave to learn this in a FSD seminar.

    There were very good people there, too. Questions and discussions made Tony open FastFAT, CDFS or RDR sources to show how things would be implemented in the real world. And I thought that just the reference considered source samples as part of the documentation. Have you already searched for some information about IRP_MN_MDL in reference? Well, I was able to find a clue in the part that talk that IRP_MJ_READ was mentioned, where they listed this, among the other options and said:

    “For more information about handling this IRP, study the CDFS and FASTFAT samples that are included in the Windows Driver Kit (WDK).”

    According to Tony, developing an FSD requires much knowledge and experience, but unlikely what many people could think, developing filter is even worse. All begin with the false impression that it is necessary to change only a small part of the filter sample from WDK (SFilter), that everything would be okay. But a side effect will require just one more change here, another there, and when you realize we have a complexity greater than a FSD project. A strong argument he used was that, when you implement an FSD, you know everything what may happen, but when you develop a filter, you are at the interface of two black boxes, the operating system and FSD; and any change in behavior, generated by your filter, can generate the most bizarre, intriguing and unexpected situations to be debugged in both black boxes.

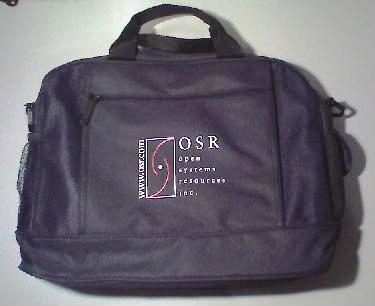
    The OSR gave us a binder with all PPTs used in the seminar; also, it gave us an OSR portmanteau, a NT Insider edition and to some people’s surprise a crazy spring. A spring crazy? Well, in summary it is a spring, but a crazy one.

    If you want to know more about File System Drivers, an excellent source of information is the OSR mailing lists. It’s worth takeing a look. Obviously, I will comment more on this subject here.

    See you next time! 🙂

  • Who said it’d be easy?

    That’s it boys and girls; time seems to become increasingly scarce. The intermediate exam period of my fourth year in Computer Engineering makes time disappear. As it wasn’t enough, I still insisted on taking some extra work to do at home. What could I do? Someone has to do the dirty work. As some of you have already known, in my university exam period, my posts were very poor and I have even commented on things that do not have much (or almost nothing) to do with driver development for Windows, just like my last Off Topic post. The funny thing is that this post which talks about my adventures programming a HP 50G calculator is one of the most visited pages of this blog. What it is not surprising. Tell me, how many Brazilians do you know who program drivers for Windows? If you could use all the fingers of one hand, congratulations; introduce me to some of your friends. I have worked with this for years and I can barely fill one hand up (counting the people who no longer work with this).

    In this post, I will bring a preview about what is coming around for future posts. My exam week will end next Friday, and after that, I imagine myself being able to breathe a little and also being able of torment your lives with this issue that nobody cares about.

    But hardware that matters…

    From the posts written so far, I still did not tell anything about writing drivers that actually do some manipulation with hardware. That’s right, interruptions, port I/O and so on. Even that Brazil is not a such big hardware producer. In companies that I have worked so far, only during the first one I had to control hardware that maintained data collector network. Among the remaining companies, I used only Kernel Mode privileges to complement some security solution. File System filters for access control, network filters, native APIs hooks, keyboard and mouse filters, disc filters, real-time encryption and blah blah blah… And about hardware? Perhaps the biggest obstacle on developing a device driver is the need to actually have a hardware to control. For those who are unaware, OSR sells training kits addressing to this need. These kits bring boards, circuits, wires, cables, chips … Uhuuu! Finally, hardware. For those who are interested in it, take a look at OSR Online Store at Hardware Learning session that will initially offer two kits. Well, at least, had offered. While I have being writing this post, one of the kits were being removed from the site. One kit is a PCI card with Digital I/O and the other is a USB card. Last week, finally the training kits that I have ordered has arrived and based on them, I have intended to build some basic examples to share with you.

    Drivers for Windows course at Sao Paulo

    The main objective of these training kits is to provide a practical example in an introductory course about Kernel Mode development for Windows at a university here in Sao Paulo. Last month, I was invited by the university to teach a course on this subject, so little explored in Brazil (I have not found another dedicated site about driver development for Windows in Portuguese). The course has still been prepared and there not a starting date. Beyond what’s been expected from such a kind of course that is usually a course in which a talkative person is supported by tons of PPTs, I intend to provide a relevant differential in this course. I want to give the opportunity for pupils learning enough to be able to develop their own driver, which will control a real board. You know, a course with so much content without the practical part would be like learning about nuclear physics, where we see tons of theory and sometimes we cannot imagine how that would be applied in real life. The examples and PPTs that are created for the course will be available here. Obviously there will be situations and questions that will deserve interesting posts here.

    File System Training at OSR

    And speaking about courses, that’s my turn as arrived. This Saturday, April 14th, I’ll be going to Boston to attend the File System Development for Windows seminar at OSR. There will be four days with tons of theory on the subject. I intend to give an overview about how the training is organized and how the content rhythm is presented. After all, this subject is not that easy.

    Computer Engineering

    That last but not least, it is the influence of what I’ve been seeing at the university reflected here. I have mentioned this issue to friends and I see that is inevitable. The study of VHDL, microelectronics, microcontrollers and processors will end up manifested here in the form of Off-Topic posts. Perhaps the issue is not completely off-topic, since low-level software is a matter that is closely tied to hardware. Anyway, I promise to control myself.

    Well, after so much, I think it’s easier for you to understand my lack of time being present here. But don’t worry DDK disciples; this blog has brought me so much cool things and I do not intend to stop publishing them suddenly. See you next time…

  • Synchronism x Performance

    No wonder that my last posts brought issues related to linked lists and performance. In recent weeks, I had been hired by a security company to take a look at one of their File System filters, in order to reduce the delay caused by them. In this post, I will talk about synchronism and CPU contention.

    I think it should not be new to many here that a linked list, or any other resource, when shared among multiple threads, should implement some access synchronism control thus, avoiding a thread to read invalid data as a result of a change made by another thread at same time.

    But I don’t have two processors, synchronism for what?

    It is true that computers with only one processor run only one thread at any given moment. So we never have two threads being executed at the same time. But it is important to remember that threads are executed in small slices of time determined by the scheduler, considering each thread quantum size and its priority. There are ways of avoiding that a thread be interrupted by the Windows scheduler, but at normal temperature and pressure conditions, we do not know when a thread is interrupted giving its place to another thread be executed.

    Suppose that thread A is scanning a list in search of a certain node. This thread reaches record R and is interrupted so that thread B can be executed. Thread B removes that same record R from the list and deallocates it from RAM. When thread A is resumed and reads the fields of the late record R, it will access invalid data and make the following steps unpredictable. Even though it is quite predictable that something blue should happen.

    There are several synchronization mechanisms that we can use, but in this post, I will comment specifically about those I’ve been involved in these weeks. But besides these ones, I have to talk about the most exotic I’ve seen in years of experience, which for me was nicknamed “Mutex, pero no Mutcho.” This was a derived class from VMutex of VToolsD. The class enter() method insanely tried to acquire a mutex few thousand times in a loop. If after these thousands of interactions the mutex has not been acquired, then the thread gave up and accessed the shared resource anyway. Do you think the system was having some trouble of Dead Lock? Anyway, it was nice to fix this years ago. There are things we only believe when we see them.

    As I have mentioned in another post, File System Filter is a layer placed over drivers like FastFAT, NTFS, CDFS, Network Redirectors and any other drivers that implement a file system interface. That is, all operations related to files, including File Mapping access, pass through File System filters.

    If you’re not only interested to know about File System filters, but interested in working with File Systems itself, then you have an obligation to read the Windows NT File System Internals by Rajeev Nagar. This book is the single known reference that is comprehensive enough on this subject. First published in 1997 by O’Reilly, this book is still a mandatory tool for development relative to File Systems even for Windows Vista. Its publication was interrupted a few years ago, and during that time, I saw this book being sold for more than U$ 200.00 for a single used copy on Amazon. Today OSR holds the book copyrights and it is currently working on an updated edition, which should bring issues such as Shadow Copy, Transactional NTFS, Filter Manager, Mini Redirectors and force volume dismount. However this is a job that will take some time, then in 2005, the original version was reprinted to meet this need, while the new edition has been made.

    The filter I have worked on maintains several lists to be consulted on each intercepted access. The mechanism used to synchronize access to these lists was the Spin Lock. An obvious choice, but inadequate for this scenario, where the activity is too intense. The list group that is used on IRP_MJ_READ routine is also used at IRP_MJ_WRITE routine and other events. The result is CPU contention. That is, when a thread gets a Spin Lock to do a query on the list, all other threads that need to consult the same list have to sit and wait until the Spin Lock is released (even in cases that we have more than one processor). Knowing that these lists are not small. Can you imagine how slow it was?

    Just as world hunger, cervix cancer, the prostate examination and other ills that affect mankind, something should be done about this. Therefore, in a relentless struggle against the evil forces was created the ERESOURCE. (Angelic chants and a dry ice mist is dissipated into the ground)

    Using ERESOURCE

    ERESOURCE is the most appropriate and native way used to synchronize access to structures that are part of a file system, such as FCB (File Control Block), which besides other information, keeps the current file size. With ERESOURCE, multiple threads can access the same linked list at the same time for reading. Assuming that none of the threads would change the data list, then all accesses could be performed simultaneously. In contrast, if necessary, a thread can gain exclusive access to the list in order to make a change.

    To use ERESOURSE, you must declare a ERESOURCE variable, which must reside in non-paged memory and 8 bytes aligned, and initialize it using ExInitializeResourceLite() function. For shared access (read only) to the list, you must use ExAcquireResourceSharedLite() function. This function checks for a thread with exclusive access to controlled resource. If so, the function may, depending on a parameter, return failure or wait until the resource to be released. To have exclusive access, use ExAcquireResourceExclusiveLite() function, which analogously checks for threads with shared access to the resource, and optionally, waits until all threads with shared access before releasing the resource for exclusive access. Finally, to release the access granted, either exclusive or shared, use the ExReleaseResourceLite() function.

    An interesting point to notice is that the Kernel APC delivery must be disabled for the threads that acquire ERESOURCE. I do not know the real reason for this need, but at least it prevents the thread holding the resource from being terminated by another thread, knowing that the TerminateThread() is implemented via Kernel APC. Thus, the most common way to use these functions is as shown below.

        //-f--> Get shared access (read only).
        KeEnterCriticalRegion();
        ExAcquireResourceSharedLite(&m_Resource, TRUE);
     
        //-f--> Query the protected values.
     
        //-f--> Release the resource.
        ExReleaseResourceLite(&m_Resource);
        KeLeaveCriticalRegion();

    One downside is that most of the functions that deal with ERESOURCE, unlike Spin Locks, should be called with IRQL < DISPATCH_LEVEL. Thus, perhaps some tricks are necessary when handling IRPs and their CompletionsRoutines to deal with this.

    After those modifications, the system has gained a lot of performance on the tests I did. The gain will be even greater as we have more operations in parallel, and of course, on computers with more than one processor.

    And everybody has lived happily ever after…