Blog
  • Legacy Drivers, WDM, WDF, KMDF, UMDF… WTF?!

    These days someone asked me what is the relationship between the operating system and the alphabet soup that has been accumulated over the builds. In this post, I’ll try to summarize what kind of each of these models brings new and what is their relationship with the operating system.

    In the beginning, God created the Earth, soon after Windows NT came and, introduced what we used to call “Legacy Drivers”. This model was used in all Windows NT drivers and there are still a lot of its concepts in the new models. Here, the classical concepts of IRP and I/O Manager have been adopted.

    With Plug-and-Play, Windows 98 and Windows 2000 advent, it was the first family to implement WDM (Windows Driver Model). This model has been intended to unify development concepts for drivers on both platforms (9x and NT). Anyone who has had contact with VXDs knows how different Windows NT drivers concepts are. VXDs programmers had to learn a completely different technology. With WDM, besides using the same sources to generate drivers for both platforms, the same binary can be used on both platforms. That is, I can generate a single binary that will run on both Windows 98 and Windows 2000. Moreover, WDM is able to identify and classify devices by Plug-and-Play class and subclass, and thus, associate drivers and filters to them. The Legacy drivers are still supported in Windows 2000 as well as VXDs in Windows 98. In practice, for NT platform, WDM drivers are Legacy Drivers that use new rules to classify and assign drivers to devices. As to the 9x platform, the change was drastic. WDM calls are routed to a VXD that makes the translation of IRP to IOP.

    As time passed by, the 9x platform ended, and the big need was to make driver development a painless thing to do. That was the priority in WDF development (Windows Driver Foundation). One comment I will not forget was the one about KMDF video (Kernel Mode Driver Framework) on Channel9 that says: “It’s hard to write kernel mode driver. Really hard. In fact, it’s hard to believe how hard it is. Well, Windows Driver staff has worked hard to become a little less difficult (not easy) to write kernel mode drivers that do not knock your system down. You know, blue screens and stuff”. WDF brings a lot of things already done, details that were repetitive, even in WDM, now there is a default behavior in WDF but that may change as the need. Applying a bigger abstraction allows, for example, registering callback routines to handle only interest events and lets the framework take care of the power management, say by the way. Impressive, don’t you think? Greater abstraction does not necessarily mean less control. You can still have access to all IRP members you think that is easy for you and want to do this with your own hands.

    I’ve read in one of these articles from NT Insider that a developer still has to know too much to do too little in Kernel Mode development and Microsoft wants to change that. Developers could know less about so many things involved in driver development to do something simple. WDF is composed of KMDF and UMDF (User Mode Driver Framework). That’s right! User Mode. Ensuring that drivers are less harmful to the system and therefore prevent a flaw in a driver that is not critical to the system (such as your MP3 player) causes a blue screen and drops your whole system. It’s really interesting to see how this works. Your driver runs as a COM server, using a system account and uses a communication framework that is based on COM to have interaction with the system as if in Kernel Mode. There is one .ppt very interesting that was used in the WinHEC 2006 that shows in a simplified way how it happens. It isn’t possible develop .net drivers because of impact of system performance, but it is desirable, no doubt. It is clear that only certain types of devices can work in User Mode, but for the growing line of USB devices it’s been already real. WDF will come along with Windows Vista DDK, many (not to mention all) of drivers of the new system were migrated to WDF, but this is not a luxury only for Windows Vista. KMDF can even be installed on Windows 2000 SP4 and UMDF beta can be installed on Windows XP SP2.

  • Getting Started…

    Let’s just stop the idle talk and get our hands dirty. Answering some requests, in this post I will take the steps to develop a minimum driver. At the end of this post, we will have a module that will be installed and loaded into the kernel without any functional purpose. I am not gonna talk yet about process context, Devices, Symbolic Links, IOCTL, IRP, DPC, ISR, FGTS, IR, or even about IPTU. I’ll talk a little about everything over time. Today we’ll just build from scratch an empty module that could eventually serve as a starting point for future experiments.

    To compile a driver for Windows, we need minimally the Windows Device Driver Kit (DDK). The DDK can be obtained from the Microsoft website. There are some alternatives to get the DDK, but the most economical of them is to opt for downloading the ISO file. When this post was created, the version available on the site was the “Windows Server 2003 SP1 DDK” with 230 MB.

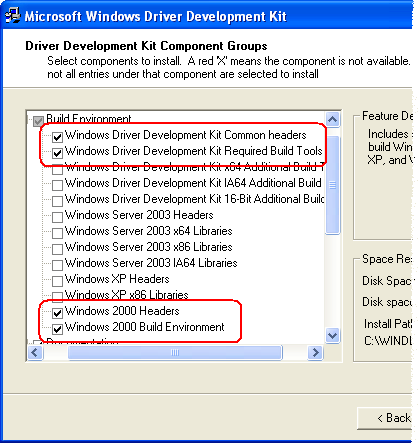
    I do not think it’s necessary to provide each detail about the DDK installation, something like “Take the mouse to the button which the text on it written NEXT and press the left mouse button”. The default options are more than sufficient for our experiments. If you don’t have much on disk space, change the options of “Build Environments” to be installed only Windows 2000 environments, as it appears below. This will make the necessary space drop from 628 MB to 246 MB. If you still have trouble installing the DDK, you might consider professional help.

    After installing the DDK, we have everything we need to create drivers. Obviously, there are many other tools that make our work more comfortable, but in this post we will stay on bread and water.

    For our test, create a folder where we put the driver source (e.g. C:\Projects\Useless). Inside this folder, create a text file named “Useless.c” and use your text editor from the bottom of your heart to enter the source below. Not worth using “Microsoft Word”, but if you thought it, use the “Notepad” and seek for professional help.

    #include 
     
    VOID OnDriverUnload(IN PDRIVER_OBJECT   pDriverObject);
     
    /****
    ***     DriverEntry 
    **
    **      That's the entry point of our driver, everything starts here,
    **      and later it'll get confused and confused...
    */
     
    NTSTATUS DriverEntry(IN PDRIVER_OBJECT  pDriverObject,
                         IN PUNICODE_STRING pusRegistryPath)
    {
        //-f--> If there is a debugger attached to the system,
        //      we could see the message below.
        DbgPrint("Wow, it's really working!\n");
     
        //-f--> Here we inform the system that our driver can be
        //      unloaded dynamically and the callback routine that
        //      will handle the completion of all is the OnDriverUnload.
        pDriverObject->DriverUnload = OnDriverUnload;
     
        //-f--> Phew! We were able to get here, that deserves
        //      a success return code to the system.
        return STATUS_SUCCESS;
    }
     
     
    /****
    ***     OnDriverUnload
    **
    **      Callback routine that deals with the necessary
    **      terminations to get this driver unloaded.
    */
     
    VOID OnDriverUnload(IN PDRIVER_OBJECT   pDriverObject)
    {
        //-f--> If there is a debugger attached to the system,
        //      we could see the message below.
        DbgPrint("But now? I did nothing so far...\n");
    }

    After doing “Copy” and “Paste” from the source above, we can notice some points. In this example, remember saving your source file with extension “.c”; otherwise, we will have some problems in exporting our entry point. In a few posts, I intend to demonstrate how to have “.cpp” files and how to use object-orientation in building drivers. Another important point to be noted is that the use of DriverUnload callback function is optional. If you don’t wanna provide a callback function for the driver unload notification, just don’t do this assignment. However, in these circumstances the driver will not be able to be unloaded. You need this assignment even for an empty function, so that its driver is able to get turned off. Let’s talk about this in more details later (see details in the DDK).

    It is still necessary to create files that define the project. In the same directory as the source, create a file named “makefile” and copy the text below to it. This file simply implements the real “Makefile” that is used to build various DDK components.

    !INCLUDE $(NTMAKEENV)\makefile.def

    The makefile should never be edited. All settings what type of driver will be compiled on, which sources will make up the driver, which libraries will be used and many other settings are specified in the file named “SOURCES” that must exist in the same directory. Its content is the one that appears below. In conjunction with the “makefile.def” from DDK, these files create a series of macros that greatly facilitate the project file creation as a Visual Studio “.vcproj”. Posts about how to use Visual Studio 2005 to compile drivers are also on my list of tasks.

    TARGETNAME=Useless
    TARGETPATH=obj
    TARGETTYPE=DRIVER
     
    SOURCES=Useless.c

    There are too many details to be discussed on a file “SOURCES” for now, let’s just limit it to know that your final binary name is defined by “TARGETNAME” variable, and the list of source code that makes up your driver should be set in “SOURCES” variables separated by space. (For more details, see it in DDK).

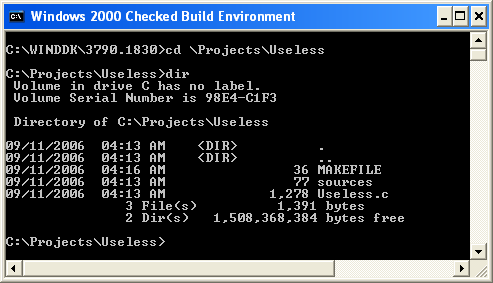
    At last, after having the files created, let’s compile them. For this, we must set some environment variables to define where the libraries, headers and binaries are that will compile your sources. Installing DDK provides a shortcut on your Start Menu that points to the file “setenv.bat”. This shortcut opens a console window and sets up the environment to compile the driver. You find the shortcut in “Build Environments” that was installed in your Start Menu. Should there be a “Checked” and a “Free” version of this shortcut. Whereas the “Checked” version sets up the environment to generate drivers with debug information, “Free” version sets up the environment for their final version, which is equivalent to “Release”. Selecting the “Checked Build” from “Windows 2000” menu, we will have a Command Prompt window with the title as shown below. Follow the same image steps below to get the same results.

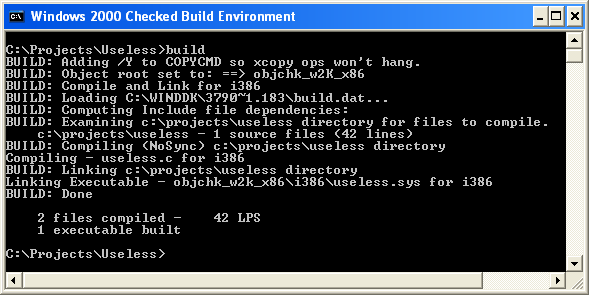
    Launching the command “build”, we should have the following results:

    All done now, we just need a victim, or rather, a volunteer. It could be your cousin’s computer, a younger brother’s, an intern’s, or just anyone’s that is not bigger than you or also a person’s who can not make you lose your job. Try not to use your own machine, we may need it later. Usually I use virtual machines; they are perfect victims. Next, we will install our driver by the simplest way I know. We will edit some entries at the registry and restart the system. There are some APIs and tools that register the driver and put it to work right away without restarting the system, but remember, we are just on bread and water.

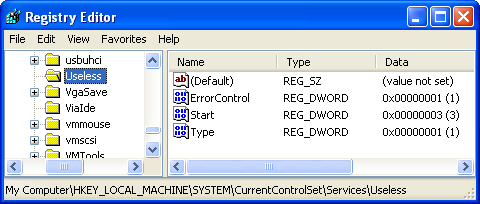
    Firstly we copy the “Useless.sys” file that was generated in subfolder “objchk_w2k_x86\i386” of our project to the folder “\Windows\System32\drivers”. Then, using the registry editor, you need to create the “Useless” key inside the “Services” key of the system and put the values as shown in the figure below.

    These lines are the minimum for a driver in the registry. The “Type” value specifies a Kernel driver, the “Start” value indicates that it will be started manually and finally the “ErrorControl” value tells the system how it should behave if this driver fails in its load time (details, details and details…).

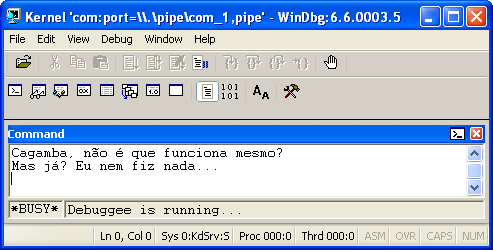
    At this point, we have to restart the system, so that the system becomes aware of this new module. Our driver won’t start automatically. Once the system has restarted, go to the Console Prompt and start the driver with the command “net start Useless”. Isn’t it impressive as anything happened? This means that the driver is doing exactly what it has been intended to do, “Nothing”. You can stop the driver using the “net stop Useless” command. If we had the debugger attached to the system, we’d have the following outputs.

    For those who have never created a driver before and cannot see the output in WinDbg, it becomes very frustrating, because nothing happened to prove that our driver was really loaded and running in Kernel. To give a little more action to this monotony, modify the DriverEntry() function as shown below. Recompile the driver, replace it at the directory “\Windows\System32\drivers” and finally reboot the machine.

    NTSTATUS DriverEntry(IN PDRIVER_OBJECT  pDriverObject,
                         IN PUNICODE_STRING pusRegistryPath)
    {
        //-f--> Say hello to the BSOD and get used to it...
        *(PVOID*)0x00000000 = 0;
     
        //-f--> We wont survive to see this.
        return STATUS_SUCCESS;
    }

    In this case, when the driver starts, it will try to write at zero address; an exception is thrown here and we will have our first Blue Screen of Death (BSOD). Have fun!

    I’ll try to interim posts for beginners with more advanced ones in order to try to attract the attention of both groups. In this post we have nothing very useful, but we already have the basis for people who have never had contact with this type of development before, so they can do their first step. Every citizen has the right to create a Blue Screen. 😉


  • ExAllocatePool(WithoutTag)

    Like most driver developers, I also have to build drivers for various Windows versions. Although I will not comment about VXDs on this post, I can comment about having a single .SYS file that can run either in Windows Server 2003 and Windows NT. I know that this OS is no longer sold and has no support from Microsoft, but it is impressive to see how we still find Windows 95 and Windows NT both in corporate environments and in end user’s homes. So, we always have to stay in dodging each operating system limitations when we are planning to develop a system.

    A function that received a new version was ExFreePool(), its new version is the ExFreePoolWithTag(), which is implemented since Windows 2000. To get a single binary that runs in both versions, we have to use the oldest one that still is supported by recent systems.

    Let’s consider the source below for a driver that performs the amazing task of allocating memory dynamically.

    #include <ntddk.h>
     
    NTSTATUS DriverEntry(PDRIVER_OBJECT  pDriverObject,
                         PUNICODE_STRING pusRegistryPath)
    {
       PVOID pTemp;
     
       //-f--> I'm thinking it's easy allocating memory.
        if (!(pTemp = ExAllocatePool(NonPagedPool, 10))
           return STATUS_NO_MEMORY;
     
       //-f--> Memory leak is vulgarity.
        ExFreePool(pTemp);
       return STATUS_SUCCESS;
    }

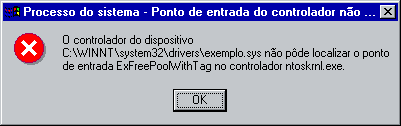
    Using the build environment for Windows XP to compile this driver, we can see the same binary runs on Windows Server 2003, Windows XP, Windows 2000 and Windows NT. Or at least, it should. When we try to start our wonderful driver on a Windows NT, we get the following message:

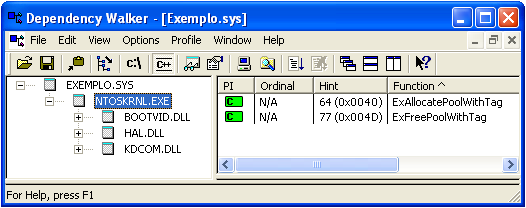
    But how? If we take a closer look at our driver, we find that it is a miserable traitor. As a DLL, drivers are executable modules that use the classical structure PE to declare their dependencies. Thus, we can open our driver in the “Dependency Walker” and see what it expects from life to be loaded. You may not believe, but it really statically depends on the new allocating memory function. A bastard traitor!

    This is because, within the file ntddk.h, there is a set of definitions that ends up changing the calls from ExFreePool() to ExFreePoolWithTag(). So, we can get those tons of code written for NT and use them in builds for newer systems without changing a single line, or we can share some source between drivers for Windows NT and newer systems.

    #define POOL_TAGGING 1
     
    ...
     
    #ifdef POOL_TAGGING
    #define ExAllocatePool(a,b) ExAllocatePoolWithTag(a,b,' kdD')
    #define ExAllocatePoolWithQuota(a,b) ExAllocatePoolWithQuotaTag(a,b,' kdD')
    #endif

    Then you ask me the following questions: But what is the real difference between old and new version? Can my driver experience problems if you try to use the old version running on a newer system? Is there intelligent life outside earth?

    The new version came to help detecting memory leaks. Each memory allocation is associated with a tag. These tags can be viewed using debugging tools such as WinDbg. For example: If your entire library setup uses a tag, and its communication library uses another, it will be easy to know which ones are leaving allocated memory. This makes it easy to know which programmer on your team you will be fired. The macros in ntddk.h use only one tag to the default memory allocations which has no associated tags.

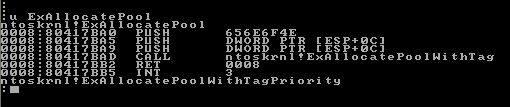
    But, what about drivers compiled with the DDK for Windows NT, running on newer systems? These drivers actually use the old functions. If we use Depends on them we could see that. As a matter of compatibility, the old functions are still exported in newer systems to support older drivers. Let’s take a look at the implementation of ExAllocatePool() Windows 2000.

    Implementation of the old function simply forwards the memory allocation for the new function and uses the tag ‘None’. This assures us that we will not die of cancer if we continue using old functions in a new system.

    Well, what were we intending to do? Oh yes, build a new driver that can run on both Windows NT and later systems. We could simply use the Windows NT DDK and have backward compatibility to run on newer systems. This is possible, but some of the functions we see in the DDK are actually defined as macros. The IoSetCompletionRoutine() function is a classic example of this. Using an old DDK means not having some of these functions defined and we’d have to patch DDK definitions if we wanted to enjoy them. There are also those cases of missing people on desert islands with only the latest DDK.

    #include <ntddk.h>
     
    #undef ExAllocatePool
    #undef ExFreePool
     
    NTSTATUS DriverEntry(PDRIVER_OBJECT  pDriverObject,
                         PUNICODE_STRING pusRegistryPath)
    {
     
    ...

    To resolve this, just after including ntddk.h, let’s take a #undef in macros that will redirect older calls to new version of ExAllocatePool() and that’s it, your problems have gone away. Rebuilding, we will have a new driver that uses the old allocation functions. Thus, it can be used in systems since Windows NT.

    This method disadvantage is that your drivers can not use the tags when running on a system that supports them. Actually, you can have a single binary that, when running on Windows NT can use ExFreePool(), whereas when running on a newer system it uses ExFreePoolWithTag(), but that’s another post.

  • Debug or Not Debug

    Here is a very simple thing to do. Generating conditional compilation using the pre-processor along with the DBG symbol has to be a simple task. Just as the _DEBUG symbol is defined by the projects written in C/C++ in Visual Studio, DBG symbol is defined by DDK to inform you that the current build is Checked or Free. Thus, we can illustrate with a simple code snippet as it follows below:

    //-f--> I'm thinking it's easy...
    #ifdef DBG
       DbgPrintf("Checked Version\n");
    #else
       DbgPrintf("Free Version\n");
    #endif

    The code above will display the message “Checked Version” when the build is done in Checked and “Free Version”, when the build is done in Free, right?

    WRONG!!! That’s it, wrong! The DBG symbol is defined as 1 in checked builds and set to 0 in free builds. Thus, we have DBG = 1 for Checked builds and DBG = 0 for Free builds. The way it is, the code above still displays the message “Checked Version”, even when compiled as Free. This is because the DBG symbol is still set, it is set to 0, but it is defined in either way. So, to adequately test this condition, we must do it with #if in place of #ifdef, as it follows below:

    //-f--> OK, now it will display the correct build configuration
    #if DBG
       DbgPrintf("Checked Version\n");
    #else
       DbgPrintf("Free Version\n");
    #endif
     
    //-f--> Testing only for Free builds
    #if !DBG
       DbgPrintf("Free Version\n");
    #endif

    To facilitate debugging, it is not rare to see some drivers with the code that, when compiled in Checked, interrupts its execution using the following code:

    //-f--> Interrupt the execution only in checked version
    #if DBG
       __debugbreak();
    #endif

    If the build test was incorrect here, we would have a beautiful blue screen whether the code above went to the production. As you may know, calling breakpoints in code throw exceptions that would be handled by the debugger, but if the debugger is not attached to the system, HORRIBLE THINGS WILL HAPPEN.

    In the file there ntddk.h, there is a shown macro below that helps to test the build conditions in Checked.

    #if DBG
        #define IF_DEBUG if (TRUE)
    #else
        #define IF_DEBUG if (FALSE)
    #endif

    In this way the syntax below is quite clear:

    IF_DEBUG
    {
       __debugbreak();
    }

    Since we are talking about conditional builds, we may also have to build specialization in SOURCES file. DDKBUILDENV environment variable is set to “che” when the build is done in Checked, or it is set to “fre” when in Free builds. So we can, for example, using different paths for libs, in accordance with the current build configuration.

    !if "$(DDKBUILDENV)" == "fre"
    BUILD_CONFIG=Release
    !else
    BUILD_CONFIG=Debug
    !endif
     
    TARGETLIBS=.\Lib\$(BUILD_CONFIG)\HtsCpp.lib
  • KdPrint((“Hello World!!!”));

    Meu primeiro computador

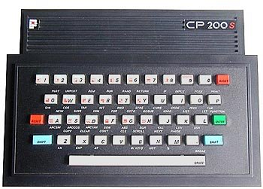
    In this first post, I’ll assume that no one will read it to talk about me. After all, people who are interested in reading this blog may want to know my profile with a little more detail. Born in 1976, I could not imagine what which job I would have when I was 13 years old and saw a computer for the first time. My cousin had a CP200 and I had no idea what kind of video game it was. When my cousin did an upgrade to a powerful MSX, I bought his CP200. I just did not know anything about it. I that time had the games and applications were recorded on K7 tape and I had no recorder to enjoy all this technology. As a result, we were only me and the BASIC manual and that’s how I learned how to program.

    I didn’t take so long to decide that I wanted to be a programmer, but I had to program using a language that once I heard about, the C language. I wanted to do what others found difficult, and perhaps for this reason, instead of doing the traditional course of Data Processing, I decided to study Industrial Informatics at ETE Jorge Street School in Sao Caetano do Sul.

    Although I knew how to program in Visual Basic, I still knew nothing about C for Windows when I was doing my internship at Provectus. I’d say I could not fell into a better place. They worked with a proprietary hardware that was equipped with a V40 processor. Using a library of run-time produced by them, we could make a program for DOS run inside a panel data collection. As time passed by, the first DLL, the first service, the first application, the first driver and long-awaited first blue screen came. The network adapter that received the messages from the network hardware was also a self-produced, and I started just maintaining the code that was already done. We had to redo all the collectors’ network protocol that was all done for us. So while my friends were doing forms, queries and reporting, the fact that debugging a network protocol, part in assembly and part in C both the driver and firmware using an oscilloscope, gave me certainty that was what I wanted to do.

    After four years working with data collectors, my wish about programming exclusively for Windows made me work on a financial site. Building MTS and COM + components was good to get another business view. But as expected, tasks using C/C++ for these purposes were little and soon ended, so they were putting me in projects of ASP with SQL, and thanks to that, I moved to work in an enterprise about information security. I just could not bear to arriving at work and having to open the Query Analyzer.

    SCUA really introduced me to the low-level programming for Windows. Window Hooks, Authentication DLL (GINA), logon in Windows with smart-card and biometric filters, file systems, file and partition encryption in real time, access control, SoftICE and WinDBG. I’ve currently worked at Open Communications Security and I am responsible for developing low-level software against hacking, detecting, combating and foiling root-kits, trojans and key loggers.

    In this blog, I intend to give some tips about developing C/C++ for Windows, including some things in User-Mode and others in Kernel-Mode. I hope I can help by offering some tips and facilities for this small group of people who develops drivers for Windows in Brazil.