

Let’s play with something more interesting now. Obviously we will still take small steps so as not to get lost in so many details. Today I will talk about driver filters. The Windows IoManager lets us add functionality to certain drivers without having to replace them. A classic example would be a file-encryption driver. You don’t need to write a new file system driver to have such functionality. You can simply write a filter that would sit between the file system driver and the rest of the system.
In the figure below we can observe the flow of IRPs that go from the IoManager to a certain driver; a filter is installed on top of the existing driver and starts receiving the IRPs in place of the original driver. With this, the filter has the opportunity to change the parameters of the received IRPs, or log the original driver’s activity, or duplicate system requests to that driver, or even deny the original driver’s service.
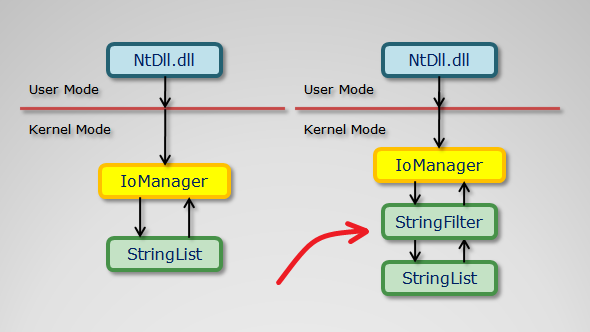
In a write operation, a filter could encrypt the data before sending it to the original driver, and similarly, in a read operation the filter could decrypt data before delivering it to the system.
It still won’t be this time that we build a file system encryption filter. Real-time file-encryption filters are among the most complex drivers to write. Let’s choose a simpler driver, not to say a really silly one, to apply the basic concepts demonstrated here.
Speaking of a silly driver, let’s use the driver from this post that we already saw here. This driver simply stores a list of strings sent by an application in write operations. Such strings are returned to the application in read operations.
Writing the DriverEntry
As we saw in this other post, one of the things the DriverEntry() function does in an ordinary driver is to set the Dispatch Routines that the driver will service for a certain device. To do this you must fill in the Major Functions array that is in the DRIVER_OBJECT structure.
//-f--> Sets the driver's dispatch routines.
pDriverObj->MajorFunction[IRP_MJ_CREATE] = OnCreate;
pDriverObj->MajorFunction[IRP_MJ_CLEANUP] = OnCleanup;
pDriverObj->MajorFunction[IRP_MJ_CLOSE] = OnClose;
pDriverObj->MajorFunction[IRP_MJ_READ] = OnRead;
pDriverObj->MajorFunction[IRP_MJ_WRITE] = OnWrite;
In the case of our example filter, we just want to monitor the activity of the driver we are attached to; this way we will always have to forward any received IRPs to the driver below. A simple and common way to do this is to set all the dispatch routines to a single function. That function is responsible for simply logging the received request and passing it along.
If we take a look at the definition of IRP_MJ_CREATE and its friends, we will see the following excerpt from the wdm.h file.
//
// Define the major function codes for IRPs.
//
#define IRP_MJ_CREATE 0x00
#define IRP_MJ_CREATE_NAMED_PIPE 0x01
#define IRP_MJ_CLOSE 0x02
#define IRP_MJ_READ 0x03
#define IRP_MJ_WRITE 0x04
#define IRP_MJ_QUERY_INFORMATION 0x05
#define IRP_MJ_SET_INFORMATION 0x06
#define IRP_MJ_QUERY_EA 0x07
#define IRP_MJ_SET_EA 0x08
#define IRP_MJ_FLUSH_BUFFERS 0x09
#define IRP_MJ_QUERY_VOLUME_INFORMATION 0x0a
#define IRP_MJ_SET_VOLUME_INFORMATION 0x0b
#define IRP_MJ_DIRECTORY_CONTROL 0x0c
#define IRP_MJ_FILE_SYSTEM_CONTROL 0x0d
#define IRP_MJ_DEVICE_CONTROL 0x0e
#define IRP_MJ_INTERNAL_DEVICE_CONTROL 0x0f
#define IRP_MJ_SHUTDOWN 0x10
#define IRP_MJ_LOCK_CONTROL 0x11
#define IRP_MJ_CLEANUP 0x12
#define IRP_MJ_CREATE_MAILSLOT 0x13
#define IRP_MJ_QUERY_SECURITY 0x14
#define IRP_MJ_SET_SECURITY 0x15
#define IRP_MJ_POWER 0x16
#define IRP_MJ_SYSTEM_CONTROL 0x17
#define IRP_MJ_DEVICE_CHANGE 0x18
#define IRP_MJ_QUERY_QUOTA 0x19
#define IRP_MJ_SET_QUOTA 0x1a
#define IRP_MJ_PNP 0x1b
#define IRP_MJ_PNP_POWER IRP_MJ_PNP // Obsolete....
#define IRP_MJ_MAXIMUM_FUNCTION 0x1b
Note that there is a special definition, IRP_MJ_MAXIMUM_FUNCTION, which indicates the maximum index of the dispatch routines table. We will use a simple loop to make all the routines in our table point to a single routine that we will name OnForwardDispatch.
//-f--> Sets all the driver's dispatch routines to
// one that forwards the IRP to the original driver.
for (i = 0; i <= IRP_MJ_MAXIMUM_FUNCTION; i++)
pDriverObj->MajorFunction[i] = OnForwardDispatch;
We will see the implementation of this routine later. The next step we will take here is to locate the device we are going to attach to. To do this, we will use the IoGetDeviceObjectPointer() routine. It basically receives the device name and returns a reference to it.
NTSTATUS
IoGetDeviceObjectPointer(
IN PUNICODE_STRING ObjectName,
IN ACCESS_MASK DesiredAccess,
OUT PFILE_OBJECT *FileObject,
OUT PDEVICE_OBJECT *DeviceObject
);
Notice that this routine has two output parameters. Besides the pointer to the device object we also receive a pointer to a file object. I have seen some people get confused about these two parameters, so I will give this some emphasis.
The pointer to the file object represents a connection created between your driver and the device you opened. As we saw in this post, a file object is created to represent connections between user-mode applications and your driver. Applications use that file object through the handle obtained in the call to the CreateFile() routine. Here we have something similar, but only the Kernel was involved. This means that if you wanted to, you could launch IRPs to the device requesting operations as an application would, but we won’t see that today; we still have a filter to finish.
The big confusion regarding these two parameters is about the references between the objects. In the documentation we see that the caller of this routine must release the reference it gained when the device is no longer used. We do this simply by using the ObDereferenceObject() routine.
VOID
ObDereferenceObject(
IN PVOID Object
);
“I’ve got it! Since we are obtaining a reference to a device object, then I should pass the device object pointer. Right?”
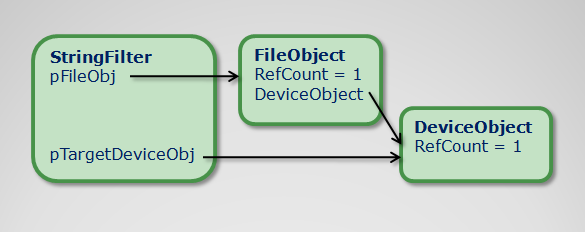
Er… Actually no. The file object is an indirect reference to the device object. According to the figure below, if we imagine that the reference counters only concern our references, when we call ObDereferenceObject() for the file object, its reference count would drop to zero and a new call to ObDeferenceObject() would be made indirectly for the device object, causing its reference count to also drop to zero, destroying the object.
After obtaining the pointer to the target device, we will have to create our own device, which will receive the IRPs in place of the original device. To do this we will still use the IoCreateDevice() routine as we did with drivers, but with some differences.
The first difference is that your device normally has no name. It is possible to create named filters, but that can create a security flaw. This happens because when a name is looked up in the Object Manager, its security rules are evaluated. When we create a named filter, we create the possibility of the same object being obtained by a different name that may have less restrictive security rules. But that is another subject.
When we create a device, we need to inform the size of the device extension.
“What is a device extension?”
Device extension is simply a space of memory that is associated with the device object. Such space normally holds information concerning the device. The address of the device we are attached to normally sits in the device extension. This way, we can define that our device extension must contain the following structure.
//-f--> Our device extension will contain only the address
// of the device we are attached to.
typedef struct _DEVICE_EXTENSION
{
PDEVICE_OBJECT pNextDeviceObj;
} DEVICE_EXTENSION, *PDEVICE_EXTENSION;
After creating our device object, we configure the I/O method by copying the DO_BUFFERED_IO and DO_DIRECT_IO bits. If you don’t remember these bits, take a look at this post. The filter must propagate the original driver’s choice, and the driver has the commitment not to change the method during its lifetime.
Now we are ready to attach to the chosen device, and we will do this using the IoAttachDeviceToDeviceStackSafe() routine to make our device enter the device stack.
NTSTATUS
IoAttachDeviceToDeviceStackSafe(
IN PDEVICE_OBJECT SourceDevice,
IN PDEVICE_OBJECT TargetDevice,
IN OUT PDEVICE_OBJECT *AttachedToDeviceObject
);
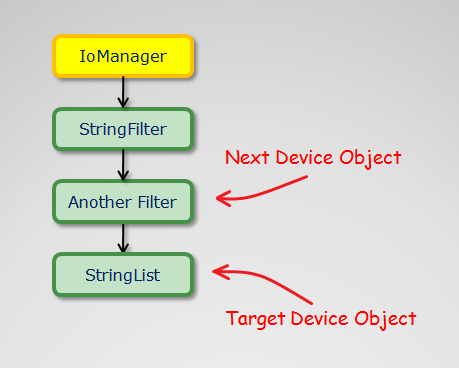
With this call we will obtain the pointer to the device we will be attached to; that device will be the next device that will receive the IRP after you pass it along.
“But Fernando, don’t we already have the pointer to the target device?”
Very well, when you obtain the pointer to a device, you theoretically don’t know whether there are filters already attached on top of it. The pointer you receive in this routine may not be the pointer to the target device. In the figure below we can understand how this relationship happens.
“Fernando, is there an unsafe version of this routine?”
There actually is, IoAttachDeviceToDeviceStack().
PDEVICE_OBJECT
IoAttachDeviceToDeviceStack(
IN PDEVICE_OBJECT SourceDevice,
IN PDEVICE_OBJECT TargetDevice
);
It is considered unsafe because of a small time window that can cause a race condition. Notice that the difference between these routines is the way of obtaining the address of the next device. In the original version, this address is obtained by the function’s return value. If we put this function to run in slow motion we will see the following steps.
- Your device is attached to the device stack.
- The address of the next device is returned by the function.
- Your driver receives this address on the function’s return and updates the device extension.
- IRPs start arriving and your driver forwards them to the next device in the list.
Everything looks beautiful and even gives the impression that everything will work very well in any situation, but a driver developer is a critter trained to hunt for race conditions. Take another look at the sequence, but now in super slow motion. With this super-slow-motion camera we can now observe the steps that can occur between steps 2 and 3.
- Your device is attached to the device list.
- The address of the next device is returned by the function.
- Your thread is interrupted and an IRP launched by an application running in parallel begins its journey through this device stack.
- Your device, which is already attached, receives the IRP and tries to forward it to the device below.
- Oops! Our device extension has not yet been updated with that address.
- Your driver remembers when it was a child and everything it had lived through until then.
- It decides to fully join that dance and send the IRP to a device whose pointer is still NULL, causing a BSOD.
- “Jeremias, I am a man. Something you are not, and I don’t shoot people in the back…”
Anyway, understand that even if you use the return value of the IoAttachDeviceToDeviceStack() routine directly to update your device extension, there is still a time window in which your device will be attached but the value has not yet been updated in the device extension. This is because a routine’s return value comes through a register. Taking the value of that register and updating a variable still gives chances for bad luck.
//-f--> ----==== DO NOT COPY THIS ====----
// Here we still have a time window between the device being
// attached and the value of pNextDeviceObj being updated.
pDeviceExt->pNextDeviceObj = IoAttachDeviceToDeviceStack(pMyDeviceObj,
pTargetDeviceObj);
The IoAttachDeviceToDeviceStackSafe() routine makes the system interrupt the flow of IRPs in this stack until the variable pointed to by the output pointer is updated. For this reason, the address passed to this routine must be the final address of the variable where this value will be stored, which in our case is pDeviceExt->pNextDeviceObj without going through intermediate variables.

These details are important and will make you understand that using the safe version of this routine is no guarantee that everything will go right. Imagine that using the safe version you receive the address of the next device in a local variable and then update your device extension. This is one of those typical cases where you need to replace that component that sits between the keyboard and the chair.
Think it’s overkill? Try reading chapter 5 of the book “Programming the Microsoft Windows Driver Model” where Walter Oney talks about how to deal with IRP cancellation.
After attaching our device we can already release the reference obtained by IoGetDeviceObjectPointer() using the ObDereferenceObject() routine, since the IoAttachDeviceToDeviceStackSafe() routine already guaranteed the reference until this connection is undone.
Very well. For those who couldn’t understand almost anything I said, here is the source code of the implementation of our example DriverEntry(). You know how a programmer’s mind is, sometimes an if is worth more than a thousand pages of explanation.
/****
*** DriverEntry
**
** Entry point of the driver.
** Welcome to hell.
*/
extern "C"
NTSTATUS
DriverEntry(IN PDRIVER_OBJECT pDriverObj,
IN PUNICODE_STRING pusRegistryPath)
{
NTSTATUS nts;
PDEVICE_OBJECT pMyDeviceObj;
int i;
UNICODE_STRING usDeviceName;
PDEVICE_OBJECT pTargetDeviceObj;
PFILE_OBJECT pFileObj;
PDEVICE_EXTENSION pDeviceExt;
//-f--> Sets the driver's unload routine.
pDriverObj->DriverUnload = OnDriverUnload;
//-f--> Sets all the driver's dispatch routines to
// one that forwards the IRP to the original driver.
for (i = 0; i <= IRP_MJ_MAXIMUM_FUNCTION; i++)
pDriverObj->MajorFunction[i] = OnForwardDispatch;
//-f--> We initialize the string with the name of the device
// we want to attach to.
RtlInitUnicodeString(&usDeviceName,
L"\\Device\\StringList");
//-f--> We get the pointer to the target device
nts = IoGetDeviceObjectPointer(&usDeviceName,
FILE_READ_DATA,
&pFileObj,
&pTargetDeviceObj);
if (!NT_SUCCESS(nts))
return nts;
//-f--> We create our device object
nts = IoCreateDevice(pDriverObj,
sizeof(DEVICE_EXTENSION),
NULL,
pTargetDeviceObj->DeviceType,
pTargetDeviceObj->Characteristics,
FALSE,
&pMyDeviceObj);
if (!NT_SUCCESS(nts))
{
//-f--> Oops!
ObDereferenceObject(pFileObj);
return nts;
}
//-f--> Gets our DEVICE_EXTENSION
pDeviceExt = (PDEVICE_EXTENSION)pMyDeviceObj->DeviceExtension;
//-f--> Uses the same IO method as the original driver
pMyDeviceObj->Flags |= pTargetDeviceObj->Flags & (DO_BUFFERED_IO | DO_DIRECT_IO);
//-f--> Here our driver enters the device stack
nts = IoAttachDeviceToDeviceStackSafe(pMyDeviceObj,
pTargetDeviceObj,
&pDeviceExt->pNextDeviceObj);
if (!NT_SUCCESS(nts))
{
//-f--> Oops!
IoDeleteDevice(pMyDeviceObj);
//-f--> There is no missing return here.
}
//-f--> Whether we are attached or not, we must release
// the reference obtained from the target device.
ObDereferenceObject(pFileObj);
return nts;
}
Writing the OnDriverUnload
Here is where the party ends; before our driver is unloaded by the system, we will have to remove our device from the device stack and destroy it. (Evil laughter)
The code here is simple and requires no explanation if you are able to read the comments contained in it.
/****
*** OnDriverUnload
**
** Driver's unload routine.
*/
VOID
OnDriverUnload(IN PDRIVER_OBJECT pDriverObj)
{
PDEVICE_OBJECT pMyDeviceObj;
PDEVICE_EXTENSION pDeviceExt;
//-f--> Our device is in the list of devices created by this driver
// so let's get it just like this:
pMyDeviceObj = pDriverObj->DeviceObject;
//-f--> Here we get the device extension.
pDeviceExt = (PDEVICE_EXTENSION)pMyDeviceObj->DeviceExtension;
//-f--> Here we remove our device from the stack, passing the address of the
// next device to the routine below.
IoDetachDevice(pDeviceExt->pNextDeviceObj);
//-f--> Now we can destroy our device (evil laughter)
IoDeleteDevice(pMyDeviceObj);
}
“Fernando, is our driver forced to unload when the original driver is unloaded?”
That is the WDM philosophy: drivers are loaded automatically when their devices are detected and unloaded when their devices are disabled or removed. Filters follow the same rules and are loaded/unloaded based on these events.
But that is not what happens here. The example drivers I use on this blog are of the Legacy model, not WDM. In the Legacy model, drivers are started following their load order in the registry, and it has nothing to do with the detection of your device. Filters need to start after the original drivers, and this is also controlled by their load order. This post talks about the load order of legacy drivers.
“OK! You talked and talked and didn’t answer my question. What happens if I request the unload of the original driver while there is a filter attached on top of it?”
The unloading of the drivers that form a stack must occur in reverse order to their loading. In this case the filter must be unloaded before the original driver, unstacking the devices from top to bottom. If the original driver receives an unload request while there are still references to its devices, whether by a filter or by an application, the unload is postponed until its references are undone. Until then, the attempt to obtain new references to a device that received the unload request will be denied.
Writing Dispatch Routines
A filter’s dispatch routines are also different from a driver’s dispatch routines. Although they can complete an IRP by calling IoCompleteRequest(), they normally pass the request along using the IoCallDriver() routine. I will talk more about the behavior of a filter’s dispatch routines in future posts. In this example filter we will just log the activity and pass the request to the next driver.
When we talk about passing a request along we are actually talking about passing IRPs along. Reading this other post is essential for what we are going to do in the implementation of our dispatch routines.
To finish this post while still in this life, here is the code for the implementation of our dispatch routine. After reading the post about IRPs that I just recommended, reading the comments in this code should be enough to understand everything that was done here, or not.
/****
*** OnForwardDispatch
**
** Our dispatch routine simply logs the received IRP
** and forwards the request onward.
**
*/
NTSTATUS
OnForwardDispatch(IN PDEVICE_OBJECT pDeviceObj,
IN PIRP pIrp)
{
PDEVICE_EXTENSION pDeviceExt;
PIO_STACK_LOCATION pStack;
//-f--> Gets pointer to the device extension
pDeviceExt = (PDEVICE_EXTENSION)pDeviceObj->DeviceExtension;
//-f--> Gets the current stack location
pStack = IoGetCurrentIrpStackLocation(pIrp);
//-f--> Prints the name of the IRP's major function
ASSERT(pStack->MajorFunction <= IRP_MJ_MAXIMUM_FUNCTION);
DbgPrint("[StringFilter] : %s\n", g_szMajorNames[pStack->MajorFunction]);
//-f--> Since we are not modifying anything in the stack location,
// let's leave it for the next device to use.
IoSkipCurrentIrpStackLocation(pIrp);
//-f--> Forwards the IRP to the next device.
return IoCallDriver(pDeviceExt->pNextDeviceObj,
pIrp);
}
If you didn’t understand anything, don’t forget to send me an e-mail explaining your doubts (without personal offenses). This will help me understand your difficulties and improve my explanations.
Testing the Filter
This is the easy part of the post. To test the filter we will first have to compile, install and start the driver from this post. If you still don’t know how to do that, this other post can give you a starting point. After that, compile, install and start the filter.
Once installed, we can use the test application to exercise the driver. We will be able to follow the filter’s activity by observing its debug messages, which can be seen in the Kernel debugger or simply by using this application, which does away with the need for a debugger to see a driver’s debug messages.
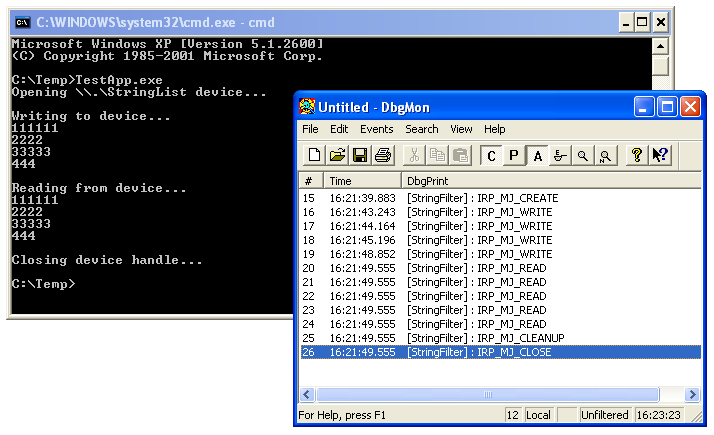
“Fernando, I ran a test here and saw that when starting the filter it logs an IRP_MJ_CLOSE event even before starting the test application. What did I do wrong?”
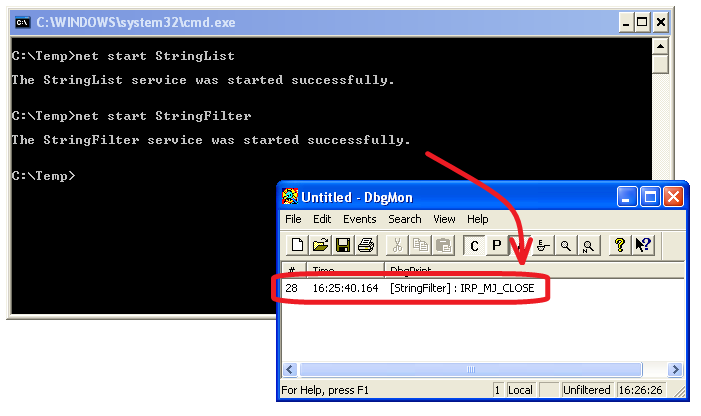
There is nothing wrong. This happens because of the sequence of steps followed in the filter’s DriverEntry() routine. Initially the driver calls the IoGetDeviceObjectPointer() routine; this makes the IoManager send an IRP_MJ_CREATE request to the original driver. After that we attach to the device stack and finally call the ObDereferenceObject() routine, which will finalize the only reference to the file object we received, sending an IRP_MJ_CLOSE request to the driver below. Since we are already attached to it, we are able to see our own activity on the original driver. This can be observed by the call stack we will have if there is a breakpoint in our dispatch routine when we release the file object reference at the end of DriverEntry().
kd> k
ChildEBP RetAddr
f8af9bcc 804ee129 StringFilter!OnForwardDispatch
f8af9bdc 80578f6a nt!IopfCallDriver+0x31
f8af9c14 805b0b18 nt!IopDeleteFile+0x132
f8af9c30 80522bd1 nt!ObpRemoveObjectRoutine+0xe0
f8af9c54 f8c80663 nt!ObfDereferenceObject+0x5f
f8af9c7c 805767ff StringFilter!DriverEntry+0xf3
f8af9d4c 8057690f nt!IopLoadDriver+0x66d
f8af9d74 80534c12 nt!IopLoadUnloadDriver+0x45
f8af9dac 805c61ee nt!ExpWorkerThread+0x100
f8af9ddc 80541de2 nt!PspSystemThreadStartup+0x34
00000000 00000000 nt!KiThreadStartup+0x16
As usual, the filter source that was implemented in this post is available for download. Our filter does almost nothing, but it will already serve as a base for future posts that will give it more functionality, explaining how such functionalities are implemented.
See you!
Leave a Reply