

The first impression, which some older readers may be having now, is that I am really running out of time to write new posts, and that is why this new post would be just a repetition of the post Step into Kernel (VMware+WinDbg). Actually I am as surprised as some of you. In this post I will talk about a small detail that will make a difference when it comes to doing Kernel debugging using a virtual machine created with the new version of VMware.
The Symptom
This last weekend, despite the holiday, the sun and the immense desire to hit the road, I had to stay home solving some personal messes. One of them involved doing Kernel debugging on a virtual machine. Nothing unusual about that so far. After all, doing Kernel debugging on virtual machines is bread and butter for those who work developing drivers.
I created a new VM and installed Windows on it, performed the TARGET and HOST configurations exactly as I describe in that other post, but to my surprise, for some reason WinDbg could not connect to the TARGET system, always staying with the same message “Waiting to reconnect…”. Even using Ctrl+Alt+D in WinDbg to see the debugger’s internal information, all I had in WinDbg’s output was the message shown below.
Microsoft (R) Windows Debugger Version 6.12.0002.633 AMD64
Copyright (c) Microsoft Corporation. All rights reserved.
Opened \\.\pipe\com_1
Waiting to reconnect...
>>>> ReadAll(0x800703E3,1,0) fails.
>>>> ReadAll(0x800703E3,1,0) fails.
>>>> ReadAll(0x800703E3,1,0) fails.
>>>> ReadAll(0x800703E3,1,0) fails.
>>>> ReadAll(0x800703E3,1,0) fails.
>>>> ReadAll(0x800703E3,1,0) fails.
SYNCTARGET: Timeout.
>>>> ReadAll(0x800703E3,1,0) fails.
Throttle 0x10 write to 0x1
>>>> ReadAll(0x800703E3,1,0) fails.
>>>> ReadAll(0x800703E3,1,0) fails.
>>>> ReadAll(0x800703E3,1,0) fails.
After checking all the steps meticulously several times, I could not understand what was happening.
The Cause
When creating a new serial port on the virtual machine, which would be redirected to a named pipe on the real machine, I noticed that its name was out of the ordinary. Although this was supposedly the only serial port of the system, VMware’s settings-editing interface showed its name as “Serial Port 2” as shown in the figure below.
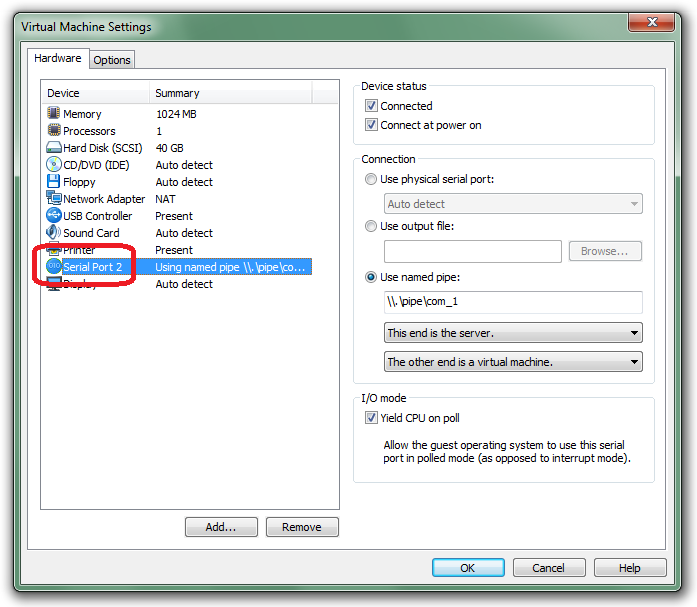
I got suspicious about this and tried to recreate the serial port, thinking it would be a bug in VMware’s interface, but the same name appeared. So nothing better than opening the VM’s configuration file in good old Notepad. That was when I discovered that although there was no serial port besides the one I was creating in VMware’s editing interface, in the configuration file there were in fact two serial ports as I show below.
.encoding = "windows-1252"
config.version = "8"
virtualHW.version = "7"
scsi0.present = "TRUE"
scsi0.virtualDev = "lsisas1068"
memsize = "1024"
mem.hotadd = "TRUE"
scsi0:0.present = "TRUE"
scsi0:0.fileName = "Windows 7 x64.vmdk"
ide1:0.present = "TRUE"
ide1:0.autodetect = "TRUE"
ide1:0.deviceType = "cdrom-raw"
floppy0.startConnected = "FALSE"
floppy0.fileName = ""
floppy0.autodetect = "TRUE"
ethernet0.present = "TRUE"
ethernet0.connectionType = "nat"
ethernet0.virtualDev = "e1000"
ethernet0.wakeOnPcktRcv = "FALSE"
ethernet0.addressType = "generated"
usb.present = "TRUE"
ehci.present = "TRUE"
sound.present = "TRUE"
sound.fileName = "-1"
sound.autodetect = "TRUE"
mks.enable3d = "TRUE"
serial0.present = "TRUE"
serial0.fileType = "thinprint"
pciBridge0.present = "TRUE"
pciBridge4.present = "TRUE"
pciBridge4.virtualDev = "pcieRootPort"
pciBridge4.functions = "8"
pciBridge5.present = "TRUE"
pciBridge5.virtualDev = "pcieRootPort"
pciBridge5.functions = "8"
pciBridge6.present = "TRUE"
pciBridge6.virtualDev = "pcieRootPort"
pciBridge6.functions = "8"
pciBridge7.present = "TRUE"
pciBridge7.virtualDev = "pcieRootPort"
pciBridge7.functions = "8"
vmci0.present = "TRUE"
roamingVM.exitBehavior = "go"
displayName = "Windows 7 x64"
guestOS = "windows7-64"
nvram = "Windows 7 x64.nvram"
virtualHW.productCompatibility = "hosted"
printers.enabled = "TRUE"
extendedConfigFile = "Windows 7 x64.vmxf"
ide1:0.startConnected = "TRUE"
ethernet0.generatedAddress = "00:0c:29:91:aa:62"
tools.syncTime = "FALSE"
uuid.location = "56 4d a8 8a e8 f9 f0 a8-62 de e8 25 40 91 aa 62"
uuid.bios = "56 4d a8 8a e8 f9 f0 a8-62 de e8 25 40 91 aa 62"
cleanShutdown = "FALSE"
replay.supported = "FALSE"
replay.filename = ""
scsi0:0.redo = ""
pciBridge0.pciSlotNumber = "17"
pciBridge4.pciSlotNumber = "21"
pciBridge5.pciSlotNumber = "22"
pciBridge6.pciSlotNumber = "23"
pciBridge7.pciSlotNumber = "24"
scsi0.pciSlotNumber = "160"
usb.pciSlotNumber = "32"
ethernet0.pciSlotNumber = "33"
sound.pciSlotNumber = "34"
ehci.pciSlotNumber = "35"
vmci0.pciSlotNumber = "36"
scsi0.sasWWID = "50 05 05 6a e8 f9 f0 a0"
vmotion.checkpointFBSize = "134217728"
usb:0.present = "TRUE"
usb:1.present = "TRUE"
ethernet0.generatedAddressOffset = "0"
vmci0.id = "1083288162"
usb:1.deviceType = "hub"
usb:0.deviceType = "mouse"
ide1:0.fileName = "auto detect"
unity.wasCapable = "FALSE"
serial1.yieldOnMsrRead = "TRUE"
serial1.fileName = "\\.\pipe\com_1"
serial1.pipe.endPoint = "server"
The “filetype” property with the value “thinprint” on serial port zero made me pay attention to this new hardware that was part of my virtual machine’s settings and that I hadn’t even noticed.
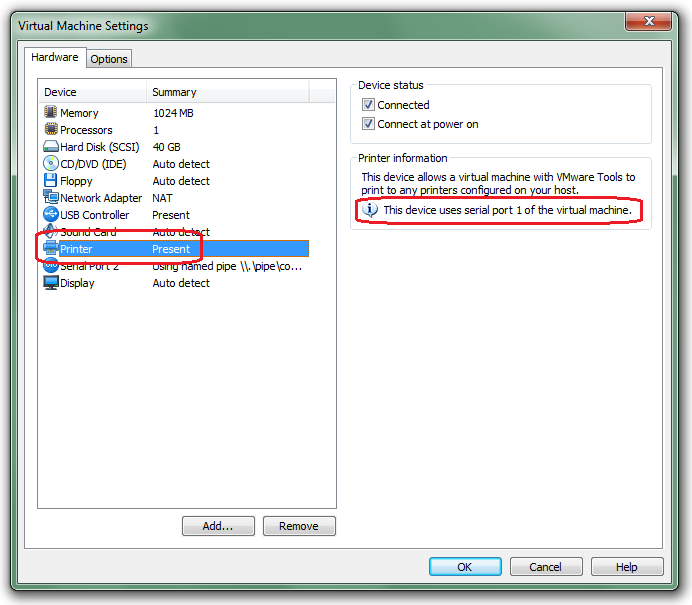
The fact that this printer uses the virtual machine’s COM1 port as a hardware interface caused any new serial port to use COM2, which would be the next free port. Now it became simple to solve.
The Solution
There are two ways to solve this small setback. The first, which in my opinion is simpler and cruder, is to simply remove the printer before adding the serial port that will be used as the debug interface. This will make the first serial port actually be used as a serial port. If you need to use the printer, then add the printer after adding the serial port. This will make the printer use the first available serial port, which in this case is COM2. VMware’s hardware-configuration window should look like the one shown in the figure below.
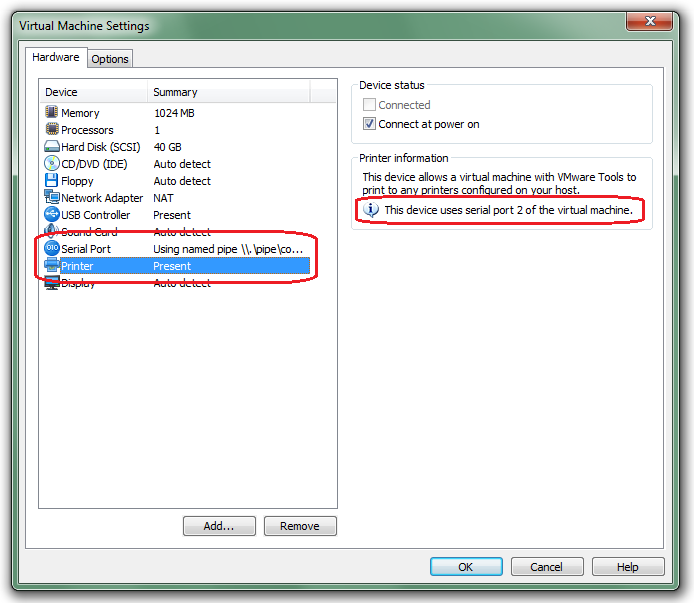
Notice that the serial port’s name no longer carries the number 2, while in the printer’s configuration it says that the port used is serial 2.
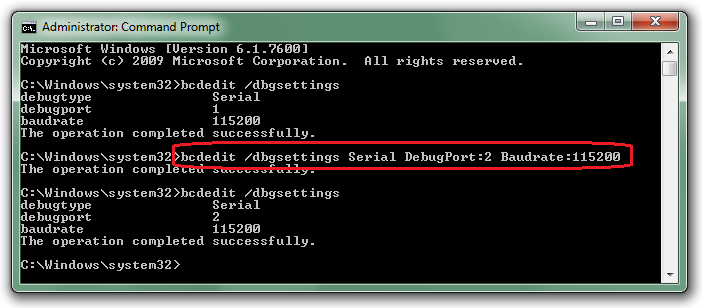
The second solution, as an alternative to the first, is to simply configure the TARGET side so that it uses serial port 2. In the example of the figure below, I change the configuration of a Windows 7 using the BcdEdit tool. I already mentioned this tool in this post, which talks about how to do Kernel debugging through USB ports using Windows Vista.
After everything was solved, the debugger now connects to the TARGET system and now comes the easiest part: debugging the problem. 😉
See you!
Leave a Reply