

I have been following the work of my friend Lesma, who on his blog has described how the boot process turns a bunch of bytes on the hard drive into a living operating system. Hitching a ride on that theme, I will take the opportunity to comment on the load order of drivers during this process. With that I can try to answer a frequent reader question: “How do I make my driver be the first one to be loaded?”. Maybe this post can clear things up a bit in that sense, or maybe not.
Me first! Me first!
An important point to consider in the Legacy model when we write a driver is the one regarding the moment at which your driver is loaded. This is configured in the “Start” value in the driver’s key in the registry. Four values configure the moment your driver is loaded, namely:
- Boot (0) – Drivers are loaded during boot, even before the operating system is completely ready to run.
- System (1) – Drivers are loaded after the boot drivers, when the Kernel is already completely functional.
- Automatic (2) – In this group drivers are loaded when the subsystems are loaded. Basically together with the User Mode services.
- Manual (3) – No automatic loading is performed here; the driver is loaded only when someone, or some component, requests its load.
- Disabled (4) – Even if the driver is requested, its load is denied.
“Well then, for my driver to be the first one loaded it just needs to be started as boot and that’s it?”
Actually, your driver is going to compete for a spot in the queue of drivers that want to be started at boot. Several drivers are configured to be started at that moment and yours will be just one more. Even among the boot drivers, a load order needs to be followed so that certain drivers can rely on the services of other drivers. For that reason, drivers are separated into groups. One group at a time is started until all the boot drivers have gone through this process.
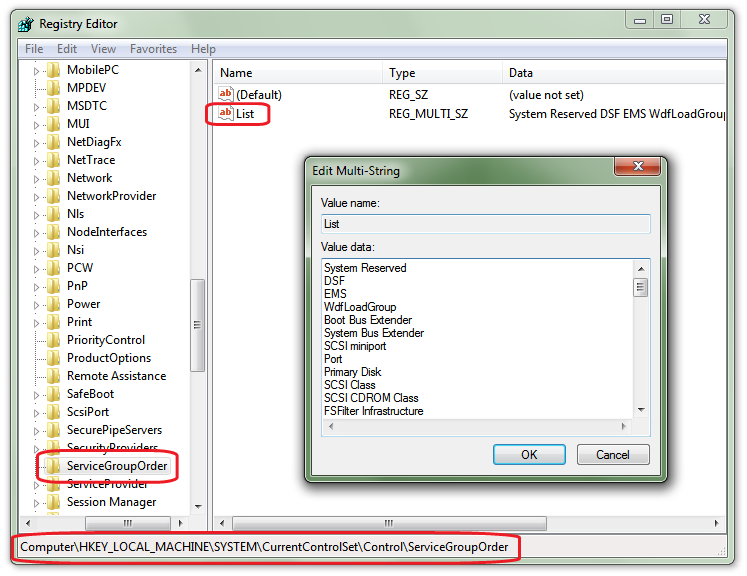
Drivers identify their group by the “Group” value found in their registry key. This key must contain the name of the group the driver belongs to. The names of all the groups can be found in the HKEY_LOCAL_MACHINE\SYSTEM\CurrentControlSet\Control\ServiceGroupOrder key. In it there is a REG_MULTI_SZ value called “List” that contains the list of all existing groups arranged in their load order.
“OK, my driver is configured to be started at Boot and configured to start with the first group of drivers. Ready now?”
Almost. When we talk about starting groups of drivers, it is already implied that more than one driver will be loaded. The order in which those drivers are loaded within each group can also be determined.
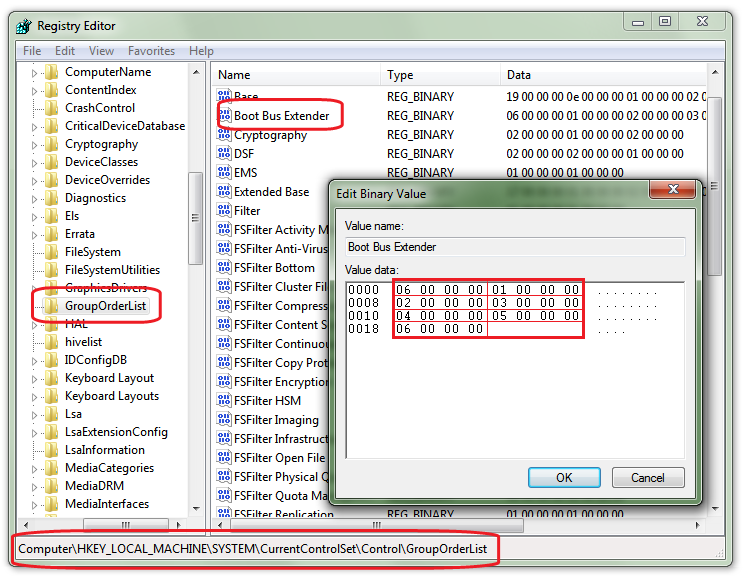
The HKEY_LOCAL_MACHINE\SYSTEM\CurrentControlSet\Control\GroupOrderList key keeps a series of values, each with the name of a group. The value is of type REG_BINARY and its interpretation is an array of sets of four bytes. The first set indicates how many tags are contained in that binary buffer. The remaining sets are the numeric representations of each tag. Thus, the interpretation of the buffer shown in the figure below tells us that we have six tags, namely: 1, 2, 3, 4, 5 and 6.
“But what is a tag?”
A tag is the numeric identification of a driver within a given group. A driver identifies itself by the “Tag” value that we can find in the driver’s key in the registry.
Even though the example shows us an increasing order of tags, the tag value does not determine the drivers’ load order. The order is determined by its position within the binary buffer.
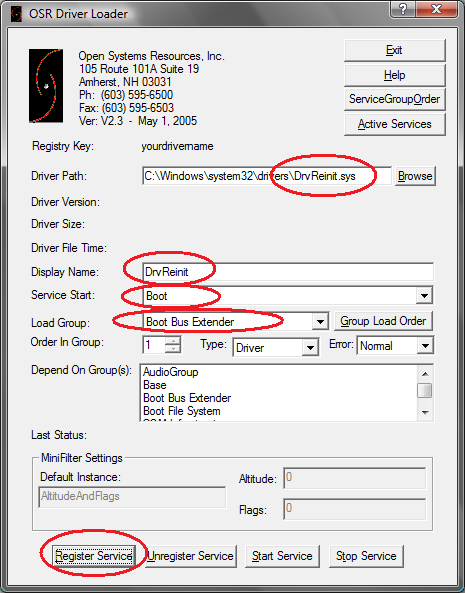
Squeamish about messing with binary buffers? You can use the OSR Driver Loader, which configures all of this for you when used to install a driver.
Putting your tag first in the list of tags ranks its load order within a given group, but it is still not the determining factor for having your driver loaded before every driver in the universe. A new group can always be created and have its load order configured to come before your group.
All these rules about groups, tags and the like make no sense for drivers managed by the Plug-And-Play (Pnp) Manager, since the loading of such drivers is requested when the device your driver is related to is detected by the bus driver.
“Ugh! Fernando, take it easy and try to explain this again.”
Alright, here we go. When you install a Pnp driver, you associate it with a given device. Just as an example, let’s say this device is a USB/Serial converter. Your driver will be loaded automagically when your device is detected and will be unloaded when the device is removed.
For it to be detected, other devices need to be detected first, such as the PCI controller, the USB controller and the USB hub. This dependency list creates the USB device stack.
The PCI controller, when detected, has its driver loaded, and this driver enumerates its child devices, since PCI is a bus. For each detected device, this driver uses the bus to detect the identity of each device and creates a Physical Device Object (PDO) for each of them. The Pnp Manager loads the driver of each device attached to this bus. That driver will create the device’s Functional Device Object (FDO), giving it functionality.
One of these devices is the USB bus controller. Following the ritual, the USB bus driver enumerates its child devices, creating new PDOs. Thus, the USB hubs are detected and their driver will be loaded. This driver will create a new FDO for each hub. The USB hub driver will enumerate its child devices, and it is at that moment that your device is detected. The driver you wrote will be loaded and the Pnp Manager will call your AddDevice routine, which will receive the PDO that the hub driver created for your device.
Phew! Alright, everybody calm down. The Plug-And-Play subject is not the focus of this post and is already on my list of future posts.
All this activity, acting recursively, serves to build the system’s device tree. Knowing that this tree is formed by our drivers and their devices, it becomes explicit here that deep down “we are the trees”. The figure below gives an idea of how the device tree is organized.
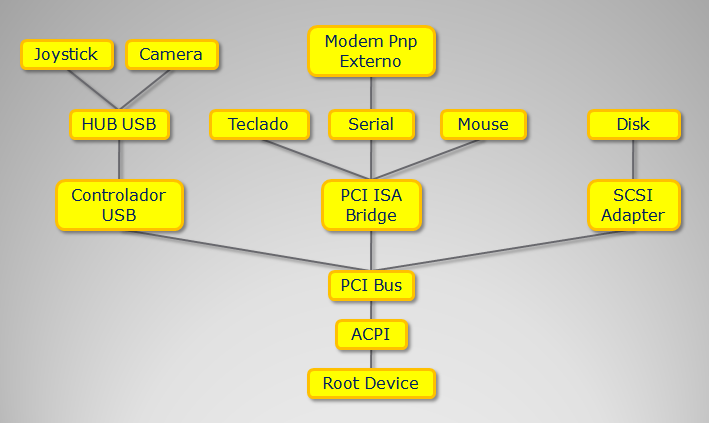
Still speaking about driver load order, it would make no sense to have your driver loaded before all the other drivers, since the basic components for communicating with your device have not been loaded yet, and therefore have no functionality at all. Moreover, having your driver loaded too early will bring you problems dealing with other system components that will not yet be ready to serve your request. More details in this post.
Debugging at Boot
Another curious subject that can cause some confusion is the one regarding debugging drivers that are loaded at boot. Even though the Debug connection uses the serial, firewire or even USB medium, the drivers for these media do not need to be loaded for you to be able to debug the system. In other words, the serial-port driver is not used to debug the system when the serial medium is used. This would be a problem if we consider that some drivers are loaded and started before the serial-port driver. How would these drivers be debugged?
The fact is that the algorithm that deals with the system’s debugging media is defined in the Kernel itself (more precisely in the ntoskrnl.exe module and its siblings). This module deals directly with the hardware responsible for the medium used. This is also the explanation for another frequent question: “My computer does not have a serial port. Can I use a USB/Serial converter on the Target side to debug the system?”. As we have just seen, a USB/Serial converter depends on a whole device stack for the serial port to be available. Such functionality is not implemented in the system’s debug algorithm and, as I commented in this other post, newer systems implement new debugging features in the Kernel.
Even if your driver is a boot driver, it can still be debugged. This other post also shows how to do the mapping of a boot driver through WinDbg. Don’t know what I’m talking about? It is about having your driver replaced by a new version automatically on the target side when it is loaded. It is worth taking a look.
Have fun!
Leave a Reply