Category: Uncategorized

  • Buffered, Direct or Neither

    In the last post I gave a brief introduction about some points regarding virtual memory that I consider to be the most relevant to driver developers. With that small load of knowledge, it will be simpler to explain the differences between the methods of transferring data between applications and drivers, as well as other issues, such as interrupt servicing, memory mapping and execution context.

    If we think in a very simplified way (and I do mean simplified), drivers are basically the modules that extract data from devices and make it available to applications and vice versa. From this point of view, it really does seem that writing drivers is easy. It even looks like a way of doing a memcpy from software to hardware. Today we will see a little about the ways a driver can choose to do this data transfer.

    Using a system Buffer

    The first method is the so-called Buffered I/O. This method uses a system buffer to transfer data between the application and the driver. When an application calls the WriteFile function passing the data to be sent to the driver, the I/O Manager makes a copy of the application’s data into a system buffer. But what is a system buffer? It is an allocation in System Space that was made in Kernel-Mode, and for that reason, is accessible in any process context. We already talked about this in the last post.

    BOOL WINAPI WriteFile(
      __in         HANDLE hFile,
      __in         LPCVOID lpBuffer,
      __in         DWORD nNumberOfBytesToWrite,
      __out_opt    LPDWORD lpNumberOfBytesWritten,
      __inout_opt  LPOVERLAPPED lpOverlapped
    );

    The I/O Manager gets the size of the buffer to be allocated from the nNumberOfBytesToWrite parameter, then performs a non-paged memory allocation and copies the data that is in User Space to System Space. If you are slipping on the terms System Space, User Space and types of memory allocation, take a read of this post so that things become less obscure for you.

    In the driver, the pointer to this buffer is obtained from the IRP and its size is obtained from the IRP’s stack location. Cool, but what is an IRP? Take a look at this mini example below to get an idea, or you can see the example used in this other post that also uses the Buffered method to send and receive strings from an example driver.

    //-f--> Handler routine for IRP_MJ_WRITE.
    //      Example of obtaining the system buffer
    //      allocated by the I/O Manager in the Buffered method
     
    NTSTATUS
    OnDispatchWrite(__in PDEVICE_OBJECT pDeviceObj,
                    __in PIRP           pIrp)
    {
        PIO_STACK_LOCATION  pStack;
        PVOID               pBuffer;
        ULONG               ulLength;
     
        //-f--> Gets the current stack location of the IRP
        pStack = IoGetCurrentIrpStackLocation();
     
        //-f--> Here we get the pointer to the buffer
        pBuffer = pIrp->AssociatedIrp.SystemBuffer;
     
        //-f--> Here the size of the buffer
        ulLength = pStack->Parameters.Write.Length;
     
        ...
    }

    In read operations, the method is very similar, but although in this case the I/O Manager also makes the allocation in non-paged memory, it does not make any copy into the system buffer. The system buffer is received by the driver also through pIrp->AssociatedIrp.SystemBuffer, but its size is obtained from pStack->Parameters.Read.Length. The driver will fill the buffer with the data coming from the device, and the I/O Manager will copy the buffer from System Space to User Space when the IRP is completed, filling the application’s buffer.

    Whoa, whoa! As far as I know, drivers normally complete IRPs in an arbitrary context, which means “only God knows in which process context”. It is fine if the driver writes to a system buffer, which is valid for any process, but the application’s buffer is in User Space and is only accessible in the context of its own process. How would the I/O Manager copy the system buffer to the application buffer in an arbitrary context? Wow, that really was an excellent question. I do not think even I would have imagined such a good question. IRPs can be handled both synchronously and asynchronously. The I/O Manager knows how the IRP was processed, and in the synchronous case, the I/O Manager is already in the context of the process that made the request, and in this case it has access to both buffers, since the I/O Manager runs in Kernel-Mode. When the IRP is handled asynchronously, the I/O Manager queues an APC (Asynchronous Procedure Call), which is an asynchronous call executed in the context of a given thread. That thread is precisely the thread that started the operation, and which therefore will be in the right process context to access the application’s User Space.

    BOOL WINAPI ReadFile(
      __in         HANDLE hFile,
      __out        LPVOID lpBuffer,
      __in         DWORD nNumberOfBytesToRead,
      __out_opt    LPDWORD lpNumberOfBytesRead,
      __inout_opt  LPOVERLAPPED lpOverlapped
    );

    In the call to the ReadFile function, the nNumberOfBytesToRead parameter indicates the size of the buffer that the application is offering to the driver. The driver receives this value as the maximum number of bytes that can be returned to the application. Assuming the application has offered 1000 bytes, the I/O Manager allocates 1000 bytes and passes the buffer to the driver. Let us suppose the driver has only 500 bytes to return to the application; in this case, the I/O Manager will have to copy to the application buffer only 500 of the 1000 allocated bytes. The I/O Manager receives this value through the pIrp->IoStatus.Information field, which is filled in by the driver before the IRP is completed. This way, the I/O Manager copies only the valid bytes from the system buffer to the application buffer. This same value is returned to the application through the lpNumberOfBytesRead parameter.

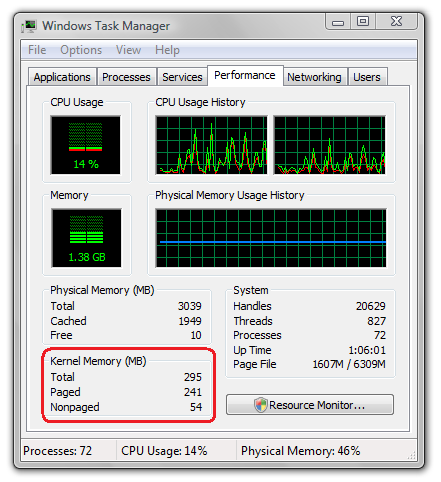
    Using non-paged memory to hold the system buffer assures us that the pages will not be removed from RAM by paging. This allows the page to be accessed even from threads running at a high priority level. However, the Buffered method is indicated only for small data movements. Imagine that an application wants to write 10 MB all at once. The I/O Manager would have to make a System Space allocation of 10 MB of non-paged memory, which would not be at all appropriate, since non-paged memory is a scarce resource. If the I/O Manager manages to make the allocation, it will still have to make a 10 MB copy from the application buffer to the system buffer. This would even work, but we would have serious performance problems. In this case, the most appropriate thing would be to use the method seen next.

    Locking the Application’s memory

    In the method called Direct I/O, as the name already suggests, the driver accesses the application’s memory pages directly without using an intermediate buffer. This way, the I/O Manager does not make an allocation in non-paged memory and also does not have to do the BPL-BPC (Buffer over there – Buffer over here). Instead, the I/O Manager tests the memory pages that make up the buffer offered by the application, creates an MDL and locks the memory pages in RAM. Whoa! Hold on there my friend, let us go slowly!

    • Tests the memory pages – Nothing stops a programmer from doing something silly. An invalid buffer may be passed to the I/O Manager. It could be that the buffer was not allocated, or that the buffer is smaller than the value indicated in the call to the ReadFile or WriteFile functions; it could also be that the memory pages offered to ReadFile are protected against writing, or that some of the pages used by the buffer have been paged out to disk. If a driver tries to access an invalid or protected page, an exception is generated and a blue screen will emerge from the darkness. But how is the I/O Manager going to test the memory? If the buffer is passed as a parameter to the ReadFile function, then the driver will perform writes to this buffer. To save time, the I/O Manager will write one byte to each RAM page just to test access to them. This write is done under an exception handler. If the buffer is invalid or protected, the exception handler will handle it and return an error to the application. If the buffer is passed to the WriteFile function, then the buffer will be read by the driver, and in this case, the test would be reading one byte from each page.

    • Creates an MDL – An MDL (Memory Descriptor List) is a data structure that describes the various memory pages that make up a buffer. These pages are the same physical pages used by the application, that is, when the driver writes to these pages, it will already be writing directly to the application’s buffer. So the I/O Manager will not need to do any BPL-BPC.

    • Locks the pages in RAM – This step makes the memory pages that compose the application’s buffer become non-pageable. This way, they can be accessed by the driver in threads that are running at a high priority level.

    After all this ritual, the driver now receives the buffer through pIrp->MdlAddress, but what we will have here is a pointer to an MDL. But what do I do with an MDL? Most of the time, you will pass it as an argument to a service offered by another driver or system component. Some examples are DMA (Direct Memory Access) drivers that use an MDL in the call to the MapTransfer function, or even when an MDL is passed on to USB (Universal Serial Bus) controller routines, such as UsbBuildInterruptOrBulkTransferRequest. MDLs are opaque structures, but if you want to have access to the application’s buffer, then we must call the MmGetSystemAddressForMdlSafe function to get the address of the buffer to be written/read. Note that the address returned by this function is in System Space, and thus, accessible in any process context. But is not the application buffer in User Space? Yes, but what we have here is a physical memory page being mapped both to the application’s address space and to the system address space.

    The size of the buffer described by the MDL is also obtained from the IRP’s stack location, just as in the Buffered method.

    Neither Buffered I/O nor Direct I/O

    The third method is simply not using the first two. In the method called Neither, the I/O Manager does not make a copy into a system buffer nor build an MDL to describe the application’s buffer. When the IRP reaches your driver, you have access to the virtual address of the buffer offered by the application through pIrp->UserBuffer. This address points to User Space, and for that reason, remember that this address is only valid in the context of the process that requested the I/O. The use of this method requires more care, because your driver needs to be the first driver in the device stack, and thus, ensure that the IRP reaches your driver in the context of the process that made the I/O request.

    You can check whether you are in the context of the process that requested the operation by doing the test below.

    /****
    ***     EstouNoContextoDoProcessoQueGerouEssaIrp
    **
    **      Function with a ridiculous name that checks whether
    **      we are in the context of the process that generated
    **      the IRP passed as a parameter.
    */
     
    BOOLEAN EstouNoContextoDoProcessoQueGerouEssaIrp(__in PIRP pIrp)
    {
        PETHREAD    pEThread;
        PEPROCESS   pEProcess;
     
        //-f--> Gets the thread that generated the IRP
        pEThread = pIrp->Tail.Overlay.Thread;
     
        //-f--> Gets the process the thread belongs to
        pEProcess = IoThreadToProcess(pEThread);
     
        //-f--> Here we compare the current process with
        //      the process that generated the IRP
        return (PsGetCurrentProcess() == pEProcess);
    }

    The fact of being in the correct process context does not guarantee that the buffer passed as a parameter is valid. Unlike the Direct method, at this point the I/O Manager did not test the buffer before passing the IRP to the driver. We will have to do this ourselves. Remember that, just as in User-Mode, when accessing an invalid buffer the driver will receive an exception that must be handled, otherwise, all blue.

    To perform the test, we will have to access one byte of each page of the buffer that was passed to us and check whether the world ends. The ProbeForRead and ProbeForWrite routines do this for us, but they must be called inside an exception handler. It is worth remembering that in a read operation, the application sends us a buffer where the driver will write data for the application. Since the driver will perform a write to this buffer, we will have to perform a write test (ProbeForWrite) in read operations (ReadFile). Analogously, the driver must perform a read test (ProbeForRead) in write operations (WriteFile). Take a look at the example read routine that follows below. As you should already be used to, read the comments that complement the text.

    /****
    ***     OnDispatchRead
    **
    **      Another function with a silly little example name.
    **      Validates the buffer sent by the application through
    **      the Neither method and writes a numeric sequence
    **      into the application's buffer.
    */
     
    NTSTATUS OnDispatchRead(__in PDEVICE_OBJECT pDeviceObj,
                            __in PIRP           pIrp)
    {
        PIO_STACK_LOCATION  pStack;
        PVOID               pBuffer;
        ULONG               ulLength;
     
        //-f--> Checks whether we are in the context of the process
        //      that generated this IRP
        if (!EstouNoContextoDoProcessoQueGerouEssaIrp(pIrp))
        {
            //-f--> Signals to the I/O Manager that the house fell down
            pIrp->IoStatus.Status = STATUS_INVALID_PARAMETER;
            pIrp->IoStatus.Information = 0;
     
            //-f--> Completes the IRP with failure
            IoCompleteRequest(pIrp, IO_NO_INCREMENT);
            return STATUS_INVALID_PARAMETER;
        }
     
        //-f--> Gets the current stack location
        pStack = IoGetCurrentIrpStackLocation(pIrp);
     
        //-f--> Here we get the address of the buffer offered
        //      by the application as well as its size.
        //      Note that this buffer must be in User Space
        pBuffer = pIrp->UserBuffer;
        ulLength = pStack->Parameters.Read.Length;
     
        //-f--> The functions that test the buffer throw exceptions
        //      if the buffer is invalid. That is why we have
        //      to do the test inside an exception handler
        __try
        {
            //-f--> If you take a look at the reference, you will see that
            //      this routine returns VOID, so the only
            //      way to know whether the buffer is invalid is
            //      by handling the exception that will be generated.
            ProbeForWrite(pBuffer,
                          ulLength,
                          1);
        }
        __except(EXCEPTION_EXECUTE_HANDLER)
        {
            NTSTATUS    nts;
     
            //-f--> Oops! Invalid buffer.
            //      Let us get the exception code and put an
            //      end to this suffering
            nts = GetExceptionCode();
     
            pIrp->IoStatus.Status = nts;
            pIrp->IoStatus.Information = 0;
            IoCompleteRequest(pIrp, IO_NO_INCREMENT);
            return nts;
        }
     
        //-f--> Here we know the buffer is safe to receive
        //      writes. Let us just write a numeric sequence
        //      just to...
        for (ULONG i = 0; i < ulLength, i++)
            ((PUCHAR)pBuffer)[i] = (UCHAR)i;
     
        //-f--> Here we report that the operation was carried out
        //      successfully.
        pIrp->IoStatus.Status = STATUS_SUCCESS;
     
        //-f--> Even though in the Neither method the I/O Manager does not
        //      use this number to do BPL-BPC, this
        //      number is still returned by the ReadFile function
        //      to tell the application how many bytes of the buffer
        //      are valid for the application to read.
        pIrp->IoStatus.Information = ulLength;
     
        //-f--> Gives the IRP a Fatality
        IoCompleteRequest(pIrp, IO_NO_INCREMENT);
        return STATUS_SUCCESS;
    }

    For all the methods, it is important to note that setting the pIrp->IoStatus.Information field tells the application how many bytes were read or written in the buffer, regardless of whether or not there is a system buffer copy as in the case of the Buffered method.

    Another thing that will not change for the different methods is obtaining the size of the buffer offered by the application. This value always comes through the stack location, as already seen in the methods already discussed.

    How to select the method

    It makes total sense for the choice of method to be made before the first IRP reaches the driver. This is done right after the device is created. After the call to the IoCreateDevice function finishes, we receive the new device through an output pointer. The Flags member of the DEVICE_OBJECT structure is a bit mask and the DO_BUFFERED_IO and DO_DIRECT_IO bits configure the transfer method.

    So it is that easy. To configure the Buffered method, we set the DO_BUFFERED_IO bit; to configure the Direct method, we set the DO_DIRECT_IO bit; and finally to set the Neither method, we do not set either of these bits. I have read in some book, which I cannot find now, that the behavior is undefined if you set both bits.

    Here is another silly little example of how to set the device that has just been created for transfers in the Buffered method.

        //-f--> Creates the device that will receive the IRPs
        nts = IoCreateDevice(pDriverObj,
                             0,
                             &usDeviceName,
                             FILE_DEVICE_UNKNOWN,
                             0,
                             FALSE,
                             &pDeviceObj);
     
        //-f--> Checks whether the device was created
        if (!NT_SUCCESS(nts))
            return nts;
     
        //-f--> Here we can already configure the desired
        //      transfer method, which in this
        //      example is Buffered I/O
        pDeviceObj->Flags |= DO_BUFFERED_IO;

    But what if an IRP is delivered to the driver before we set these bits? Another excellent question. Things happen like this. Whenever a new device is created, the DO_DEVICE_INITIALIZING bit is set. IRPs only start being delivered to this device when the driver clears this bit. This allows us to initialize the device before any IRP arrives.

    Nice try, smart guy, but your example does not clear this bit. How do you explain that? You are impossible today! At the end of the DriverEntry routine, when control returns to the I/O Manager, it scans the list of devices created by the driver and clears this bit for us. It is important to remember that we still need to clear this bit when we create a new device after the DriverEntry routine has finished. A very common example is WDM devices, which are created in the AddDevice routine, but that will be for another time. This post has already gotten very long.

    See you! 🙂
  • A Pinch of Virtual Memory

    Now let us cut the small talk and get straight to what matters. The example I described in another post shows how to implement a very simple driver that stores a list of strings that are sent to the driver through write operations (WriteFile), and the same strings are returned in subsequent read operations (ReadFile). This is a good example of how application data goes to the drivers and vice versa. There are three ways to access the data offered by applications from within a driver. In this post we are going to take a little look at virtual memory so that we can have a basis for future posts, where I will be able to explain the differences between those three ways. We are going to stick to just a few basic characteristics of virtual memory so that the things I will explain next make more sense to you, but if you want more details about Virtual Memory, you can read Chapter 7, “Memory Management”, of Windows Internals, or take a little look at a presentation made by my friend Strauss.

    What is a memory page

    A memory page is a unit used by the hardware in memory-access protections. More about memory page protections here. This is a hardware-defined unit that helps to subdivide memory into smaller, manageable spaces. Although there are two page sizes (a small one of 4KB, and a large one of 4MB), every reference to the page size seen in the documentation refers only to the small pages. The memory page size varies with the hardware platform. On x86 and x64 systems the pages are 4KB, whereas on IA64 systems the page is 8KB. The page size can be obtained through the PAGE_SIZE constant.

    Address space

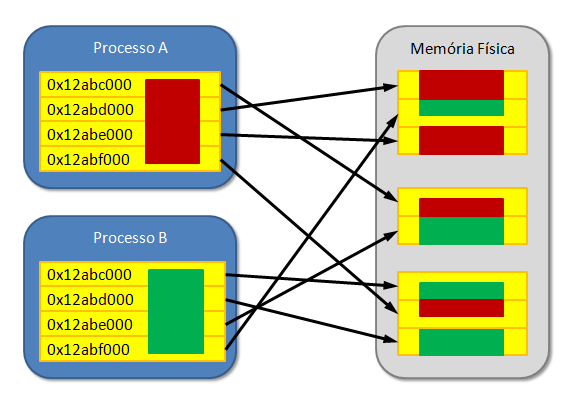
    In a very brief way, virtual memory is a mechanism that, in a joint effort between hardware and software, allows processes running on Windows to have their own address space. Address who? The address space, or Address Space as we usually see it in the reference, allows each process to have a private view of the memory it is using. That is, a process cannot read or write to another process’s memory pages. This prevents a badly written program from erroneously writing to another process’s memory pages, or even to operating-system pages, thus compromising the stability of the whole system. Therefore, we can assume that a process’s address space is only accessible by the process to which it belongs.

    Note: It is possible to share memory between processes, but even in this case, the same physical memory page is referenced by two or more different address spaces.

    Virtual Memory and Physical Memory

    Right after the discovery of fire, memory was addressed directly in real mode. This means that a pointer used by an application accessed the data exactly where it was physically located on the RAM memory chips. Virtual memory pages associated with processes reflect physical memory pages through virtual addressing. The bits that make up the virtual address map the physical memory you want to access. When dereferencing a pointer that contains a virtual address, the processor, transparently to the process, consults structures filled in by the operating system in order to translate the virtual address into a real one, and this way, finds the physical page where the data actually is.


    The arrangement of virtual memory pages has no relation to their physical arrangement. This means that when you make a large memory allocation, which is composed of several memory pages, you get a pointer that, from the application’s point of view, points to memory pages that are linearly distributed (one after the other), whereas the physical memory pages may be scattered all over the RAM chips.

    Memory might not be in RAM

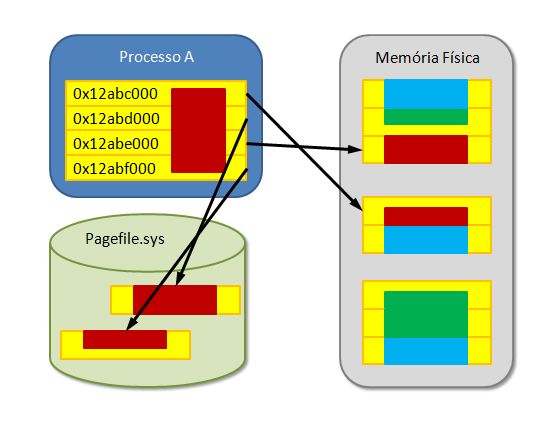
    The memory used by applications is not limited to the amount of memory offered by the RAM chips installed on your motherboard. As processes, increasingly hungry for memory, are executed, the available space in RAM gets shared among the various processes. Memory pages accessed less frequently are removed from the RAM chips and go to disk (to the Pagefile.sys to be more precise), making room for another memory page that is needed at that moment. This process is called paging. When the application finally accesses the data that is on that page now on disk, the system allocates space in physical RAM to bring the page back from disk to RAM. This may result in other pages that were in RAM being paged out to disk.


    For applications, the paging process is completely transparent. The developer is not the least bit worried about whether the region of memory the program is going to access is on disk or in RAM. You just access the data and the processor, together with the memory manager, sorts this out for you. Unfortunately, the story is not so rosy for driver developers. Applications always run at a low thread priority (PASSIVE_LEVEL), and when accessing data that is on a page on disk, the thread is interrupted by the memory manager so that it has the opportunity to trigger the File System drivers and consequently the disk drivers, wait for the I/O to be performed (even though it takes a gazillionth of a second, we still have to wait), and then the thread is released. Although there are people who do not believe in these things, the NT platform is completely preemptive. This means that a thread can be interrupted by another one of higher priority. In Kernel Mode, a thread can be at priorities higher than APC_LEVEL, which is the priority at which paging is performed. If the thread that is going to access the data is at a very high priority level (greater than or equal to DISPATCH_LEVEL), the processor will not be able to do the paging and a blue screen will bloom before your eyes. A typical example of high-priority execution is interrupt handling, but let us not stray from the subject.

    A page can be accessed not only by software, but also by hardware. Huh? An application can pass the pointer of a memory region to a driver, which in turn will use a DMA channel to fill this buffer. Copying a buffer through the DMA process does not use CPU cycles to be performed. Filling a buffer is something so simple that even a chimpanzee can do it. So a group of chimpanzee engineers created a chip that does this, but that is beside the point now. This chip may be on the motherboard or on the very board controlled by the driver. The chip is programmed by the driver and a transfer is started. During the copy, neither the application, nor the operating system, nor even the processor are aware of what is happening. The system may then determine that the pages used in the transfer, which are not being accessed by any process, should be paged out to disk. If that happens, the DMA chip will keep transferring bytes to that physical RAM address and… Well, you know, right? To avoid this, there are ways to warn the memory manager that one or more pages must not be paged.

    During the development of a driver, you may want to allocate a buffer that will be used by an ISR (Interrupt Service Routine). Since an ISR runs at high priority, we can make a memory allocation requesting a buffer that is not pageable, and thus ensure that the buffer obtained by this allocation is always in RAM. But take it easy: non-pageable memory is a scarce resource and must be used sparingly. Otherwise, some operations will stop being performed by the system due to lack of RAM, even if there is still plenty of pageable memory available.


    User Space and System Space

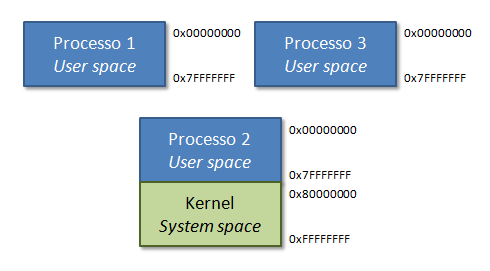
    Taking a 32-bit system as an example, a pointer is capable of addressing 4 GB of memory. Of these, 2 GB are reserved for addressing private pages for each process, that is, they will make up the private address space of each application. This range, which goes from 0x00000000 to 0x7FFFFFFF, is called User Space and these are the addresses that applications access in User Mode. As we saw, this range makes up the private address space of a process, protected against improper access by other processes. An example would be: Only the threads of Process A will have access to the User Space of Process A. The same address points to different physical RAM pages in different processes, depending on the context of the process making the access. The other remaining 2 GB of the 32-bit addressing are reserved for addressing system pages. The address range from 0x80000000 to 0xFFFFFFFF defines the so-called System Space, which, unlike User Space, addresses memory pages that are not private to a given process. This means that the same data (on the same physical page) can be accessed through the same virtual address in different processes. Data in System Space can be accessed only in Kernel Mode, whereas data in User Space can be accessed both in Kernel Mode and in User Mode.


    Good grief! Was that a machine gun of concepts? If you show symptoms of blurred vision or vomiting followed by diarrhea and trembling, quit being a wimp and get ready for the next posts. In case you have not shown any of these symptoms, do not worry, for some people the process takes longer. In future posts I will explain how drivers access the virtual addresses offered by applications, how they deal with memory paging, and even test buffers offered by applications. A badly written driver can allow an invalid parameter in an application to cause a blue screen.

    That is enough for today, but it is worth remembering that what was presented here is just the tip of the iceberg. This little tip is what I believe to be the most relevant for driver development, but there are still tons of details regarding virtual memory.

    Have fun! 🙂
  • Recife Office

    Can a person work on the other side of the country and still teach a Windows Drivers course? The answer to that question is: “It depends on whether that person is Home enough for it”. The fact of having been given the opportunity to work from home opened up to me the great flexibility of being able to work away from home. Working over the Internet does not necessarily mean working at home.

    I was invited to teach the Drivers course at a study center located in Recife – PE. I could never accept an invitation like that under normal conditions of temperature and pressure, since I work regularly at a company in São Paulo, and as if that were not enough, I am still finishing my degree in Computer Engineering in the evening. But now that I have gone Home, things are different. Taking advantage of the university holiday period, I went to do my Home Office in Recife and teach the course during the evening.

    A multinational company in the electronics sector hired the services of this study center for the development and maintenance of the drivers that would communicate via USB with cell phones. The original driver was written by none other than Walter Oney. I was given the mission of teaching the path to blue screens to this group of 10 students, my largest class so far. How many people who work with drivers do you know? The number of students was not a problem at any moment; I thought it would be harder to manage. All of them interested, hard-working and eager to learn. What was really hard was having to spend two whole weeks staying at a seaside Hotel on Boa Viagem beach and not being able to take a single dip (the first photo in this post was taken from the hotel window). One of the reasons is the constant presence of sharks on the beaches of Pernambuco, with a few exceptions. Another factor was the workload that was adopted. A basic drivers course is normally taught in 40 hours, which is perfect for two weeks, being 10 classes of 4 hours. But in this case there was a need for a specialization in USB devices. That took us two Saturdays, half a Sunday and a lot of energy. A three-week course was given in two. I do not know whether it was the most productive, but my schedule did not allow me the luxury of resting on weekends.

    A frequent question on my blog is “When will the next class be formed?”. At the beginning of this year I imagined I could put together an open class during the holiday period, but the rush that came right afterward, made worse by my trip, did not allow me to get organized regarding infrastructure and publicity. The course for this holiday would not have existed, but in the case of Recife, there was already a closed class and the availability of the resources they offered. The question still persists, and the answer now is going to be that I am getting organized to put together an open class for the beginning of January. Obviously I will publish any news regarding this here on the blog, but I would like to already have a notion of the resources I will have to set aside for it. So, if you are interested in taking part in this class, send me a no-obligation e-mail or leave a comment on this post. My e-mail address that nobody can find is on the page pointed to by this link, which is my blogger profile page.

    See you…

  • Now That I Work From Home

    Out of the blue my manager calls me and asks – “You are Home, right?”. I felt a bit awkward in that situation, but what could I do? I had to answer that question. “Look, I am not completely yet, but I am interested in becoming one”, I replied. “Then fill out the forms and I will approve them”. That is basically how I became Home Office.

    As a regular employee, I still had the right to do Home Office 2 days a week. At first comes a feeling of guilt. You cannot just accept, right off the bat, that I will not have to get up at half past five in the morning and face almost two hours of traffic to leave Santo André, take Avenida dos Estados and finally reach the building where I work. I confess that not leaving home so early and sitting down in front of the company notebook wearing a hoodie causes a certain discomfort at first. It gives the impression that we are not working, that we are doing something wrong.

    After the feeling of guilt comes the slacking off. To this day I still get up early to take my wife to the train station, which is exactly 7 minutes from my house. In the first weeks, I would go back to bed and get some more sleep until nine in the morning. I have even managed to arrive at work 30 minutes late while being only twenty meters from it. Having breakfast in front of the notebook became routine. But that passed. I think that as time went by, the body and mind get more rested, until a point where you no longer feel like going back to bed. Besides, I still have a reasonable list of books to read. The time I used to spend in traffic, I now spend reading, and that is working out really well.

    My neighbors must now think that I got laid off and that I am supported by my wife. There is someone who, besides cleaning my house, prepares my lunch. That way, I can have lunch in 15 minutes and I am not going to run back to the notebook afterward. I need to do my photosynthesis. For that I go have an espresso at a bakery that is waaaaaay up there and take the chance to soak up some sun walking to the bakery. Having a scheduled time to catch some sun even sounds like a prisoner’s routine. Sometimes I take my dogs for a walk during my lunch break. I do not blame my neighbors. What would you think if you saw a person of about thirty years of age, with a few days’ beard on his face, walking dogs at noon? “That guy walks dogs so he can get money for booze”.

    Well, I really am drooling and shuffling around in the eyes of the neighbors. What is complicated is what your relatives think of you. To get coffee, I pass in front of an aunt’s house. You know that aunt for whom all she managed to understand about what you do is that you work with computers, she is just not sure whether it is cleaning them or selling them. On one of those trips back and forth for coffee, I ended up running into her. “Hey Fernando, are you off today?” – she asks. “No, auntie, I work from home now” – I answer all pleased, but looking at her expression, you can just imagine the gears turning in her head – “Oh, poor thing, he must be doing one of those side gigs like Work from home, ask me how.

    Harder than convincing yourself that you can work from home is convincing others that you are working from home. Back when I did Home Office only 2 times a week, my wife always asked me – “Are you going to work tomorrow?”, as if I did not work at home. My brother once told me, ” …but aren’t you going to be home tomorrow? So, I will drop by and we will go look at that car part”.

    Working from home requires discipline; although I can make my own schedule, I prefer to have a fixed time to have lunch, and to start and stop working. I am not just talking about working less. Working too much is a bigger risk. You are already there with a tough nut to crack, just one last test to go, which has been the last one for about 5 tests now, you do not have to deal with traffic, you are already in the comfort of your home, and by the time you notice it is already nine at night.

    Nothing changes for the company?

    I work on a global team. Some here, others in the United States and India. The development team’s manager is in another hemisphere. Do you really think this is going to make any difference to him? Even when I was working in the building, all I needed was a network port. Even though I have a notebook, it is used to open a remote session on one of the machines that serve the external labs (Brazil and India). The test machines are virtual for the most part; the real ones are also accessed remotely. All the meetings are held via Web Conference. Your extension is forwarded to a VOIP tool on the notebook. You dial an extension to talk to someone on the other side of the planet. All through a network port.

    When you become Home Office, the company gives you a reimbursement limit to buy furniture, a phone and phone bill, broadband Internet, a printer and office supplies. Obviously everything has to be returned when you stop being Home Office. Fortunately my house already had all the necessary requirements, and so, I will not end up using a desk or a chair that are not even mine. The good thing about that is that I can replace them whenever I want.

    What will mainly change for the company is that now they will have one more free cubicle. A company this size does not fit in the buildings where we are (that is right, plural). The company encourages Home Office. One of the clauses of the transition to Home Office is that you must remain in this condition for at least one year. I got worried when I read that part, so I went to ask the people who were already Home Office what I was not managing to read between the lines. What happens is that at the company I work for, the vast majority of the employees are salespeople. A salesperson is the extroverted type of professional, who talks a lot and greatly values contact with people. For that kind of person, being cloistered inside the house is death. So much so that many people who are Home Office leave their houses to fight tooth and nail over empty cubicles back at the building. My own wife, if she stayed at home, would go crazy biting the arm of the sofa in less than a month.

    Yeah, there are people and there are people. As you have probably noticed, I am a software developer. I am the type of person who prefers to have their own time to do things; I like having my space. I am not saying that I am allergic to people and that I walk around with a paper bag stuck over my head. I am just saying that I do not mind working alone at home, listening to my favorite music while I do everything over the internet. In fact, that gives me a hook to talk about a book I read and that I imagined I would never have the opportunity to comment about on this technical blog. This book talks precisely about the differences between extroverted and introverted people. It explains that although 75% of people are extroverted, there is nothing wrong with being introverted. The book explains that introverted people do have their advantages. They concentrate more easily. They know fewer subjects, but in more depth. They have fewer friends, but the friendships are more intense. I found the book interesting, with its statistics and reasoning to explain the why behind people’s behavior.

    I still have not said everything I could say about my transition to Home Office, but this post is already getting far too long for an Off Topic.
    See you…

  • Step into Kernel (Firewire)

    I know! Your test computer does not have a serial port and you need to do Kernel debugging on it. I believe that, after the serial port, the most widely used way to debug the Windows Kernel is by using a firewire interface. There is still the option of doing Kernel debugging over USB 2.0, but that is still for the few, since besides only being supported on Windows Vista, you also need a special cable. The details about Kernel debugging over the USB port can be found in this post. Today the story is a different one.

    But I do not have a firewire port

    Stop being such a crybaby. What matters here is not whether or not you have a firewire port on your development machine, but rather the fact that the client’s machine has a firewire port. You know very well that, by Murphy’s Law, that problem you did not even know existed only ever happens on the machine that has no serial ports. So you had better be prepared to run into this kind of thing. It really does happen. Your complaint could also be a different one: “But I do not have a serial port”. Some notebooks that have no serial ports offer firewire ports, but regardless of that, there are both PCI and PCMCIA cards capable of providing the IEEE 1394 interface. This way, whether your machine is a desktop or a notebook, there are ways for them to gain firewire ports.

    Configuring the TARGET side

    If you still do not know what the HOST/TARGET side means and are completely lost on the subject, read this introductory post before continuing. Configuring the TARGET side is not very different from what we have already seen in other posts in this series. We can edit the boot.ini file, as we already saw in this post, to add the following debug settings.

    [boot loader]
    timeout=10
    default=multi(0)disk(0)rdisk(0)partition(1)\WINDOWS
    [operating systems]
    multi(0)disk(0)<<...>>/fastdetect /debugport=1394 /channel=44
    multi(0)disk(0)<<...>>/fastdetect

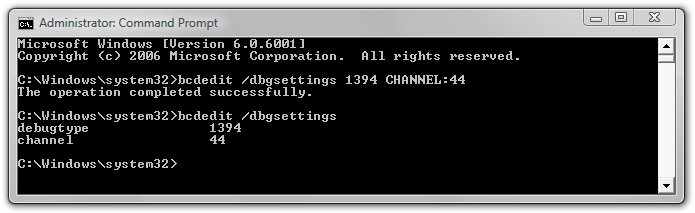
    The channel number to be used can be any value, but the value must be the same on both the TARGET and HOST sides. In case you are trying to debug a Windows Vista, the method for configuring these same things changed a little, as we saw in this other post. The figure below shows the steps to set the system configuration mode for the IEEE 1394 interface.

    Remember that here we are only configuring the way in which the system would be debugged in case a debug entry exists in the machine’s boot list. This post shows the details of how to create an additional entry in this list and configure it for debugging.


    That is it? It did not even hurt!

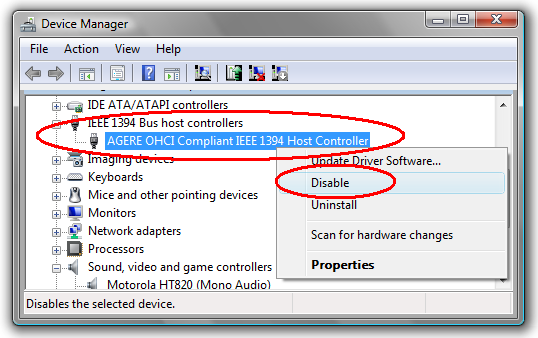
    To do Kernel Debugging using a firewire cable, both machines must be running Windows XP or higher, not necessarily the same version on both sides. There is a particularity regarding the use of systems earlier than Windows XP SP2 or Windows 2003 Server without a service pack on the TARGET side of the story, as this page reports. For these systems, you must disable the 1394 bus controller. This is necessary because Windows, which is being debugged unwittingly, may try to talk to the Firewire interface during the debug, and that can cause the connection to the debugger to drop. To disable this interface on the systems mentioned above, you simply select the “Disable” item in the context menu that appears when you right-click on the firewire controller.

    Can I disable the Firewire controller regardless of the Windows version? No. If you disable the controller on systems later than those mentioned above, you may not be able to debug the system when it switches between the system power states. Power states? Are you talking about the computer’s aura? Suppose you want to debug your driver during the system power transitions, which are managed by the Power Manager. The Power Manager determines which bus can be turned off to save energy. So the system may decide to turn off the firewire interface during your debugging of some driver, and that way you will not be able to follow the power-management IRPs arriving at your driver.

    Configuring the HOST side

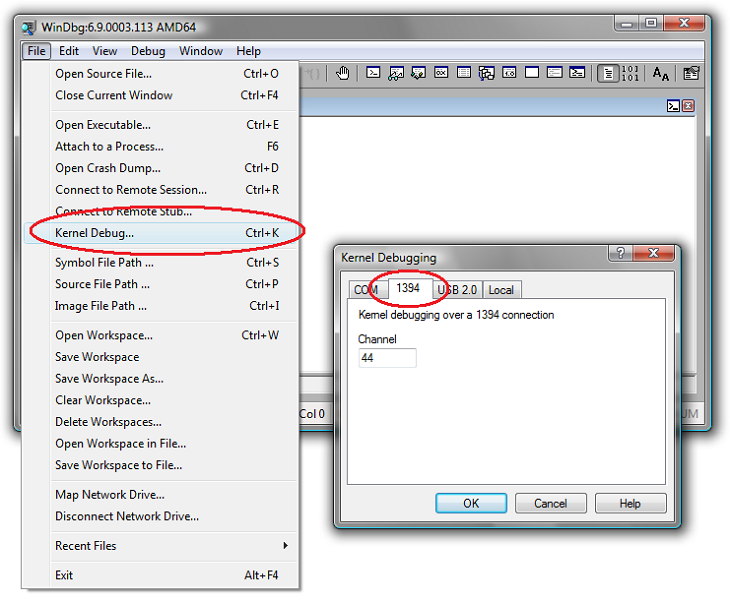
    Normally, to start a debug session on the HOST side, you just open WinDbg, select the “Kernel Debug…” item from the File menu, click on the 1394 tab, fill in the channel number you want to use, click OK as shown in the figure below, and run for a hug.


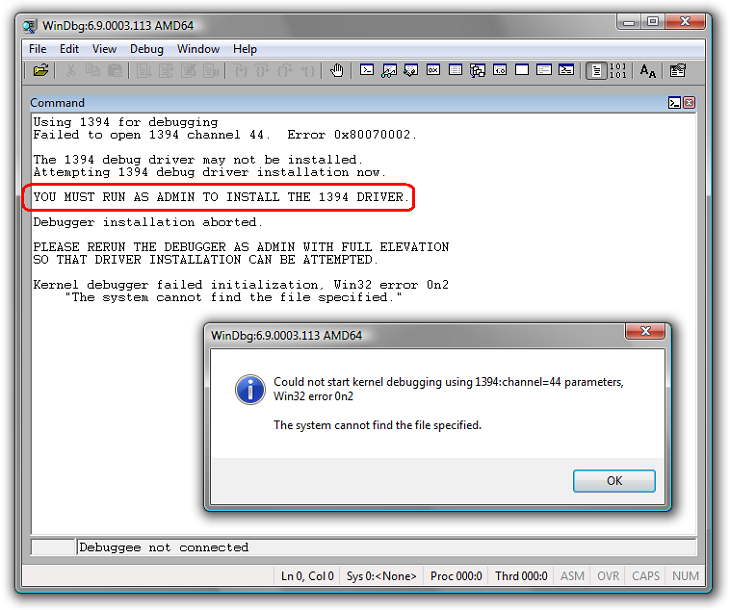
    Everything I have just described still holds, but in order to be able to use firewire on the HOST side, WinDbg needs to install the virtual drivers for accessing the IEEE 1394 bus, as shown on this page. WinDbg does this automagically when you select the options above, but the drivers can only be installed if you are logged in as the system administrator. Otherwise you will receive the following message.


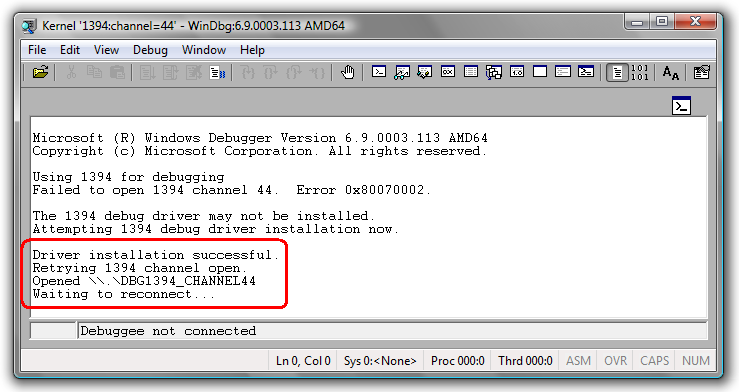
    Come on, Fernando, I am a driver developer! Do you really think I am not the administrator of my own machine? All right, you may well be, but even being an administrator on Windows Vista you will need to run WinDbg by right-clicking on the WinDbg icon and selecting the “Run as Administrator” item. Then, yes, you repeat the procedure described above so that the virtual drivers get installed. This procedure is only necessary the first time you use the firewire port for debugging; the next times, the drivers will already be installed. For those using a system earlier than Vista and already using an administrative account, it is like my friend Thiago says: “It comes out in the pee”. That is, the virtual driver will be installed and you will get the output shown in the figure below, which demonstrates the same operations performed on Windows Vista running WinDbg as Administrator.


    From there on, it is just debugging, really.

    Dump Racing

    Taking advantage of the fact that we are all gathered here, let us run a test and check whether the speed of firewire really helps when it comes to Kernel Debugging. Let us imagine the situation where you are visiting a client where, obviously, your driver is not working properly. Remember that bug you did not even know existed? Well, it turns out to be a deadlock. Deadlocks are especially dear when it is time to debug, because you are right there when the problem happens, but a nice blue screen? no such luck. In this situation, you can generate a dump file of the machine and leave the problem to be analyzed at home, after all, you wash your dirty laundry at home, and that way you can free up the client’s machine for use, since normally in these situations there are about three people breathing down your neck asking “So? Did you find the problem?” every 3 minutes. I set up my desktop here at home to debug Windows Vista over a serial port. This machine has 2GB of RAM. A full dump file is a copy of everything that is in the computer’s memory at that instant, so it is only fair that this file be approximately 2GB in size. This file can be generated on the HOST machine during a debug session using the .dump command. Below is the output of this command when used over a serial connection.

    0: kd> .dump /f c:\Temp\SERIAL.DMP
    Creating a full kernel dump over the COM port is a VERY VERY slow operation.
    This command may take many HOURS to complete.  Ctrl-C if you want to terminate the command.
    Creating c:\Temp\SERIAL.DMP - Full kernel dump
    Percent written 0
    Percent written 1
    Percent written 2
            :
            :

    Did you notice the threatening message we were shown? Personally, I think these software engineers are all a desperate bunch, probably because of the amount of coffee they drink per day. I can already imagine how many of them do not even wait for the dump to start before pressing CTRL+C to interrupt the process. They really are cowards. Well, since this is going to cost me some time, I am going to take the opportunity to go take a leak.

    Much, much later indeed…

            :
            :
    Percent written 97
    Percent written 98
    Percent written 99
    Dump successfully written
    0: kd>

    OK, so far so good. Now let us repeat the process in a debug session using the firewire cable. The same machine with the same amount of memory and even the same command.

    1: kd> .dump /f c:\Temp\FIREWIRE.DMP
    Creating c:\Temp\FIREWIRE.DMP - Full kernel dump
    Percent written 0
    Percent written 5
    Percent written 10
            :
            :
    Percent written 90
    Percent written 95
    Dump successfully written
    1: kd>

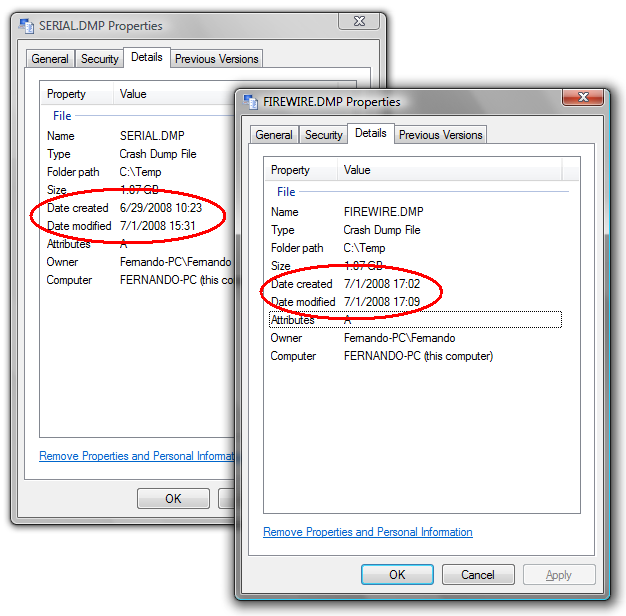
    Yeah, all right, the count goes up by fives instead of by ones like it did with the serial cable, big deal. It is no wonder it takes longer over the serial port; they spend processing on everything. Now we can compare the creation and modification dates in each file’s attributes in order to determine how long it took to generate them.


    Bearing in mind that the month of June ends on the 30th, we can conclude that the dump over the serial port took approximately 2 days, 5 hours and 12 minutes. It is a shame this window does not show the seconds so we could be more precise here. In any case, also remembering that each minute has 60 seconds, the same dump generated over the firewire port took approximately 7 minutes. Wow, that was close! If it were not for that small advantage of 3187 minutes.

    See you…

  • The Hardest Subject

    As some of you are already tired of hearing, I am in the fifth year of Computer Engineering. At the beginning of the course I naturally struggled to learn Calculus, Algebra, Physics and those other subjects that make smoke come out of the calculator.

    Since I could not leave my technical high school and go straight into a university, I worked in the field for a while until I could afford the monthly tuition at a college. Interns really do earn little. That time, besides bringing me a bit of extra cash each month, also brought me a little experience. It was not much, but enough to spot the occasional slip-ups by professors during the programming classes. The Computer Engineering course lasts six years, and during that time I still had to work, not least because I had to pay for college. Over that period I ended up reading a book or two, or three, four, five, well, a few.

    It is natural for professors to tend not to explain exactly how things are or work, and thereby buy a little time to cover more topics in less detail. After all, you do not learn everything you need at university, but you do get a good sense of what you are getting yourself into when you go to work in the field, and where to start looking for more details on a given subject. I myself, in the driver courses I have taught, try to explain the essentials, what the student will actually use, but I always try to make it clear that there are details left to be seen.

    During the course, I could hardly wait to reach the technical subjects, the ones that would open my eyes to a new way of seeing electronic devices, integrated circuits and computers. After swallowing a few things sideways from the C Language and Software Engineering professors, I finally began to study something really interesting. The Operating Systems subject really is surprising. In it we study different operating systems running on different computer architectures. Phew! At least one architecture and one operating system I know reasonably well.

    It is fine for the professor to say that Thread and Process are the same thing, to explain Inter Process Communication without even touching on Virtual Memory and Marshaling, but it was quite something trying to swallow the explanation about Synchronization and Interrupt Management in operating systems. All right, I can only say that the professor slipped up on Windows; I do not know all the other operating systems. I think he just chose the wrong operating system when giving an unfortunate example. I do not remember the exact words, but my professor taught us that Windows XP is not yet a preemptive operating system, and that calls to the operating system could not happen concurrently. First one, then the other, and so on. Personally, I think he must have confused XP with 9X. After all, both have the letter X. At that point I had to stop reading the book I was reading and ask him to repeat that. I could have misheard, but unfortunately that is not what happened. He really did say it. Later in the same class he told us that Windows XP still cannot manage interrupts properly, that if an interrupt occurs while a process is running, the system normally waits for the entire process to finish so that only afterward can it service an interrupt.

    As in every university classroom, there is always a little group of students who hate Windows and defend some other operating system option. Nothing against them, nor against their choice, but every now and then some real piece of work shows up. Anyway, these ones soon said, ironically and laughing: “Obviously! Because it is the smartest thing to do”. And so everyone in the room started laughing at that terrible example of Windows interrupt management. I never say anything; I am that guy who gets to the room about 30 minutes early so I can read my book in peace. I do not go around campaigning for Windows or against other systems. I do not go around explaining how to complete an IRP to every person I meet at the coffee shop, but this one I could not let slide. I asked the professor: “Wow, how interesting! Where was it again that you read that?”. “In any Operating Systems book” he answered me. See how naive of me: I imagined that the classic Operating Systems books had been written when Windows XP did not even exist yet. So I said: “No offense, it is just that this is not what I have been seeing in the books I have been reading. Maybe I am reading the wrong books.”

    Windows Driver Model (1999)

    “The operating system can preempt any subroutine at any moment for an arbitrarily long period of time, so we cannot be sure of completing critical tasks without interfere or delay. Even if we take steps to prevent preemption, code executing simultaneously on other CPU in same computer can interfere with our code.”


    Windows NT Device Driver Development (1999)

    “As was mentioned in Chapter 1, Windows NT is a pre-emptive, multithreaded, and multitasking, operating system. It employs a traditional operating system technique to provide this multitasking capability by associating a quantum with each thread when it starts running.”


    Desvendando o Windows NT (1998)

    “Como o Windows NT implementa um escalador preemptivo, se outro thread, com uma prioridade mais alta se aprontar para execução, o thread sendo executado atualmente é solicitado antes de terminar sua fatia de tempo.”


    Windows Internals (2005):

    “Windows implements a priority-driven, preemptive scheduling system the highest priority runnable (ready) thread always runs, with the caveat that thread chosen to run might be limited by the processors on wich the thread is allowed to run, a phenomenom called Processor Afinitty.”


    Developing Drivers with Windows Driver Foundation (2007):

    “Windows is a preemptive multitasking operating system in wich multiple thread can try to aceess shared data or resources concurrently and multiple drivers functions can run concurrently.”


    Anyway, it is obvious that I am not going to argue with my professor and turn my academic life into hell. Once again I will take a deep breath and let out that resounding “Ahhhh, right…”.

    It is at moments like these that I get worried about another aspect. Fortunately I can listen to and filter what the C Language programming and Operating Systems professors say, but there is nothing I can do about the Electronics, Artificial Intelligence, Microcontrollers and so many other subjects we are learning. Could it be that we are hearing the same nonsense and do not know it?

    In any case, the subject I thought would be the easiest is now one of those that torment me.
    Keep reading…

  • Using the Registry (Part 2)

    Well, as I was saying in the first part of this post. That is a lot of code. This whole thing looks like a lot of work, doesn’t it? Building a UNICODE_STRING for the path of the key you want to access, building an OBJECT_ATTRIBUTES with it, opening a handle, determining the size of the values to be read, allocating a large enough buffer, reading the value you want, freeing any temporary buffer used in the process, and finally closing the handle to the registry key. You can check how much code we used in our example from the previous post to read two values from the registry. Today we will look at a group of registry-manipulation routines that make this process easier.

    RTL Registry Routines

    There are only five routines that make up this little group. In the reference you will find a description of each one. A common trait of this group of routines is that we do not have to use handles for the keys. The handles are opened and closed for each operation. Another common trait is that you do not need to compose the full name of the key where the values you want to read or write are. These routines work with a key-name scheme relative to some pre-defined place. Confusing? Let us take a look at one of the routines so we have a more practical example. Trying to follow the same idea as the example given in the previous post, we first need to check whether the key where the values are stored actually exists. There is a little function just for that.

    NTSTATUS
      RtlCheckRegistryKey(
        IN ULONG  RelativeTo,
        IN PWSTR  Path
        );

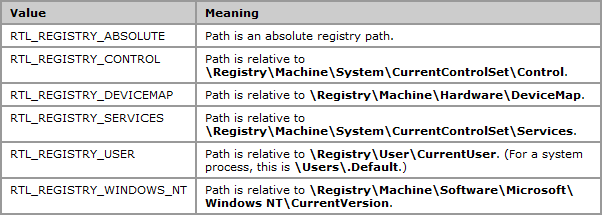
    Note that the first parameter of this routine is a constant that indicates what reference will be applied to the second parameter. Look at the table below, which was taken from the reference.

    An example would be the following: If we use RTL_REGISTRY_ABSOLUTE as the first parameter, the second must be the full path of the registry key. After all, we have to pass the key’s absolute path. On the other hand, if we use RTL_REGISTRY_SERVICES, the second parameter should be only the path complement relative to the Services key. That was the option I used in this post’s example. See how our routine for creating the parameters in the registry turned out.

    /****
    ***     CreateParams
    **
    **      This routine is called when the key that contains
    **      the parameters is not detected. It creates the key and the parameters
    **      with pre-defined values.
    */
    NTSTATUS
    CreateParams(VOID)
    {
        NTSTATUS        nts = STATUS_SUCCESS;
        WCHAR           wzParam[] = L"DriverEntry.com.br";
        ULONG           ulParam = 0x12345678;
     
        __try
        {
            //-f--> Create the key where the parameters will be stored.
            //      Just like that.
            nts = RtlCreateRegistryKey(RTL_REGISTRY_SERVICES,
                                       L"KernelReg2\\Parameters");
            if (!NT_SUCCESS(nts))
                ExRaiseStatus(nts);
     
            //-f--> Here we write the numeric value
            nts = RtlWriteRegistryValue(RTL_REGISTRY_SERVICES,
                                        L"KernelReg2\\Parameters",
                                        L"DoubleWord",
                                        REG_DWORD,
                                        &ulParam,
                                        sizeof(ulParam));
            if (!NT_SUCCESS(nts))
                ExRaiseStatus(nts);
     
            //-f--> And here the String. Note that it was not necessary
            //      to create a UNICODE_STRING for this.
            nts = RtlWriteRegistryValue(RTL_REGISTRY_SERVICES,
                                        L"KernelReg2\\Parameters",
                                        L"String",
                                        REG_SZ,
                                        wzParam,
                                        sizeof(wzParam));
        }
        __except(EXCEPTION_EXECUTE_HANDLER)
        {
            //-f--> Oops!
            nts = GetExceptionCode();
            ASSERT(FALSE);
        }
     
        return nts;
    }

    Once again, the code shown here is available for download at the end of this post.

    When easy gets complicated

    From what we have seen so far, this group of routines has already made our life a little easier. But it is in the read routine that we can see the code savings really happen. The cost of that comes down to understanding how the read routine works.

    NTSTATUS
      RtlQueryRegistryValues(
        IN ULONG  RelativeTo,
        IN PCWSTR  Path,
        IN PRTL_QUERY_REGISTRY_TABLE  QueryTable,
        IN PVOID  Context,
        IN PVOID  Environment  OPTIONAL
        );

    Looking at it like this, it does not even seem like it bites, but if you take a look at the reference, you will see it can be quite flexible. Flexibility is sometimes translated as “Hard to get the right way to use it”. The first two parameters are the ones already known from before. Things start to change with the third parameter, which is a table that contains the details of the values to be read from the registry. I will not go into the details of each parameter of this routine in this post. I will just write the code equivalent to the previous post’s example.

    /****
    ***     LoadParams
    **
    **      This routine loads the global variables with the
    **      values retrieved from the registry.
    */
    NTSTATUS
    LoadParams(VOID)
    {
        NTSTATUS                    nts = STATUS_SUCCESS;
        RTL_QUERY_REGISTRY_TABLE    QueryTable[] =
        {
            { NULL, RTL_QUERY_REGISTRY_DIRECT | RTL_QUERY_REGISTRY_REQUIRED,
              L"DoubleWord", &g_ulParam, REG_NONE, NULL, 0 },
            { NULL, RTL_QUERY_REGISTRY_DIRECT | RTL_QUERY_REGISTRY_REQUIRED,
              L"String", &g_usParam, REG_NONE, NULL, 0 },
            { NULL, 0, NULL, NULL, REG_NONE, 0, NULL }
        };
     
        __try
        {
            //-f--> If this routine is called more than once, let's free
            //      the buffer of this parameter.
            if (g_usParam.Buffer)
                RtlFreeUnicodeString(&g_usParam);
     
            //-f--> Here all the table's values are read
            nts = RtlQueryRegistryValues(RTL_REGISTRY_SERVICES,
                                         L"KernelReg2\\Parameters",
                                         QueryTable,
                                         NULL,
                                         NULL);
            if (!NT_SUCCESS(nts))
                ExRaiseStatus(nts);
        }
        __except(EXCEPTION_EXECUTE_HANDLER)
        {
            //-f--> Oops!
            nts = GetExceptionCode();
            ASSERT(FALSE);
        }
     
        return nts;
    }

    No, nothing is missing. That is really all there is. Let us take a closer look at what we did here. The table we filled in has the data for the reads to be performed and is defined as shown below.

    typedef struct _RTL_QUERY_REGISTRY_TABLE {
        PRTL_QUERY_REGISTRY_ROUTINE QueryRoutine;
        ULONG Flags;
        PWSTR Name;
        PVOID EntryContext;
        ULONG DefaultType;
        PVOID DefaultData;
        ULONG DefaultLength;
    } RTL_QUERY_REGISTRY_TABLE, *PRTL_QUERY_REGISTRY_TABLE;

    Looking at each of its members we have:

    • QueryRoutine: Here you have a function pointer that will be called when this table item is read from the registry. We do not use this method in our example. There are some interesting things about this callback routine. It is called for each item of this table, but if the value to be read is of type REG_MULTI_SZ, the callback routine is called once for each string contained in that value. Check the reference for a complete description of these details.
    • Flags: The flag we used here was RTL_REGISTRY_DIRECT, which signals that we will not use the callback method. Another flag is RTL_QUERY_REGISTRY_REQUIRED, which indicates that the value described in this table row is required. If the value is not found, RtlQueryRegistryValues returns an error and the remaining values will not be read.
    • Name: Here comes the name of the value to be read. Note that it is not a UNICODE_STRING, but a zero-terminated WCHAR array.
    • EntryContext: In our example, this parameter is the buffer where the read value will be stored, but in the cases where we get the call through the callback routine, this value is passed as one of the parameters.

    The parameters DefaultType, DefaultData and DefaultLengh would be used if the value did not exist and was not a required value.

    Each value to be read is represented by a row in this table. The routine identifies the end of the table when it finds the QueryRotuine and Name members set to NULL.

    Hold on, Fernando! All right, nothing up this sleeve, nothing up that one, and the values just get read? Clever you, huh? Thought you would fool everyone with that little chat? All right! Where do I indicate the size of the buffer offered for the read?

    Very good question! I do not think even I would have asked such a good one. The buffer size is indicated by the buffer itself. In the case of the string, we pass a pointer to a UNICODE_STRING; the size of the string’s buffer is already described by that structure, but if the buffer of this structure is NULL, the routine allocates a buffer of the needed size. We have to free that buffer when we are no longer going to use it. For reads where the resulting buffer is smaller than or equal to sizeof(ULONG), the resulting value is stored directly in the place pointed to by EntryContext. For further details, consult the reference.

    This function is quite flexible and I will not be able to put everything this routine offers into a single post, but feel free to send your questions about it.

    Have fun!

    KernelReg2.zip

  • Using the Registry (Part 1)

    In the last post, in response to a question from a reader, I mentioned a little about how to create and use new IOCTLs. After all, the motto of this blog is “To serve well to serve forever.” Questions from readers are a great source of suggestions for new posts. I believe that like it is in any other specialty, driver development is a topic that can be broken up into many many parts. No wonder that the smallest book I know about driver development has not less than four hundred pages. So, it’s good to know what the reader’s difficulties are to know what subject to post here. Feel free to send further suggestions or questions. Some time ago, I had received an email from Fabio Dias (Fortaleza, CE – BRA), who suggested a post on how to access the Registry from a driver. Okay, let’s go.

    HKEY_LOCAL_MACHINE is User-Mode stuff

    Before going out there saying what APIs you should use to access the registry, let’s first take a look on how the registry is organized. I think the first step here is talk about opening a registry key. As in User Mode, we must have a string that informs the key path which we want to open, and thereby obtain a handle to it. Oops! Did I say I handle? Therefore, it is worth mentioning that the registry keys are also resources managed by the Object Manager. Registry keys are all stored under the “\Registry” namespace. Thus, in User Mode we use HKEY_LOCAL_MACHINE name as one of the basic divisions of the registry, whereas in Kernel Mode we use “\Registry\Machine “. Similarly to HKEY_USERS we have “\Registry\Users”. More details can be found here.

    Which is the CurrentControlSet?

    The DriverEntry routine of any Windows NT driver receives two input parameters, one being a pointer to the DRIVER_OBJECT structure, which represents the instance of our driver, and another parameter is a UNICODE_STRING containing the registry path, which indicates where our driver is registered. But how so? Can’t our driver know how it was registered in the registry? Here, in the reference is simple:

    “The registry path string pointed to by RegistryPath is of the form \Registry\Machine\System\CurrentControlSet\Services\DriverName”

    Okay, let’s take a ride on any driver and take a look at this using WinDbg. Let me open a parenthesis here to say to any new reader of this blog that I’m using a virtual machine to run the tests with a sample driver, as it is explained in this post. This allows me to do Kernel Debugging not necessarily having to use two machines. To make the driver replacement easier for each modification I do, I am using WinDbg mapping drivers, as it is explained in another post. This feature allows WinDbg to always load a new driver version in the TARGET machine without the need of having to manually replace the driver in it. Close parenthesis.

    Even before the driver be loaded, I have put a breakpoint on its DriverEntry routine. Oops! How can you put a breakpoint in a driver that has not been loaded? Oh, OK … You can do this using the bu command, as it is shown below. The breakpoints will be set whenever the driver will be loaded. In the following line, I list the breakpoints, just to… When the driver isloaded, its execution stops at my breakpoint and I use the !ustr extension, which shows the UNICODE_STRING contents, so that we can see the value of its second parameter.

    kd> bu KernelReg!DriverEntry
    kd> bl
     0 eu             0001 (0001) (KernelReg!DriverEntry)
     
    kd> g
    KD: Accessing 'Z:\Sources\DriverEntry\KernelReg\objchk_w2k_x86\i386\KernelReg.sys'
        (\??\C:\WINDOWS\system32\drivers\KernelReg.sys)
      File size 2K.
    MmLoadSystemImage: Pulled \??\C:\WINDOWS\system32\drivers\KernelReg.sys from kd
    Breakpoint 0 hit
    KernelReg!DriverEntry:
    f8d394a0 8bff            mov     edi,edi
    kd> !ustr poi(pusRegistryPath)
    String(114,114) at 82302000: \REGISTRY\MACHINE\SYSTEM\ControlSet001\Services\KernelReg

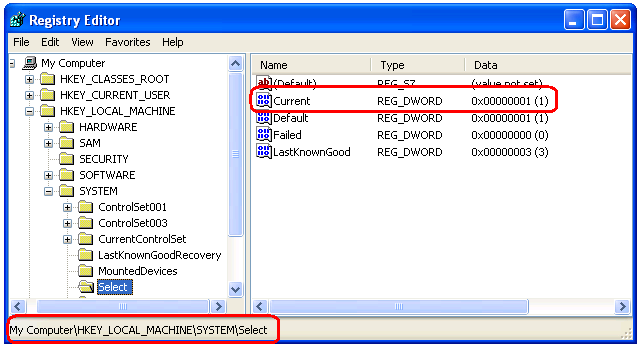
    Mas não era pra ser CurrentControlSet? Na verdade o CurrentControlSet é um link para um outro ControlSet. No caso observado acima, o CurrentControlSet está refletindo o ControlSet001, ou seja, as alterações feitas no ControlSet001 são vistas no CurrentControlSet e vice-versa. O CurrentControlSet pode refletir qualquer outro ControlSet. Algumas regras determinam quando eles mudam, como em casos de mudanças de configurações de sistema ou instalações de drivers. Para saber para onde o CurrentControlSet está apontando, dê uma olhada no valor Current que está na chave “\Registry\Machine\System\Select” como mostra a figura abaixo.

    Shouldn’t It be CurrentControlSet? Actually CurrentControlSet is a link to another ControlSet. In the case noted above, CurrentControlSet is reflecting ControlSet001, i.e., changes in the ControlSet001 are seen in CurrentControlSet and vice-versa. The CurrentControlSet can reflect any ControlSet. Some rules determine when they change, like in cases of system configuration changes or driver installation. To know where the CurrentControlSet is pointing to, take a look at the Current value, which is in “\Registry\Machine\System\Select” key, as it is shown below.

    But that’s just for the sake of curiosity. When you use CurrentControlSet as part of the key path you wish to access, the Object Manager do the translation for you and everyone lives happily ever after.

    Where is \Registry\Machine\Software?

    It may have already happened to some of you. You write a driver that should read a value in a certain “\Registry\Machine\Software” key when the driver get loaded. While you do tests with the driver, which now has its Start set to Manual(3), everything works successfuly but, when you change the driver Start to Boot(0) or System(1), it is not possible to open the same key, the driver receives STATUS_OBJECT_NAME_NOT_FOUND (0xc00000034).

    What did you mean by “name not found”? It was here right now! What happened is that the SOFTWARE key is mounted later. Thus, during the system boot it does not exist yet. To access that key you have to wait a little, perhaps using this post idea. Then everything will work like fine.

    Anything to say about HKEY_CURRENT_USER?

    Well, let’s think. Who is the Current User? The user who is making a system call, right? Thus, according to tradition, you start thinking it’s easy and when you are logged in as Paul you manually start your driver. During the call to its DriverEntry routine, the driver read settings for the user logged in, which are actually stored in the Paulo’s HKEY_CURRENT_USER. Well, that’s right up here. Yeah, it’s all wrong. For Paul point of view, the settings are right there, but the DriverEntry routine is called in system context, which incidentally is not Paul.

    This is a problem faced even in User Mode, where services that run on system account try to open the HKEY_CURRENT_USER key. One thing we must bear in mind is that “The logged user” is not a simple system information. Try to imagine a Terminal Service, there may be multiple users logged in at the same time. Even when there is only one user logged into the system, threads can be executed in other user’s context or even in the system context. Drivers do not have its own context. Portions of the driver run in system context, others in arbitrary context. Depending on the driver type and its position within the device stack , it can receive calls in user’s context. That is the case of File System drivers for example.

    Ah, OK! HKEY_CURRENT_USER will work! Er… How do I say that? No, it will not work. According to Microsoft’s reference, there is no simple translation to HKEY_CURRENT_USER, but there are routines that provide simplifications. After all this chat about context, you will still have to access the HKEY_USERS key, or rather, “\Registry\User” in the format already familiar to User Mode programmers used with HKEY_USERS. An example is: “\Registry\User\S-1-5-21-73586283-1897051121-839522115-500”. The equivalent for a system account is the “\Registry\User\.DEFAULT” key.

    OK, ok, ok! An example please

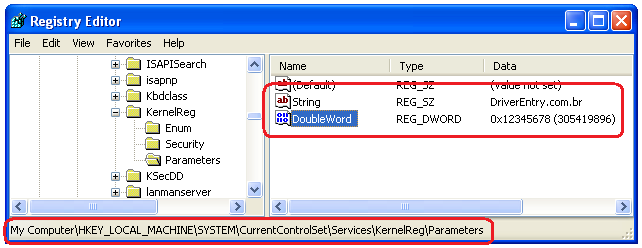
    Once again, I’m assuming you already know how to build and install a driver as it is explained in this post. The example code available for downloading at the end of this post can also be compiled on Visual Studio by using DDKBUILD, as this post explains. In this example I will show how to read two registry values ​​that are in the key which it is shown below. To make the game more fun, when the driver get executed by the first time, it will create the key and its contained values​​ when it realizes that it does not exist yet.

    The values will be contained in a subkey of the one you received as a parameter in the DriverEntry routine. So our basic work on coding the DriverEntry routine is precisely to create the registry full path key that contains these values​​. With this UNICODE_STRING in hand, we will take it to the reading and writing in the registry routines. Below is the DriverEntry routine code. It does not contain anything special about the registry. As always, it’s worth a read on the comments.

    /****
    ***     DriverEntry
    **
    **      Our driver's entry point.
    **      Knife in the teeth and blood in the eyes.
    */
    extern "C"
    NTSTATUS
    DriverEntry(__in PDRIVER_OBJECT  pDriverObject,
                __in PUNICODE_STRING pusRegistryPath)
    {
        UNICODE_STRING  usParameters = RTL_CONSTANT_STRING(L"\\Parameters");
        UNICODE_STRING  usFullRegPath = {0, 0, NULL};
        PWCHAR          pwzBuffer = NULL;
        NTSTATUS        nts = STATUS_SUCCESS;
     
        //-f--> Here we receive as a parameter the registry path up to
        //      our driver's key. Our parameters live in a
        //      sub-key named "Parameters". Let's build the
        //      full path by appending the sub-key name to the
        //      registry path we received as a parameter.
        __try
        {
            __try
            {
                //-f--> Set the driver's unload callback routine.
                pDriverObject->DriverUnload = OnDriverUnload;
     
                //-f--> To do this append, we will need a buffer
                //      large enough to store the original string
                //      plus the size of the sub-key. Here we allocate
                //      this buffer.
                pwzBuffer = (PWCHAR)ExAllocatePoolWithTag(PagedPool,
                                                          pusRegistryPath->Length +
                                                          usParameters.Length,
                                                          _KRN_REG_TAG);
                if (pwzBuffer == NULL)
                    ExRaiseStatus(STATUS_INSUFFICIENT_RESOURCES);
     
                //-f--> Now that we have the buffer, let's initialize the
                //      UNICODE_STRING structure for the string resulting from this append.
                RtlInitEmptyUnicodeString(&usFullRegPath,
                                          pwzBuffer,
                                          pusRegistryPath->Length +
                                          usParameters.Length);
     
                //-f--> Copy the string received as a parameter
                RtlCopyUnicodeString(&usFullRegPath,
                                     pusRegistryPath);
     
                //-f--> Concatenate the string "\Parameters"
                RtlAppendUnicodeStringToString(&usFullRegPath,
                                               &usParameters);
     
                //-f--> Using the full path, try to load the parameters
                nts = LoadParams(&usFullRegPath);
                if (!NT_SUCCESS(nts))
                {
                    //-f--> On failure, check whether the cause was the missing
                    //      sub-key in the registry. This should happen when the
                    //      driver is run for the first time. But if the failure
                    //      is a different one, then each to their own problems.
                    if (nts != STATUS_OBJECT_NAME_NOT_FOUND)
                        ExRaiseStatus(nts);
     
                    //-f--> Let's create the sub-key and write the
                    //      pre-defined values.
                    nts = CreateParams(&usFullRegPath);
                    if (!NT_SUCCESS(nts))
                        ExRaiseStatus(nts);
     
                    //-f--> Try to read the parameters again.
                    //      Okay, I know this is silly. After all, if I
                    //      just created the parameters, why would I
                    //      read them again? Well, just to illustrate.
                    nts = LoadParams(&usFullRegPath);
                    if (!NT_SUCCESS(nts))
                        ExRaiseStatus(nts);
                }
            }
            __finally
            {
                //-f--> Cleaning up the mess.
                if (pwzBuffer)
                    ExFreePool(pwzBuffer);
            }
        }
        __except(EXCEPTION_EXECUTE_HANDLER)
        {
            //-f--> Oops!
            nts = GetExceptionCode();
            ASSERT(FALSE);
        }
     
        return nts;
    }

    Let’s play with UNICODE_STRING a little more. Let’s look at the routine that writes the registry values​​. This routine does not offer anything much different than we’re used to seeing in User Mode. However, it’s like they say: “One example is worthier than a thousand articles.” Wow, that was terrible! I need to stop doing this. You must be thinking now: “Wow! What I need to read to have a driver example.”

    /****
    ***     CreateParams
    **
    **      This routine is called when the key that contains
    **      the parameters is not detected. It creates the key and the parameters
    **      with pre-defined values.
    */
    NTSTATUS
    CreateParams(__in    PUNICODE_STRING pusRegistryPath)
    {
        HANDLE              hKey = NULL;
        NTSTATUS            nts = STATUS_SUCCESS;
        OBJECT_ATTRIBUTES   ObjAttributes;
        UNICODE_STRING      usStringParam = RTL_CONSTANT_STRING(L"String");
        UNICODE_STRING      usDWordParam = RTL_CONSTANT_STRING(L"DoubleWord");
        ULONG               ulParam = 0x12345678;
        WCHAR               wzParam[] = L"DriverEntry.com.br";
     
        __try
        {
            __try
            {
                //-f--> No secret here. It's all quick and easy.
                InitializeObjectAttributes(&ObjAttributes,
                                           pusRegistryPath,
                                           OBJ_CASE_INSENSITIVE,
                                           NULL,
                                           NULL);
     
                //-f--> Create the new key and request
                //      access to set values inside it.
                nts = ZwCreateKey(&hKey,
                                  KEY_SET_VALUE,
                                  &ObjAttributes,
                                  0,
                                  NULL,
                                  REG_OPTION_NON_VOLATILE,
                                  NULL);
                if (!NT_SUCCESS(nts))
                    ExRaiseStatus(nts);
     
                //-f--> Set the numeric value
                nts = ZwSetValueKey(hKey,
                                    &usDWordParam,
                                    0,
                                    REG_DWORD,
                                    &ulParam,
                                    sizeof(ulParam));
                if (!NT_SUCCESS(nts))
                    ExRaiseStatus(nts);
     
                //-f--> Set the string value
                nts = ZwSetValueKey(hKey,
                                    &usStringParam,
                                    0,
                                    REG_SZ,
                                    &wzParam,
                                    sizeof(wzParam));
                if (!NT_SUCCESS(nts))
                    ExRaiseStatus(nts);
            }
            __finally
            {
                //-f--> Close the handle of the newly created key
                if (hKey)
                    ZwClose(hKey);
            }
        }
        __except(EXCEPTION_EXECUTE_HANDLER)
        {
            //-f--> Oops!
            nts = GetExceptionCode();
            ASSERT(FALSE);
        }
        return nts;
    }

    Finally the funny part of this story. I believe that most of the fun is concentrated in the ZwQueryValueKey routine, which performs the reading of values ​​in the registry.

    NTSTATUS 
      ZwQueryValueKey(
        IN HANDLE  KeyHandle,
        IN PUNICODE_STRING  ValueName,
        IN KEY_VALUE_INFORMATION_CLASS  KeyValueInformationClass,
        OUT PVOID  KeyValueInformation,
        IN ULONG  Length,
        OUT PULONG  ResultLength
        );

    The point that differs from the API used in User Mode to do the same task is the third parameter KEY_VALUE_INFORMATION_CLASS. An enum that tells what information we would get on a particular value in the registry. One of them asks only the name while another asks all the information and the latest all the partial information referring to the value.

    typedef enum _KEY_VALUE_INFORMATION_CLASS {
      KeyValueBasicInformation,
      KeyValueFullInformation,
      KeyValuePartialInformation
    } KEY_VALUE_INFORMATION_CLASS;

    For each enum value, a different structure is returned. Always in a single block, the structure can bring a variety of information using offsets telling where to find the data within that single memory allocation.

    In the example, I used the KeyValuePartialInformation, which I imagine to be the most used. Once again my tip is to read the comments at the excerpt below.

    /****
    ***     LoadParams
    **
    **      This routine loads the global variables with the
    **      values retrieved from the registry.
    */
    NTSTATUS
    LoadParams(__in PUNICODE_STRING pusRegistryPath)
    {
        HANDLE              hKey = NULL;
        NTSTATUS            nts = STATUS_SUCCESS;
        OBJECT_ATTRIBUTES   ObjAttributes;
        UNICODE_STRING      usStringParam = RTL_CONSTANT_STRING(L"String");
        UNICODE_STRING      usDWordParam = RTL_CONSTANT_STRING(L"DoubleWord");
        ULONG               ulBytes = 0;
        PWCHAR              pwzBuffer = NULL;
        PKEY_VALUE_PARTIAL_INFORMATION  pValueInfo = NULL;
     
        __try
        {
            __try
            {
                //-f--> Build the ObjectAttribute
                InitializeObjectAttributes(&ObjAttributes,
                                           pusRegistryPath,
                                           OBJ_CASE_INSENSITIVE,
                                           NULL,
                                           NULL);
     
                //-f--> Try to open the registry key
                nts = ZwOpenKey(&hKey,
                                GENERIC_READ,
                                &ObjAttributes);
                if (!NT_SUCCESS(nts))
                    ExRaiseStatus(nts);
     
                //-f--> Since the value has a fixed size, we can determine
                //      the buffer size needed to read the value from the
                //      registry.
                ulBytes = sizeof(KEY_VALUE_PARTIAL_INFORMATION) + 
                          sizeof(ULONG) - sizeof(UCHAR);
     
                //-F--> Allocate the buffer for the read.
                pValueInfo = (PKEY_VALUE_PARTIAL_INFORMATION)
                    ExAllocatePoolWithTag(PagedPool,
                                          ulBytes,
                                          _KRN_REG_TAG);
                if (!pValueInfo)
                    ExRaiseStatus(STATUS_INSUFFICIENT_RESOURCES);
     
                //-f--> Here we do the read.
                nts = ZwQueryValueKey(hKey,
                                      &usDWordParam,
                                      KeyValuePartialInformation,
                                      pValueInfo,
                                      ulBytes,
                                      &ulBytes);
                if (!NT_SUCCESS(nts))
                    ExRaiseStatus(nts);
     
                //-f--> We make sure we read a DWORD
                ASSERT(pValueInfo->Type == REG_DWORD);
     
                //-f--> Here we load our global variable
                //      with the value read from the registry.
                g_ulParam = *(PULONG)pValueInfo->Data;
     
                //-f--> Free the read buffer and zero the pointer.
                //      You may decide to allocate the read buffer
                //      based on the largest value you need to read,
                //      and thus use the same buffer to read all
                //      the smaller values. Here, once again, I am
                //      redoing everything to demonstrate.
                ExFreePool(pValueInfo);
                pValueInfo = NULL;
     
                //-f--> Since the string can have any size in the registry,
                //      we will offer zero bytes of read buffer so that
                //      the API tells us how much it needs for the whole buffer.
                nts = ZwQueryValueKey(hKey,
                                      &usStringParam,
                                      KeyValuePartialInformation,
                                      NULL,
                                      0,
                                      &ulBytes);
     
                //-f--> We must get one of these errors.
                ASSERT(nts == STATUS_BUFFER_OVERFLOW ||
                       nts == STATUS_BUFFER_TOO_SMALL);
     
                //-f--> Here we allocate a buffer of the size
                //      requested by the API.
                pValueInfo = (PKEY_VALUE_PARTIAL_INFORMATION)
                    ExAllocatePoolWithTag(PagedPool,
                                          ulBytes,
                                          _KRN_REG_TAG);
                if (!pValueInfo)
                    ExRaiseStatus(STATUS_INSUFFICIENT_RESOURCES);
     
                //-f--> Now we will do the read again, but this time
                //      offering a buffer of a decent size.
                nts = ZwQueryValueKey(hKey,
                                      &usStringParam,
                                      KeyValuePartialInformation,
                                      pValueInfo,
                                      ulBytes,
                                      &ulBytes);
                if (!NT_SUCCESS(nts))
                    ExRaiseStatus(nts);
     
                //-f--> We must have read a string.
                ASSERT(pValueInfo->Type == REG_SZ);
     
                //-f--> Now let's allocate the buffer that will be used to hold
                //     the string read from the registry. So we can discard the buffer
                //     used by the read. The DataLength field brings the size of the
                //     unicode string with the zero terminator. Note that this structure
                //     does not bring a UNICODE_STRING, but a WCHAR array.
                pwzBuffer = (PWCHAR)ExAllocatePoolWithTag(PagedPool,
                                                          pValueInfo->DataLength,
                                                          _KRN_REG_TAG);
                if (!pwzBuffer)
                    ExRaiseStatus(STATUS_INSUFFICIENT_RESOURCES);
     
                //-f--> After some time programming, you get quick with some
                //      things. I bet someone, and that includes myself, will one day
                //      Copy-Paste this function to use somewhere else. Here,
                //      anticipating that the registry read may happen several times,
                //      and so, if there is an allocation from a previous read, we will
                //      deallocate it.
                if (g_usParam.Length)
                    RtlFreeUnicodeString(&g_usParam);
     
                //-f--> Initialize the global string with the buffer we just allocated.
                //      Even though we set a buffer for this UNICODE_STRING, it is
                //      still empty (Length=0)
                RtlInitEmptyUnicodeString(&g_usParam,
                                          pwzBuffer,
                                          (USHORT)pValueInfo->DataLength);
     
                //-f--> Here we append the WCSTR (zero-terminated WCHAR array), read
                //      from the registry into our empty buffer. This is similar to a copy,
                //      but with an incredible advantage: not using wcslen().
                //      Never mind, it's purist paranoia. So we leave it to the API to
                //      determine the Length and MaximumLength of the UNICODE_STRING. Remember
                //      that the zero terminator is not counted as part of the UNICODE_STRING.
                RtlAppendUnicodeToString(&g_usParam,
                                         (PCWSTR)pValueInfo->Data);
            }
            __finally
            {
                //-f--> General cleanup
                if (pValueInfo)
                    ExFreePool(pValueInfo);
     
                if (hKey)
                    ZwClose(hKey);
            }
        }
        __except(EXCEPTION_EXECUTE_HANDLER)
        {
            //-f--> Oops! I did it again.
            nts = GetExceptionCode();
            ASSERT(FALSE);
        }
     
        return nts;
    }

    Phew! What a big code! In this first part of the issue I have used the APIs that most closely resemble the User Mode ones. In the next post I will bring a different way of doing the same thing we did here.

    I hope I could help.

    CYA…

    KernelReg.zip

  • Creating and Using IOCTLs

    Last week I had received the following question from a reader:

    “Is it possible for my application to send a customized IOCTL (made by myself) to a driver, and that driver being able to recognize it with no problems?”

    The short-term answer for this question is: “Yes, and good luck!”. However, what is the fun a blog has if we can not talk more about this subject and even give a simple example? You’re assumed by this you’re already aware of some basic concepts, such as compiling, installing and testing drivers; but, if you have not known this yet, do not worry, just read this post.

    The driver that used to calculate

    Let’s create a sample driver that uses the same idea my friend Heldai had already used to illustrate IOCTLs use when I was still learning how to make blue screens. At today’s example, we are making a driver that adds two numbers contained into a structure that will be received via an IOCTL.

    With no more yada yada, I think we can start by defining the structure. Like the kindergarten teacher had taught us, we are just creating a header file that is included by both, the application project and the driver project. This header file should not include any other specific one from User Mode nor Kernel Mode. That means, it cannot include files like Windows.h nor Ntddk.h. All this is aleady done, tested and able to be built in a project available for downloading at the end of the post.

    typedef struct _KERNEL_MATH_REQUEST
    {
        //-f--> I can define this structure in any way I
        //      want to.
        //      These are the two numbers to be added to it.
        ULONG   x;
        ULONG   y;
     
    } KERNEL_MATH_REQUEST, *PKERNEL_MATH_REQUEST;
     
     
    typedef struct _KERNEL_MATH_RESPONSE
    {
        //-f--> To the newbies: I know it's possible to be done it using
        //      just one structure. But I'm only doing in that
        //      way for a better illustration.
        ULONG   r;
     
    } KERNEL_MATH_RESPONSE, *PKERNEL_MATH_RESPONSE;

    Creating the IOCTL

    IOCTL is more than just a number to identify the desired operation. It consists of a bit mask interpreted by Windows. This mask is defined as it is shown below. You can get more details at this macro on this link.

    To define an IOCTL, we use the CTL_CODE macro which has its parameters shown below:

    #define IOCTL_Device_Function CTL_CODE(DeviceType, Function, Method, Access)

    Let’s define our IOCTL, as it is shown below:

    //-f--> Here, we define IOCTL for our driver.
    #define IOCTL_ADD_THESE_TWO_NUMBERS \
        CTL_CODE(FILE_DEVICE_UNKNOWN, 0x800, METHOD_BUFFERED, FILE_ANY_ACCESS)
     
    //-f--> Although this driver haa the word "Sum" as part of its name,
    //      I've decided to put an IOCTL for subtraction, just as an example.
    #define IOCTL_SUBTRACT_THESE_TWO_NUMBERS \
        CTL_CODE(FILE_DEVICE_UNKNOWN, 0x801, METHOD_BUFFERED, FILE_ANY_ACCESS)

    Now, let’s take a look at every used parameter and talk a litle about it.

    FILE_DEVICE_UNKNOWN – If you take a look at the DriverEntry routine, you can notice this is the same device type used at the call for the IoCreateDevice() routine.

    /****
    ***     DriverEntry
    **
    **      That's the driver entry point.
    **      "A knife among the teeth and some blood in the eyes".
    */
    extern "C" NTSTATUS
    DriverEntry(__in PDRIVER_OBJECT     pDriverObj,
                __in PUNICODE_STRING    pusRegistryPath)
    {
        UNICODE_STRING  usDeviceName = RTL_CONSTANT_STRING(L"\\Device\\KernelSum");
        UNICODE_STRING  usSymbolicLink = RTL_CONSTANT_STRING(L"\\DosDevices\\KernelSum");
        NTSTATUS        nts;
        PDEVICE_OBJECT  pDeviceObj;
     
        //-f--> Setting the unload routine to allow the 
        //      driver to be dynamincaly unloaded.
        pDriverObj->DriverUnload = OnDriverUnload;
     
        //-f--> The Open, Cleanup e Close routines behave in the same way.
        //      So, through the minimum effort law use, they will be the same one.
        //      Besides this one, we must handle the DeviceControl which is
        //      responsible for dealing with the received IOCTLs.
        pDriverObj->MajorFunction[IRP_MJ_CREATE] =
        pDriverObj->MajorFunction[IRP_MJ_CLEANUP] =
        pDriverObj->MajorFunction[IRP_MJ_CLOSE] = OnCreateCleanupClose;
        pDriverObj->MajorFunction[IRP_MJ_DEVICE_CONTROL] = OnDeviceIoControl;
     
        //-f--> Here we are creating the driver control device. Notice that we used
        //      FILE_DEVICE_UNKNOWN as the device type. This same one is used
        //      at the CTL_CODE macro. See: IoCtl.h
        nts = IoCreateDevice(pDriverObj,
                             0,
                             &usDeviceName,
                             FILE_DEVICE_UNKNOWN,
                             0,
                             FALSE,
                             &pDeviceObj);
     
        //-f--> Is everything fine so far? OK...
        if (!NT_SUCCESS(nts))
        {
            ASSERT(FALSE);
            return nts;
        }
     
        //-f--> Here we are creating a symbolic link so that, the application
        //      can get a handle for the control device.
        nts = IoCreateSymbolicLink(&usSymbolicLink,
                                   &usDeviceName);
     
        //-f--> Is it all right?
        if (!NT_SUCCESS(nts))
        {
            //-f--> Oops... I think my pant is sort of wet...
            IoDeleteDevice(pDeviceObj);
     
            ASSERT(FALSE);
            return nts;
        }
     
        //-f--> Great, that is it!
        return STATUS_SUCCESS;
    }

    The secong CTL_CODE parameter Function, receives a 0x800 number, since numbers below this one are reserved for Microsoft.

    METHOD_BUFFERED – indicates to the I/O Manager the driver will receive an input buffer copy passed to DeviceIoControl function. I/O Manager allocates a system buffer, which means in kernel space, that it is big enough to fit both the input and output data. When the DeviceIoControl function is called, the I/O Manager allocates the system buffer and copies the input buffer inside it. The driver receives the IRP, gets the input parameters, processes them and writes the output data at the same system buffer. When the IRP is completed, the I/O Manager copies the output data from the system buffer to the output buffer provided by the application.

    Besides the Buffered method, there are still the Direct I/O and Neither methods. For our currently example, the Buffered method is great. I am owing a post to you that talks about how to use every one of the other methods.

    FILE_ANY_ACCESS – That indicates the handle doesn’t need to be opened with any special kind of access to allow the IOCTL to be excetuted.

    From the application to the driver

    To send an IOCTL to the driver, you need to use the DeviceIoControl function as it is shown at the example below. This is a very simple program that shows its use.

    /****
    ***     main
    **
    **      I hope all of you have already known that this is the entry
    **      point of the application. Otherwise you might be
    **      precipitated on reading a Windows driver blog.
    **
    */
    int __cdecl main(int argc, CHAR* argv[])
    {
        HANDLE                  hDevice;
        DWORD                   dwError = ERROR_SUCCESS,
                                dwBytes;
        KERNEL_MATH_REQUEST     Request;
        KERNEL_MATH_RESPONSE    Response;
     
        printf("Opening \\\\.\\KernelSum device...\n");
     
        //-f--> Here, we are opening a handle for our device, which
        //      has been created by the driver. Remember that our
        //      sample driver must be installed and started
        //      so that the call below can work properly.
        hDevice = CreateFile("\\\\.\\KernelSum",
                             GENERIC_ALL,
                             0,
                             NULL,
                             OPEN_EXISTING,
                             0,
                             NULL);
     
        //-f--> It Verifies whether the open was opened.
        if (hDevice == INVALID_HANDLE_VALUE)
        {
            printf("Error #%d opening device...\n",
                   (dwError = GetLastError()));
            return dwError;
        }
     
        //-f--> I got lazy and I put the values fixed at the sample code.
        Request.x = 3;
        Request.y = 2;
     
        printf("Calling DeviceIoControl...\n");
     
        //-f--> It sends the IOCTL
        if (!DeviceIoControl(hDevice,
                             IOCTL_SOMA_QUE_EU_TO_MANDANDO,
                             &Request,
                             sizeof(KERNEL_MATH_REQUEST),
                             &Response,
                             sizeof(KERNEL_MATH_RESPONSE),
                             &dwBytes,
                             NULL))
        {
            //-f--> Oops...
            printf("Error #%d calling DeviceIoControl...\n",
                   (dwError = GetLastError()));
     
            CloseHandle(hDevice);
            return dwError;
        }
     
        //-f--> Show the results.
        printf("%d + %d = %d\n",
               Request.x,
               Request.y,
               Response.r);
     
        printf("Closing device...\n");
        //-f--> Close the handle.
        CloseHandle(hDevice);
        return 0;
    }

    Note that there is no strong relation between the IOCTL and the used input or output buffers, but we must be attentive to the buffer sizes when the driver makes use of them. Nobody wants to corrupt the kernel heap allocations or throwing off exceptions in kernel mode, do they?

    You can see how data are processed by the driver when receiving the IRP_MJ_DEVICE_CONTROL. Reading the comments is a good idea; they are a part of the explanation. Wow, that sentence representing my laziness got nice!! Basically, it is the same to say: “Oh my! Seriously, besides preparing this example, you still want me to duplicate all the comment information? I don’t think so!”

    /****
    ***     OnDeviceIoControl
    **
    **      This routine is called when an application
    **      sends an IOCTL to our driver via DeviceIoControl.
    */
    NTSTATUS
    OnDeviceIoControl(__in PDEVICE_OBJECT   pDeviceObj,
                      __in PIRP             pIrp)
    {
        PIO_STACK_LOCATION      pStack;
        NTSTATUS                nts;
        PKERNEL_MATH_REQUEST    pRequest;
        PKERNEL_MATH_RESPONSE   pResponse;
     
        //-f--> We get the parameters referring to our driver.
        pStack = IoGetCurrentIrpStackLocation(pIrp);
     
        switch(pStack->Parameters.DeviceIoControl.IoControlCode)
        {
        case IOCTL_SUM_THIS_TWO_NUMBERS:
        case IOCTL_SUBTRACT_THIS_TWO_NUMBERS:
     
            //-f--> Let's do the checking about the input
            //      and output buffer sizes.
            if (pStack->Parameters.DeviceIoControl.InputBufferLength !=
                sizeof(KERNEL_MATH_REQUEST) ||
                pStack->Parameters.DeviceIoControl.OutputBufferLength !=
                sizeof(KERNEL_MATH_RESPONSE))
            {
                nts = STATUS_INVALID_BUFFER_SIZE;
                pIrp->IoStatus.Information = 0;
                break;
            }
     
            //-f--> The safe then sorry.
            ASSERT(pIrp->AssociatedIrp.SystemBuffer != NULL);
     
            //-f--> Making use of METHOD_BUFFERED, the system allocates only one
            //      buffer to transport either the input and output data. The buffer
            //      size is the same as the biggest one of them. Thus, be careful having read
            //      all the input data before starting to write the output to the buffer.
            pRequest = (PKERNEL_MATH_REQUEST)pIrp->AssociatedIrp.SystemBuffer;
            pResponse = (PKERNEL_MATH_RESPONSE)pIrp->AssociatedIrp.SystemBuffer;
     
            //-f--> It does the math and indicates its success.
            if (pStack->Parameters.DeviceIoControl.IoControlCode == IOCTL_SOMA_QUE_EU_TO_MANDANDO)
                pResponse->r = pRequest->x + pRequest->y;
            else
                pResponse->r = pRequest->x - pRequest->y;
     
            nts = STATUS_SUCCESS;
     
            //-f--> It informs the I/O Manager how many bytes have to be transferred 
            //      back to the application.
            pIrp->IoStatus.Information = sizeof(KERNEL_MATH_RESPONSE);
            break;
     
        default:
            //-f--> Oops... We have received an unknown IOCTL.
            nts = STATUS_INVALID_DEVICE_REQUEST;
            pIrp->IoStatus.Information = 0;
        }
     
        //-f--> It copies the final IRP status and completes it.
        pIrp->IoStatus.Status = nts;
        IoCompleteRequest(pIrp, IO_NO_INCREMENT);
     
        //-f--> NOTE: Remember that we cannot touch the IRP after completing it;
        //      so, don't be the "smart ass" changing the line below to return the
        //      IRP status taking the value from the IRP. (return pIrp->IoStatus.Status;)
        return nts;
    }

    Building in this or in that way

    The sample project available for downloading at the end of this post can be compiled in two ways. One way is using the standard way to compile drivers offered by WDK. Briefly you go through “Start->All Programs->Windows Driver Kits->WDK 6000->Build Environments->Windows XP->Windows XP x86 Checked Build Environment”. This should open a console prompt, as it is shown below. Then, just go to the directory where you download these Internet sources and to the project root directory. There you need to call Build.exe and it is done.

    The other way to compile the entire project allows you to build it using Visual Studio 2008, which has been the environment I have used to compose this project. However, to build the project by using the IDE you have to use DDKBUILD, as it is shown in this post referring to it.

    While I was out, I had received another reader’s question who wanted to know how to read or write into the registry using a driver. In the next post, I’ll talk about that and other details regarding to the registry from a driver’s point of view.

    CYA!

    KernelSum.zip

  • Getting up-to-date

    Once more I have not posted any for a long time. Now you might be thinking: “Here he comes with that chatter he has no time, everything is difficult and God does not like the kernel developers and so on.” Well, I am skipping this part of apologies and just saying what I have been doing during that time.

    Windows Driver Training

    Well, let me see where I have stopped. My last post was during the period when I was teaching a driver development course for a private class. The course was given in five Saturdays of eight hours each. Needless to say, it took me a while. Okay, okay, okay, no excuses.

    Forth C/C++ Programmers’ Meeting

    On next Saturday following the end of the course, I took a tour around this event. They left the door open and I could get through for a peek and talk a little about Windows drivers’ architecture and development using C language. I confess that the invitation to participate in this event was a surprise to me. I’m not a great C++ programmer but I use the C language with “classes”, as just my friend Strauss gets used to say. I can say it was very interesting to participate in this event with a very high technical level. I had an opportunity to realize the way the language may be used in different scenarios. The slides from my talk are available at this link.

    Going back to Boston

    It seems that things only happen on Saturdays. Anyway, on the next Saturday following the meeting, I embarked to Boston on a trip taking about one month. The last time I had been there was due to the OSR training described in this post. This time, it was about an IBM integration program. I could personally meet the people I work with and previously had only met through Web Conferences. Again, it was very interesting and I tried to enjoy it mostly. We were two Brazilians and one Indian. I missed our Brazilian coffee a lot. In this photo, there are below, from left to right, David E. Jones (Manager), Scott D. Hankin (Documentation), William C. Oliveira (Linux), William H. Taber (Linux), Mridula Muppana (Testing), Paul Ganshirt (Windows), Niraj Kumar (AIX), Kaveesh Mishra (Windows), Fernando Roberto (Windows) and Richard Kissel (AIX and Linux). This is just one part of the whole MVFS team.

    Don’t you know what MVFS is? It is a File System that is part of a product called ClearCase. Don’t you know ClearCase? Well, beyond Wikipedia, I had the pleasure of bumping into an observation about the ClearCase at Rajeev Nagar’s book. This book, as I have never gotten tired of saying, is still the only respectable reference on Windows File System development, even though it was first published in 1997. Where is ClearCase in this story? Well, if you’re sick like me and have this book, take a peek at the beginning of chapter nine. On the first page of this chapter, you’re going to find the following passages.

    Yeah, that’s really cool! 🙂

    Back to the Classes

    For a whole month after I had come back to Brazil, I spent some time chasing the content I had lost at the university. Yeah, I’m still graduating in Computer Engineering. I have been working on my final project (Final Course Project). My project must obligatorily have a Windows driver; that is the least thing I could do. Finally, I will be able to show what I can do to my classmates. During the course, some friends had asked me what I’ve worked with, since I have often been reading big books from Microsoft. After trying to explain the simplest way possible, drawing or even using puppets, they still get with that interrogation face. Well, at the time that the blue screen shows up, they will eventually understand.

    I took the tour in the United States to buy this development kit of Altera. This kit will be part of my project and in the future, I will be able to use it in my courses on driver development. Nowadays I have just counted on the OSR training boards, as I already talked about in this post. Unlike the OSR boards, this kit may have its hardware defined by a language called VHDL, and thus, it can cause the board to have a wide variety of behaviors and be able to illustrate the driver interface construction for every situation. This card costs around R$ 1,700.00 in Brazil, while I had only paid U$ 150.00 there in USA. Practically, a candy price. Do you know, when we used to go to the bakery to buy that ice cream cone that came with a stuck toy? So, it was almost the same thing. Another interesting thing in this kit, besides its price, is the possibility of using its USB and PCI interfaces. That will be very funny.

    Portability and Performance Seminar

    In this last weekend, I also attended that event organized by Brazil C/C++ group. It’s amazing to notice how these events are bringing more and more people to it. I took some pictures, but I’ll leave the comments on behalf of my friend Slug, who has a cool post about it.

    Back to the bloggers’ world, I will try not to abandon you, guys for so long. Some excuses apart, it has not been that easy.

    CYA.