Author: Fernando

  • Try, Except, Finally and IoWriteErrorLogEntry (Part 1)

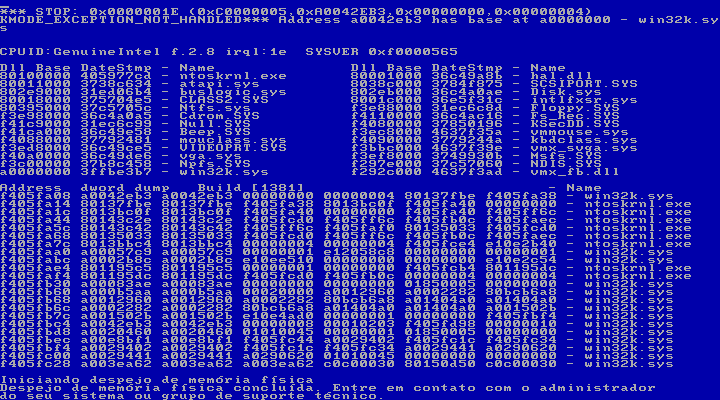
    Most of you have already known about exception handling in C. Knowing that the C Run Time Kernel does not support exception handling in C++, the exception handling in C fits us like a glove. Exceptions do not always mean that a critical error has occurred, but regardless, it is essential to treat them. An unhandled exception in kernel means blue screen. In the case of an unexpected exception, such as an Access Violation, using exception handlers could prevent the system from a blue finish. That’s great, congratulations, one more life saved, but we must not forget that there had been an unexpected exception. This post will not mention how to use exception handlers in details, but it will talk about how we can report such events to the system administrator.

    A Typical Exception Handling

    For those who are just waking up right now, I’ll just give you a brief description of exception handling in the source below. The details are in the reference. The following source was taken from one of the examples available on this blog. This feature can save us from a merciless blue screen whenever “a loser” who calls this function, passes an invalid string as a source of duplication.

    /****
    ***     DupString
    **
    **      This routine receives a Unicode String and duplicates it.
    **      The resulting string should be released
    **      using the ExFreePool routine.
    */
     
    NTSTATUS
    DupString(IN PUNICODE_STRING   pusSource,
              OUT PUNICODE_STRING  pusTarget)
    {
        NTSTATUS    nts = STATUS_SUCCESS;
     
        __try
        {
            __try
            {
                //-f--> Initializes the target
                pusTarget->Buffer = NULL;
     
                //-f--> Allocates the target buffer
                if (!(pusTarget->Buffer = (PWSTR)ExAllocatePool(PagedPool,
                                                                pusSource->Length)))
                    ExRaiseStatus(STATUS_INSUFFICIENT_RESOURCES);
     
                //-f--> Copies the buffer
                RtlCopyMemory(pusTarget->Buffer,
                              pusSource->Buffer,
                              pusSource->Length);
     
                //-f--> Copies the buffer legths
                pusTarget->MaximumLength = pusTarget->Length = pusSource->Length;
            }
            __finally
            {
                //-f--> If something gets wrong, we must release the target buffer.
                if (AbnormalTermination())
                    if (pusTarget->Buffer)
                        ExFreePool(pusTarget->Buffer);
            }
        }
        __except(EXCEPTION_EXECUTE_HANDLER)
        {
            nts = GetExceptionCode();
     
            DbgPrint("DupString >> An exception occourred at "__FUNCTION__
                     " with status 0x%08x.\n", nts);
     
            ASSERT(FALSE);
        }
        return nts;
    }

    Note that there are two blocks of execution. The outermost is the one, which will deal with unhandled exceptions, and the innermost the one, which will deal with resource releasing. The exception handler block will executes the __except block when any exception is thrown from the inside of __try block. This will give us the opportunity to find out what happened and, in some cases, to request that the instruction causing the exception is re-executed. The completion __finally block is executed when the thread goes out of the main block, either by reaching the block’s end, for a return, for a goto out of the block, or even an exception that was thrown. The __finally block is always executed. This gives us the opportunity to release any resource that has been pending during the execution of the block. Taken it together, we can imagine the following situation: suppose the function RtlCopyMemory() throw an exception. In this case, the __except block will run, but for this to occur, the execution flow will leave the inner block as well, thus causing the __finally block execution.

    Within each handler, there is a special function call. Inside __except, we have GetExceptionCode(), which returns us the exception code that was thrown. This function can only be called within this context. Also note that, within __finally block, there is a call to the AbnormalTermination() function which indicates that the block was not executed until reaching its end. In our example, we use this function to determine that something wrong should have happened and it is necessary to release the buffer which would be returned to the calling function. Anyway, check out the reference for a complete description of these resources.

    The main point here to note is the ASSERT at the end of the __except block. If this source is compiled in Checked, the ASSERT will cause a prompt in the debugger. If there is no debugger attached to the system, then a blue screen will appear. That’s because this macro will throw a break exception to the debugger but, as the debugger will not be there to handle this exception, figure it out. When compiled in Free, the ASSERT macro is translated into nothing: our function will handle the exception gracefully and it will return the exception code to the calling function. How sweet but, when will is the administrator going to know?

    A Life Sign

    The standard way to leave this signal is writing in the system event log. What is this? This link can give you detailed information about the system event logs. To write a record in this list from the kernel, we initially must allocate the buffer that will house all the information record using the IoAllocateErrorLogEntry() function.

    PVOID 
      IoAllocateErrorLogEntry(
        IN PVOID  IoObject,
        IN UCHAR  EntrySize
        );

    The pointer returned by this function, although being the type PVOID, points out to an IO_ERROR_LOG_PACKET structure, which has variable size depending on the information that composes it. This structure is used to package all the event data that will be logged.

    typedef struct _IO_ERROR_LOG_PACKET
    {
        UCHAR MajorFunctionCode;
        UCHAR RetryCount;
        USHORT DumpDataSize;
        USHORT NumberOfStrings;
        USHORT StringOffset;
        USHORT EventCategory;
        NTSTATUS ErrorCode;
        ULONG UniqueErrorValue;
        NTSTATUS FinalStatus;
        ULONG SequenceNumber;
        ULONG IoControlCode;
        LARGE_INTEGER DeviceOffset;
        ULONG DumpData[1];
     
    } IO_ERROR_LOG_PACKET, *PIO_ERROR_LOG_PACKET;

    Although this structure has three kilograms of members, you won’t need to fill most of them up. Then, the next step is to pass the structure to the IoWriteErrorLogEntry() function and that is it.

    VOID 
      IoWriteErrorLogEntry(
        IN PVOID  ElEntry
        );

    It is not that easy

    So, is it just to allocate the structure, initialize it, call the function of writing and all is done? This question is simply funny. Not long ago, I was in Porto Alegre, and there someone told me that when one explain something starting with “It’s just…”, the actual work is five times bigger than the one explained. Let’s start writing that famous phrase “Hello World” to see the size of the mess!

    Well… Where do I put error message? Oh yeah, that’s right, into the message file. Unlikely log files we usually do in applications, the messages are not passed directly to the writing function. Instead, the ErrorCode member of the IO_ERROR_LOG_PACKET structure receives a handle to the message which will be displayed. When the IoWriteErrorLogEntry() function is called, it puts the packet in a list in memory. Later, this package is written to the system events log file. The EventViewer, the software used to view such events, gets the message identifier contained in the package. With this handle, it finds the string that will be stored in a separated module. This module can be your own driver or a DLL. Thus, this string is read and displayed to the user’s module. Phew!

    Huh? Who? When? Where? We will rely on the simplest driver example we have to add these features. Let’s start composing the module writing messages to a text file that takes the .mc extension. This text file will be compiled by the Message Compiler. This compilation will generate the resource file containing strings along with the header file that will refer to certain created symbols. See the template message file below:

    MessageIdTypedef = NTSTATUS
     
    SeverityNames =
    (
        Success         = 0x0:STATUS_SEVERITY_SUCCESS
        Informational   = 0x1:STATUS_SEVERITY_INFORMATIONAL
        Warning         = 0x2:STATUS_SEVERITY_WARNING
        Error           = 0x3:STATUS_SEVERITY_ERROR
    )
     
    FacilityNames =
    (
        System          = 0x0
        DriverEntryLogs = 0x2A:DRIVERENTRY_FACILITY_CODE
    )
     
    LanguageNames =
    (
        Portuguese  = 0x0416:msg00001
        English     = 0x0409:msg00002
    )
     
    MessageId = 0x0001
    Facility = DriverEntryLogs
    Severity = Informational
    SymbolicName = EVT_HELLO_MESSAGE
     
    Language = Portuguese
    "Ola mundo!"
    .
    Language = English
    "Hello world!"
    .

    Notice that we have the same message in several languages. What a fancy thing, uh? Save this file with the name of LogMsgs.mc. You can name it of your choice, but remember that this name will be repeated at the generated files. To compile this file, just put it in the list of sources to be compiled, which is in the sources of your project file, as it is shown below. If you decide the messages should be contained within the driver itself, then you need to add the LogMsgs.rc file that will be generated by the Message Compiler.

    TARGETNAME=Useless
    TARGETPATH=obj
    TARGETTYPE=DRIVER
     
    SOURCES=LogMsgs.mc\
            Useless.c \
            LogMsgs.rc

    Once compiled, the files LogMsgs.rc and LogMsgs.h will be generated. The header file defines the error codes defined at the message file and should be included in the sources files that will make calls for log creation. Watch an excerpt of this file that was generated automagically.

    //
    // MessageId: EVT_HELLO_MESSAGE
    //
    // MessageText:
    //
    //  "Ola mundo!"
    //
    #define EVT_HELLO_MESSAGE                ((NTSTATUS)0x402A0001L)

    Finally we can write the code lines that will use all of this stuff we have created.

    #include  
    #include "LogMsgs.h"
     
    /****
    ***     DriverEntry 
    **
    **      That's our driver entry point, everything starts from here,
    **      and atfer gets worse and worse...
    */
     
    NTSTATUS DriverEntry(IN PDRIVER_OBJECT  pDriverObject,
                         IN PUNICODE_STRING pusRegistryPath)
    {
        PIO_ERROR_LOG_PACKET    pLogPacket;
     
        //-f--> Allocates an entry to the event.
        pLogPacket = IoAllocateErrorLogEntry(pDriverObject,
                                             sizeof(IO_ERROR_LOG_PACKET));
     
        //-f--> Inicializes all the structure
        RtlZeroMemory(pLogPacket, sizeof(IO_ERROR_LOG_PACKET));
     
        //-f--> Puts up the desired message
        pLogPacket->ErrorCode = EVT_HELLO_MESSAGE;
     
        //-f--> Sends the entry to the system event list
        IoWriteErrorLogEntry(pLogPacket);
     
        //-f--> Phew, we got to be here; that makes
        //      a success returning code to the system be worthy!
        return STATUS_SUCCESS;
    }

    Is everything done now?

    From the driver viewpoint, it is all already done. The driver can now be compiled, loaded and thus able to create the entry in the log, carrying the message number to be displayed by EventViewer. After executing the driver, we can open the EventViewer; and it is able to find the entry generated by our driver, and then to see the message.
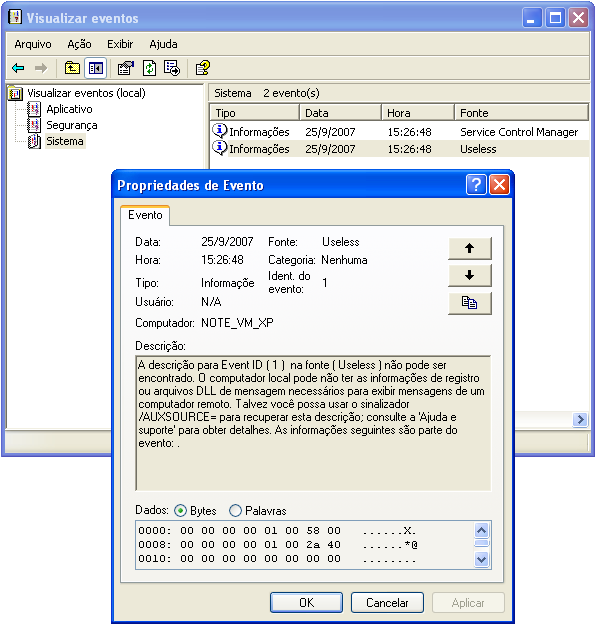
    Oops! We still have to tell EventViewer what is the responsible module for storing the strings. In our case, the messages are in the driver itself. To achieve this, we must add a key with the name of our driver in the EventLog registry key. Within this key, we still have to create two values indicating the module path which contains the messages and what kinds of events our driver can generate. Look at carefully the registry path in the figure below.
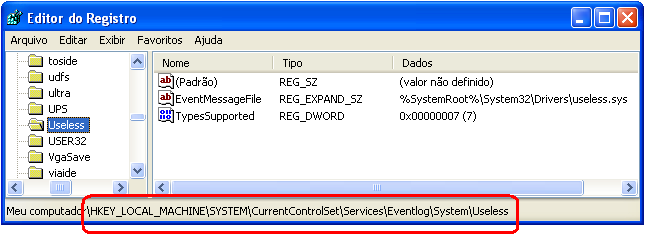
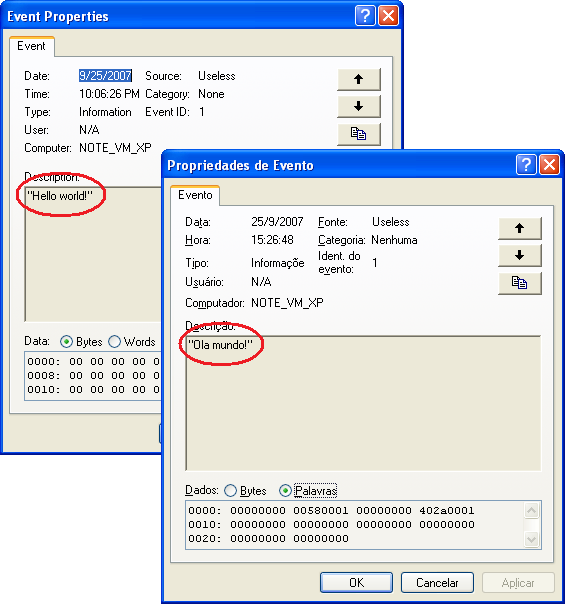
    Once we set the values described above in the registry, just reopen the same event so that the message is displayed as it should be. Remember that the driver does not need to send the event again for the message to be displayed correctly. The driver sends only one entry with the message identifier. This was already done regardless of the message module has been configured. In the figure below, we can see the messages in Portuguese and English, depending on the language of the operating system. What a cute!
    As this post is getting bigger than I had expected (for change), I will divide it into parts. I still want to comment on how to use its input parameters to clarify the doubts that some of you may be asking now: “If the log entry is initially in a linked list, and only after a time that is actually going to the disk, can entries be lost if the machine falls in this interval? “.

    Is the butler really culprit? Is the Matrix inside another Matrix? Does Tostines sell more because it’s fresh, or is it fresh because it sells more? Do not miss it!
    CYA … 🙂
  • Did you say I don’t like Blue Screens?

    I’m not saying I love them. Blue screen is a sign that something went wrong but, it is better you see it than a customer calling you saying that he saw one. So we need to do our best to make it make it appear while your driver is under test. I’ve seen programmers escaping the blue screen just trying to hide themselves behind an exception handler. I do not need to say this is not that useful. This way, you just defer to find mistakes that you or someone else will find eventually. Computers that are using your drivers may have a sudden reboot here or there. But even blue screens can happen, it’s all a matter of luck; however, your customers can realize that using your drivers makes them too unlucky. In this post, I’ll give you some tips about how we can see more blue screens in our test drivers.

    Going through with F8

    Do not take this as “Test Yourself,” but take it as testing all the returning codes that you can. Remember that if something gets wrong, it is not just a MessageBox that will appear, but usually, everything ends up in “blue”, sooner or later. Let’s hope for “sooner”. I often use to say that every code deserves, at least, an F8 walkthrough, which is my Step Into key. Yeah, I know it’s different of the usual one, but when I started using Visual C/C++ 1.52, its keyboard layout was it. But back to the point, once I have made a function that should simply read a file, I went through the code with F8 and received a return code that was not STATUS_SUCCESS, but passed the NT_SUCCESS() macro. The haste induced me to ignore it. It was not an error, it was just a warning. Weeks later, the test team told me that, for any reason, the driver was returning garbage when reading the file. A bit of debugging showed me that same returning code. Only after having loked at its definition in the file ntstatus.h I could understand everything.

    //
    // MessageId: STATUS_PENDING
    //
    // MessageText:
    //
    //  The operation that was requested is pending completion.
    //
    #define STATUS_PENDING                   ((NTSTATUS)0x00000103L)    // winnt

    During debug sessions, the system has enough time to do the I/O that was deferred previously; but, freely running the code, the story can change.

    A code that has passed on its F8 test can run in various existing and imaginable environments. Therefore, this first phase is just to remove the grosser errors. After that, it is the test team should beat the victim. There are people who really have a gift to test software. I had worked at a company where the person who used to test the products should have had a personal problem with the software that we produced (or with us, go figure!). I could test the software for days, but when I delivered it for testing, it did not take half an hour for him to call me back saying that phrase that has become his trademark: “Too bad !!!”. There was no explanation. We used to say that his PC had been formatted over an Indian burial ground. No wonder that developer’s testing is so frowned upon.

    Using ASSERT

    I imagine most of you have already heard from ASSERT macro. This macro is intended to ensure that a certain condition is true. If the condition is false, a blue screen just pops up. Wow, what an incredible macro that helped us very much! Yeah, I know, it is not quite that. Actually, this is the behavior we would have if the debugger was not attached to the system. Then, that macro would be perfect only in Checked. Do I must remind you that Checked means Debug and Free means Release? Well, already done. If we take a look at its definition, we will see that the obvious thing has already been thought.

    #if DBG
     
    #define ASSERT( exp ) \
        ((!(exp)) ? \
            (RtlAssert( #exp, __FILE__, __LINE__, NULL ),FALSE) : \
            TRUE)
    ...
     
    #else
     
    #define ASSERT( exp )         ((void) 0)
     
    ...
     
    #endif // DBG

    But what happens if we have the debugger attached to the system? Good question, this is a really interesting question; I’m glad you have asked it. Has anyone ever told you that you have some knack for programming? Anyway, I have changed one of our examples to enforce this condition.

    extern "C"
    NTSTATUS DriverEntry(IN PDRIVER_OBJECT pDriverObj,
                         IN PUNICODE_STRING pusRegistryPath)
    {
        //-f--> I think I'm sure that this count is right.
        ASSERT(1 + 1 == 3);

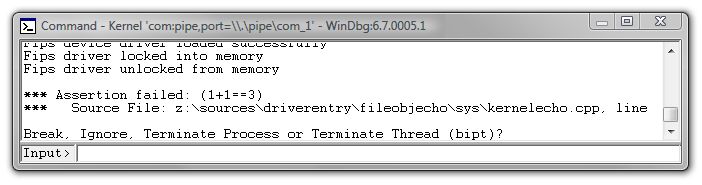
    If the condition fails and we have a kernel debugger attached to the system, it will display the condition that had failed at the output window and it will request us an answer among the four alternatives, as it is shown below.

    As you can see, the ASSERT is practical, easy and not fattening. It just requires a bit of brain, as well. I’m sying this because we’ve all had bad days, and after 11:00 pm, no programmers should answer for any produced code. Once, it took me some time to figure out why the code below was not working properly. Although everything was working perfectly fine when compiled on Checked, it seemed to me that a certain function simply was not being called in Free. If you take one more looking at the definition of this macro, you will see that the condition disappears when compiled in Free, and in this case, the call too.

        //-f--> Programming is just not enough, thinking is required.
        //      << Don't copy this >>
        ASSERT(DoSomeThing() == STATUS_SUCCESS);

    A system in Checked

    Wouldn’t it be nice to have an entire operating system full of ASSERTs and tests to detect the slightest sign of trouble and on finding one, the system would present us with a nice blue screen? Well, you’ve probably heard of the Checked Build versions. They are exactly what I have just written. An entire operating system built on Checked. This means that all of ASSERTs that were at the sources have been included in the final binaries and they are checking the system for you. It may seem silly to have to install your driver on one of these systems, but believe me, it is worth. I’ve had drivers that worked very well for months until my manager suggested that they should be tested on Checked versions. From the top of my arrogance, I thought to myself: “I see no reason for that”. Well, we are always learning as we are living. The test machine has not even has started with my drivers. Several blue screens were shown, one after another. Checked Build versions are still able to check for deadlocks. Could you guess what would happen if a spinlock was held for more than a certain time? I bet you do.

    Since Checked Build versions are foolproof, I can use them as my default system? Actually you can, but everything is much slower, thousands of checks are being made all the time and the code has no optimization applied. In a fresh installation without installing any additional software, you can find ASSERTs at Internet Explorer or other programs. That’s right, not just the kernel is Checked, but the entire system is as well. You always have to let a kernel debugger attached to your system, because the slightest hint of smoke would be more than an enough reason for one more blue screen.

    If my driver has passed by the Checked Build, then is the driver perfect? Sorry to disappoint you. Remember that the performance impact caused by so many tests can hide problems like race conditions. The ideal is to test your drivers in both versions. One setting allows us having only the system image and HAL in Checked, while the rest of the system stays in Free. This may provide you with additional tests in the kernel while the rest of the system runs the lighter version. This link explains how.

    OK, is my driver beautiful now?

    Actually, this still is only the minimum you should do. Another excellent tool for generating blue screens is the Driver Verifier. This application works in conjunction with the system to track actions from a list of drivers composed by you. From Windows 2000, DriverVerifier comes already installed. Try it now! It doesn’t require any skill or even practice. Type “Verifier” at the Windows “Run…” window and a simple Wizard starts. As I intend to finish this post still alive, I won’t describe how to use this tool step by step, but there are several links on the product page that can help you with this.

    OK, now I know you really love Blue Screens!

    To get an idea of how importnat a search for blue screens is for a software company, Microsoft promotes IFS Plug Fest in order to test the interoperability of different products that implement File Systems or filters for them. The event is for free, but each company must pay for travel expenses and lodging of its representatives. In these meetings, the professionals around the world gather together to do the tests with each other and they can get in touch and ask possible questions concerning this complex model of development. There are also sponsored seminars that discuss common problems faced by this community. I have not been at one of these, but maybe one day I will be able to.

    Stay calm, there are even more

    Beyond the mentioned tools, there are some others that I could not forget mentioning; however, I won’t take long on explaining how each of them works.

    • Prefast – A tool that analyses the source code to be compiled by the DDK, looking for usual programming mistakes for Kernel drivers.
    • Static Driver Verifier – That tool makes a binary analysis on the driver file already built. The test takes longer but, it detects more defects than using Prefast.
    • Hardware Compatibility Test – A set of software to apply tests to get drivers certified by Microsoft. It was discontinued a while ago.
    • Driver Test Manager – That’s the new test software used to get your drivers certified.

    After so many blue screens, only drinking some coffee can help us!.
    CYA!

  • Using FileObject and FsContext

    Well, with some posts and a little patience to endure my jokes, we can construct a simple driver that responds to calls from applications. A call to CreateFile function creates a connection between the application and device, returning a handle which will later be used to route reading/writting requests to the device. If there are more calls to CreateFile function, new handles will be returned. Like it happens with files, each handle has its own context. Suppose you open the same file twice so, you will get two handles with different contexts. A reading of 100 bytes from the first handle would cause the file’s current location be different from the initial position. A new reading using the same handle would result on getting the next 100 bytes ahead of the ones already read. Now if you used the second handle, you would get the first 100 bytes of the file. That’s because each handle would keep different file locations. In this post, I will talk about how to keep this context between the different opened handles for your device.

    The issue in practice

    Not long ago, in one of my posts, I gave a basic driver example that implements a linked list of buffers that were written to the device. The same buffers are obtained from further reads to the same device. This post will be based on this sample driver to make the tests and suggested modifications. The driver’s string list was implemented as a single global variable. If there is a single list, the various handles gotten from the applications will manipulate this same list.

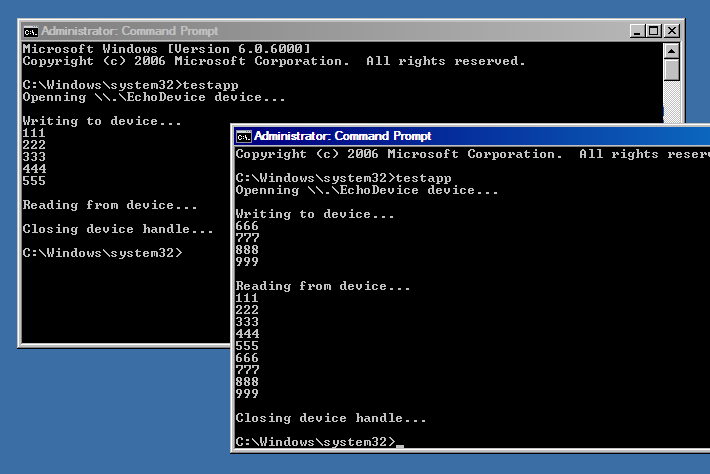
    Remember that the test program writes the strings, that were typed in a console at the device until an empty one is supplied. When this occurs, the application starts reading and displaying the results at the screen. Thus, the same provided string sequence should be displayed. To reproduce the problem, follow the steps below with the test driver already installed:

    1. Open up a Prompt window and execute a test program instance.
    2. Enter the string sequence that goes from “111”, “222” until “555”, but don’t enter the empty one yet.
    3. Open up a new Prompt window and execute another test program instance.
    4. On this new window, enter the string sequence that goes from “666” until “999” and then, an empty one.
    5. Go back to the previous instance and then, enter an empty string into the test program.

    You should get an output as it is shown below. Note that the first test program instance has not read any string, despite having written several ones. These missing strings were got to the second test program instance.

    Separating lists

    Creating an algorithm able to separate these lists using the process identification could even work, but try to imagine that a single application could use two different libraries, which in turn, would use these lists. In this way, one library list would merge into the other library list, since both libraries are at the same process. To separate the context using various device openings, we use the FileObject member of the current stack location.

    When an application calls the CreateFile function, this request goes to the ObjectManager which verifies the existence of the desired object, then checks whether the application has rights to obtain a handle to this object, and, if everything is agreed, the request reaches your driver in the form of an IRP with its Major Function as IRP_MJ_CREATE. To get the FileObject referring to this new connection being created, you need to do as shown at the code below.

        //-f--> Gets the FileObject referring to this list
        pStack = IoGetCurrentIrpStackLocation(pIrp);
        pFileObject = pStack->FileObject;

    This or that list?

    All subsequent operations that come from the same object instance will come with the same FileObject. This helps tracking the context of a certain device opening from the several ones that your driver receives.

    So, all that I need to do is to create a list of FileObjects and then link each one of them to a string list? The idea of linking the FileObject to a structure that holds this context is so obvious that the system has already reserved a space into the FILE_OBJECT structure exclusively for this use.

    typedef struct _FILE_OBJECT
    {
        CSHORT  Type;
        CSHORT  Size;
        PDEVICE_OBJECT  DeviceObject;
        PVPB  Vpb;
        PVOID  FsContext;
        PVOID  FsContext2;
        PSECTION_OBJECT_POINTERS  SectionObjectPointer;
        PVOID  PrivateCacheMap;
        NTSTATUS  FinalStatus;
        struct _FILE_OBJECT  *RelatedFileObject;
        BOOLEAN  LockOperation;
        BOOLEAN  DeletePending;
        BOOLEAN  ReadAccess;
        BOOLEAN  WriteAccess;
        BOOLEAN  DeleteAccess;
        BOOLEAN  SharedRead;
        BOOLEAN  SharedWrite;
        BOOLEAN  SharedDelete;
        ULONG  Flags;
        UNICODE_STRING  FileName;
        LARGE_INTEGER  CurrentByteOffset;
        ULONG  Waiters;
        ULONG  Busy;
        PVOID  LastLock;
        KEVENT  Lock;
        KEVENT  Event;
        PIO_COMPLETION_CONTEXT  CompletionContext;
        KSPIN_LOCK  IrpListLock;
        LIST_ENTRY  IrpList;
        PVOID  FileObjectExtension;
     
    } FILE_OBJECT, *PFILE_OBJECT;

    The FsContext and FsContext2 fields are used for this purpose and unless you implement a filter, you can at ease use them. To make each device opening has its own list, it is necessary to store the head list address in one of these fields, as it is shown below at the new implementation of OnCreate. The whole source code changes are available for downloading at the end of this post.

    /****
    ***     OnCreate
    **
    **      This routine is called whenever an application or driver
    **      tries to get a handle to the device we have created.
    */
     
    NTSTATUS
    OnCreate(IN PDEVICE_OBJECT  pDeviceObj,
             IN PIRP            pIrp)
    {
        NTSTATUS            nts = STATUS_SUCCESS;
        PBUFFER_LIST_HEAD   pListHead;
        PIO_STACK_LOCATION  pStack;
     
        //-f--> A hello to the debugger...
        KdPrint(("Opening EchoDevice...\n"));
     
        //-f--> Allocates the list head for this IRP_MJ_CREATE
        pListHead = (PBUFFER_LIST_HEAD) ExAllocatePoolWithTag(
            PagedPool,
            sizeof(BUFFER_LIST_HEAD),
            ECHO_TAG);
     
        if (pListHead)
        {
            //-f--> Initializing the buffer list and its Mutex
            InitializeListHead(&pListHead->BufferList);
            KeInitializeMutex(&pListHead->Mutex, 0);
     
            //-f--> We store the context to the FileObject.
            pStack = IoGetCurrentIrpStackLocation(pIrp);
            pStack->FileObject->FsContext = pListHead;
        }
        else
            nts = STATUS_INSUFFICIENT_RESOURCES;
     
        //-f--> Here we complete the IRP with success.
        pIrp->IoStatus.Status = nts;
        pIrp->IoStatus.Information = 0;
        IoCompleteRequest(pIrp, IO_NO_INCREMENT);
        return nts;
    }

    Is a FileObject equivalent to a Handle?

    No. Initially we have a handle for each FileObject, but the number of handles to a FileObject increases as their handles are duplicated. When the CreateFile function is called, your driver receives an IRP_MJ_CREATE; however your driver is not alerted when someone calls the DuplicateHandle function. Thus, each handle points to an object but an object can be pointed out by several handles.

    Who will clean this mess?

    When all references to a given FileObject are released, your device will receive an IRP_MJ_CLOSE. Let’s use this event to clean up any remaining strings on the list.

    /****
    ***     OnClose
    **
    **      I'll make it simple just saying that this routine is called, whenever
    **      an application or driver closes the handle which was previously opened.
    **      Actually, this does not happen exactly in this way. (postponed to a future post)
    */
     
    NTSTATUS
    OnClose(IN PDEVICE_OBJECT  pDeviceObj,
            IN PIRP            pIrp)
    {
        PBUFFER_LIST_HEAD   pListHead;
        PIO_STACK_LOCATION  pStack;
        PLIST_ENTRY         pEntry;
        PBUFFER_ENTRY       pBufferEntry;
     
        //-f--> A hello to the debugger...
        KdPrint(("Closing EchoDevice...\n"));
     
        //-f--> Retrieves the list referring to this FileObject.
        pStack = IoGetCurrentIrpStackLocation(pIrp);
        pListHead = (PBUFFER_LIST_HEAD)pStack->FileObject->FsContext;
     
        //-f--> Here, we remove all the remaining nodes that were not read
        //      by the application. That would happen if the application had called
        //      WriteFile but not ReadFile.
        while(!IsListEmpty(&pListHead->BufferList))
        {
            //-f--> It takes the first node from the list.
     
            pEntry = RemoveHeadList(&pListHead->BufferList);
     
            //-f--> Retrieves the base address from the node
            pBufferEntry = CONTAINING_RECORD(pEntry, BUFFER_ENTRY, Entry);
     
            //-f--> Finally releases the memory used by
            //      that node.
            ExFreePool(pBufferEntry);
        }
     
        //-f--> Releases the memory used by the head list.
     
        ExFreePool(pListHead);
     
        //-f--> Here, we complete the IRP with success.
        pIrp->IoStatus.Status = STATUS_SUCCESS;
        pIrp->IoStatus.Information = 0;
        IoCompleteRequest(pIrp, IO_NO_INCREMENT);
        return STATUS_SUCCESS;
    }

    When an application is terminated or even when it falls unwillingly, all those application handles are closed by the system. Thus, it is guaranteed that your driver will always receive the IRP_MJ_CLOSE related to the object that was released. Actually, there is a little story about IRP_MJ_CLEANUP and IRP_MJ_CLOSE that we will let to the next time.

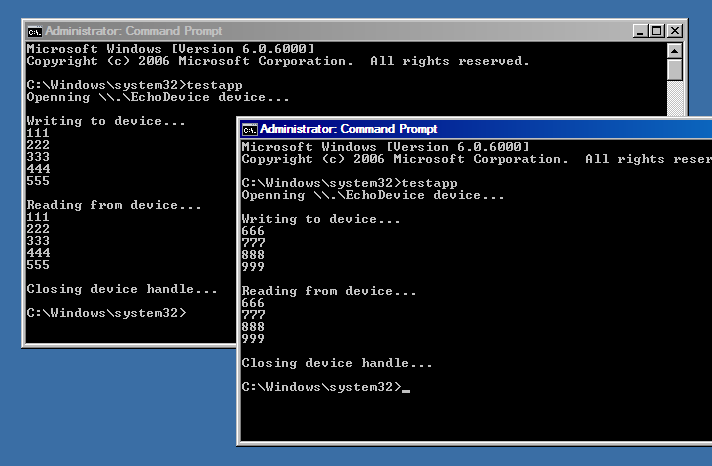
    Once implemented the change, each opened handle will own list, unless the handle is duplicated. If we repeat the same sequence of the listed steps above to force the error, we will get the following output.

    In a future post, I’ll show you how to give names to the lists in order to allow different processes begin able to open the same list from a known name.

    CYA! 🙂

    FileObjEcho.zip

  • Debug Option or Security Fault?

    Some time ago I have written a post that talks about replacing faulty drivers using WinDbg. This is nn excellent technique to substitute drivers which, because of some kind of problem, prevents the machine from starting. However, to be able to enjoy all of this facility, there must be a connection between the system and the Kernel Debugger. This brings us to my last post that ostensibly talks about how to enable this feature just being in front of the machine, and at worst, having a serial port. All of this is too easy, after all; you never know where an unknown problem can happen and much less, in which machine ir is going to happen. But all of this convenience has a price. The side effect is that anyone can debug the kernel of a machine without ever having any valid account on it. In fact, a laptop, a cable and a serial port are beyond than enough weapons to dismantle the system security, without a password, wireless network and even without brute-force, only doing Kernel Debugging.

    Installing a Driver Through the Serial Port

    Drivers are a kind of software that needs to be reliable and very well written. After all, they run at the lowest level of the system. With the drivers, it is actually very easy to cheat the system, since most of the system runs on the service offered by the kernel. The posts above mentioned have motivated me to write a small proof of concept that aims to inject a driver which installs itself on the system. This driver, in turn, extracts and installs a program into the Windows which will run every time one logs on the system. To do that, we only need a machine that can be debugged. My last post shows that this condition is not so difficult to be found. Want to try? What’s the percentage of computers around you that have serial ports?

    Step by Step

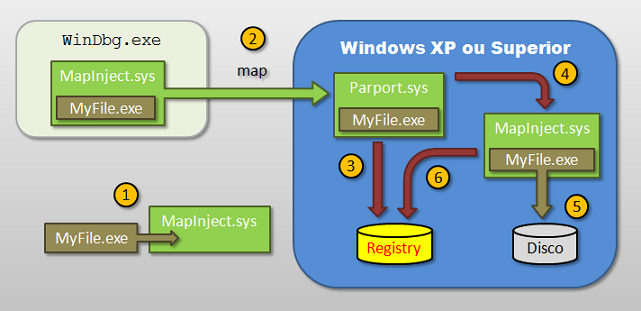
    This is one of those posts that come with a code available for downloading. The whole procedure shown here can be reproduced and modified by the readers of this blog. This is not a blog devoted to attack Windows; and my goal here is purely didactic. I won’t explain every line of the sample code; otherwise, this post would be very extensive. However, I am willing to answer any questions about this. The figure below outlines the steps to be taken to achieve our goal.

    1. The first step occurs when compiling the sample driver. The solution has three available projects. The first project is the application to be injected. In this case, a Win32 application that just displays a message and is ended up. We will refer to this application as MyFile.exe. The C/C++ Run Time was removed, in order the smallest possible application to be obtained. This will be worthy a lot when you have to transfer everything via a serial cable at 19200. The second project is just one tool. Using the archive MyFile.exe, which must already be compiled, this tool generates a header file that creates a variable of the type array of characters contained into its body, where the file passed as a command line. This is not the most advanced method of making a Self-Extractor, but it is enough for our purpose here. Let’s call this tool HeaderFile.exe. When the driver is compiled, this header file is included making the variable containing the application be injected. We will call our driver MapInject.sys. The driver in this example is compiled using ddkbuild.cmd with Visual Studio 2005. More details with this regard in this post.

      /****
      ***     WinMain
      **
      **      This application does almost nothing and doesn't use C/C++ Run Time
      **      so that we can avoid a bunch of codes.
      */
       
      int WINAPI WinMain(HINSTANCE   hInstance,
                         HINSTANCE   hPrevInstance,
                         LPSTR       lpCmdLine,
                         int         nShowCmd)
      {
          //-f--> That is it...
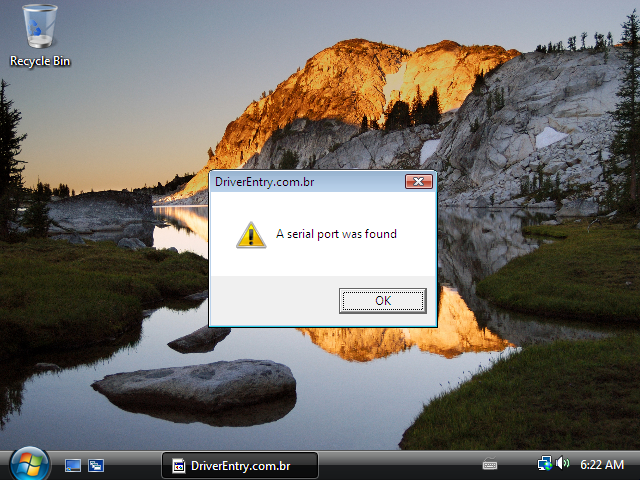
          MessageBox(NULL,
                     L"A serial port was found",
                     L"DriverEntry.com.br",
                     MB_OK | MB_ICONEXCLAMATION);
       
          return 0;
      }
    2. Using driver mapping techniques demonstrated in this post, we can make our driver be loaded in replacement of any driver in the pre-existing system. Obviously, our driver will not perform all the steps that the original driver should perform, thus, we must not choose a driver which does essential tasks for the system loading, such as disk drives, video or something like that. Particularly I have chosen using the Partport.sys parallel port driver, which is a driver that exists in any basic Windows installation and don’t not make us so missed while playing here. This driver is not also a Boot driver, because boot drivers need a special Loader on Windows XP to be mapped by the Debugger.

      map 
      \Windows\System32\drivers\parport.sys 
      Z:\MapInject\Driver\objfre_wnet_x86\i386\MapInject.sys
    3. After the driver has been loaded and mapped by the system, all that we need to do on the system is just some willingness. When our driver is first loaded, it is loaded in replacement of Parport.sys. In this condition, the driver must install itself on the system. Some things have never changed. To install a driver on Windows NT platform just create a few key values in the system registry, as described in this post. This will still work on Windows Vista. Our driver does this at this time.

    4. After making the registry modifications, now we have to rename our driver because it was mapped and, for that reason, it gets the replaced driver name. Thus, a function changes the name of the driver from Parport.sys to MapInject.sys. This driver could remain installed using the original name but, our driver would be replaced by the system restore when the driver mapping didn’t take place.

    5. As you know, our driver has a variable that contains the whole body of our application. Thus, it is very simple to extract the application and save it into the disk. The System32 directory comes in handy as a destination for our application. Since we’re running on system account at this time, we have no problem on doing it.

    6. Now that our application has been extracted, we have to make it run automagically. Some of you may know that there is no documented or reliable enough way to create a process from the system kernel however, there are several places on registry where we could write and ask an existing process in Windows to start our application. One of the most classic registry keys that allow this it is the Run of Windows Explorer; but, as shown in this application, there are many other keys to be chosen. When a user logs on the system, the Shell enumerates this key and executes each line in the user’s account that is logged on. This will make our program be executed.

    Making it Work

    Again, a virtual machine fits like a glove for this type of thing. If you do not know how to do Kernel Debugging using a virtual machine, this post can help you. Everything is very simple after the driver being already encoded. The only thing needed to complete the test set is a mapping that replaces the Parport.sys driver for a MapInject.sys file, as it is shown in the map file above. After that, just wait until the system loads up and everything is done. Any user who logs on to the system will see the message of our program. A point to note is that, even if the user is smart enough to find the MyFile.exe file, our change at the registry and delete them, they will be recreated when the MapInject driver starts on each system reboot. To stop this process, just remove the MapInject driver from the system.


    Password? What For?

    Windows protects its most important resource for most users, allowing only administrators to have access to the machine settings that can compromise the system stability. This phrase is kind of “cute” and makes several system administrators to feel comfortable. But life is a box of surprises, and in a nice sunny morning, a post is published on a RootKits website, providing tips on how to log into a system in Debug Mode without any password. Recently, another post has come out about it and I will not repeat everything here but, I can say that this same technique also works with Windows Vista. In fact, if you can log into the system without using any password, you will not need to map a driver to make it run on this machine. Just log in as an administrator, install it and go ahead but, I admit that it was at least funny to write this proof of concept, and moreover, the sources may still be an example for some tasks you want to do in Kernel Mode.

    A possible solution? Maybe letting your serial port disabled in BIOS, which should be password protected, is something to be done. But there is not much you can do when someone has physical access to the machine.

    Enough, I already wrote too much.
    Hugs!

    MapInject.zip

  • Emergency Debug

    Suddenly, a blue screen. That’s right, that driver which you had not seen its source files for so long, which was your model for stable driver, the one that was installed in the machine of the CEO where you have worked, the same one that suddenly decided to take revenge and simply got a blue screen at the system startup. That means the machine turns on and resets and resets and resets in an infinite loop that runs in parallel with your resignation letter printing which, by the way, has being printed on another PC. To debug this machine and see what is happening, and then save your project, your job, your dignity, your marriage, and why not, your life: you must configure the system to enter in Debug Mode so that our inseparable friend WinDbg can take action. But how about setting it to debug a machine that is not even starting? Today I will talk about the support that Windows offers to avoid such an embarrassing situation to connect a Debugger in a computer that has never its settings for Kernel Debugging enabled, either through BOOT.INI or BdcEdit.

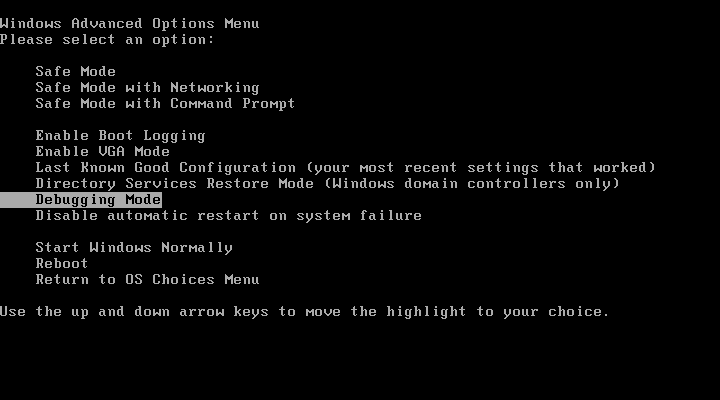
    This post assumes that you have already known how to do Kernel Debugging and uses some related terms with this regard. Since Windows 2000, if you press the F8 key while the machine is running the NT Loader, more precisely, 2 seconds before the system starts to loading up, the system will freeze up and displays the menu as it is shown below.

    Select the “Debugging Mode” item. It will take us to the list of installed operating systems. Select the system and the rest is up to the WinDbg. Under these conditions, setting the serial connection would be applied a baud rate of 19200 on the higher serial port existing on your machine. That is, if your PC had two serial ports, then the connection would be made on COM2 at 19200. At least that’s what tells us the reference.

    But in real life…

    If you do some tests, will also conclude that we cannot believe everything we read. Both Windows 2000 and Windows XP always use COM2 port with 19200.

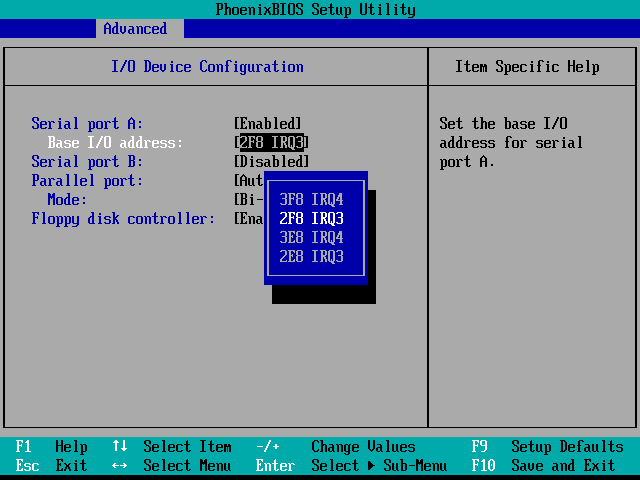
    My computer is modern and it only has one serial port. Can I kill myself? That is it, even in theses cases, the system tries to use COM2, even if it does not exist. But don’t worry, life is beautiful and there is still hope. Some BIOS allow you to configure the base address and interrupt about the only existing serial port. This will help us greatly; after all, the NT Loader is not a Win32 application that requests a handle to the COM1 or COM2 device through the Object Manager. It simply follows the addresses adopted as standards.

    • COM1: Address 3F8h, IRQ 4
    • COM2: Address 2F8h, IRQ 3

    In this way you can configure the only port (COM1) to answer for the addresses which are normally used for COM2. The BIOS usually has a list of features commonly used by serial ports. Thus, any autistic chimp could make this change.

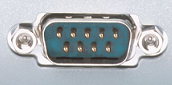
    But my computer is even more modern and has no serial port at all. Can I kill myself now? Hope it is the last to die. You can still install a PCI card Expander (PCMCIA in case of notebooks) that provides us with the needed serial ports. It is important to note that this board should create additional ports COM1 and COM2 at the above standard addresses.

    You don’t understand, I am an unlucky bastard who bought a MacBook 13″ which, besides not having serial ports, also offers no PCMCIA or ExpressCard slot. Can I kill myself now? As I have mentioned in another post, serial ports created from USB ports are not an option for using in a TARGET machine during the Kernel Debugging. This connection is made by the NT Loader and serial ports that it knows and they are the only those ones the addresses mentioned above. OK, now you can kill yourself.

    Anything that could get better?

    Windows Vista ignores the documentation mercilessly. The default setting for Kernel Debugging when you press F8 during its Boot is for using COM1 port with 115200. But if you used the Bcdedit application with the /DbgSettings to modify the connection settings for Kernel Debugging, then these same settings will be used when F8 is pressed. That is, if you are an unlucky bastard that, like me, have configured the IEEE1397 port for debugging into your MacBook, then these are the settings used when you press F8.

    Pode parecer brincadeira, mas é realmente frustrante ter que ir até à máquina do cliente onde seu driver está dando trabalho, armado dos seus vários aparatos tecnológicos, tais como notebook, porta FireWire, cabo serial e assim por diante, e não poder fazer nada simplesmente porque você não consegue conectar o depurador.

    It may seem fun, but it’s really frustrating having to go to the customer machine where your driver is annoying, armed with all of your various technological devices such as laptop, FireWire port, serial cable and so on, and simply could not do anything because you cannot attach the debugger.

    Once again, I hope I could help in anyway.
    Cya!

  • My Personal GINA

    Due to my returning classes to the university, my time to write posts has now subsided, and once again, you will have to put up a post that says nothing about drivers. In fact, I wrote this GINA sample while I was writing a post about drivers. My friends Slug and Thiago have told me I should just leave this post and write one which could be applied to Windows Vista, since GINAs have not longer been supported on Windows Vista. Then, I have ended up forgetting this code over here. Poor thing… Anyway, as I have thought the result was at least funny, I’ll leave this Stub GINA here (sources included), that allows us to change the title of the dialogs presented.

    What is a Stub GINA?

    It would be even better to say what a GINA is. I have written a few things about this subject on the post that talks about how to use SoftIce, but in summary, GINA is the system component that implements the Graphical Interface for Network Authentication for users on the computer. Do you still want it more concise? It is the small screen for system logon. GINA is responsible for receiving the data that identifies a user and pass them to the components that can validate their password and generate the token with the user’s credentials. This token is used to create the session that the user is logging in and where your desktop will be created. GINA also implements the interface that makes the password changing, lockout and station shutdown. I will not detail all the steps here: everything is explained at the Platform SDK.

    The original Windows GINA is implemented into a DLL named Msgina.dll that is into the System32 directory. To implement a new GINA, you must create a new DLL and “tell” the system that this DLL will be the new GINA via registry key. However, creating a GINA is not that easy as it seems to be. I have developed some of it and let’s say documentation could be better. GINA has many responsibilities and if you just want to supplement or change any of its default behavior, you should simply create a stub GINA. Stub GINA is a DLL that exports all the functions GINA should do, but it passes the calls to the original system GINA, thus, giving us the option to only change the desired features.

    This is not a Tutorial

    If you want to learn how to develop a stub GINA and need a starting point, then go to the Platform SDK Samples folder and use the example that can be found at C:\MSSDK\Samples\Security\Gina\GinaStub. The project I’m leaving here performs some juggling to avoid too many repetitive codes and it also does not use the C/C++ Run Time, so that, it can be compiled using Visual Studio 2005 and still be able to run on a Windows NT 4.0.

    Installing a GINA

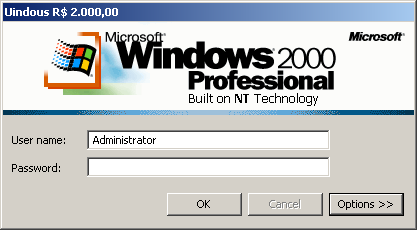
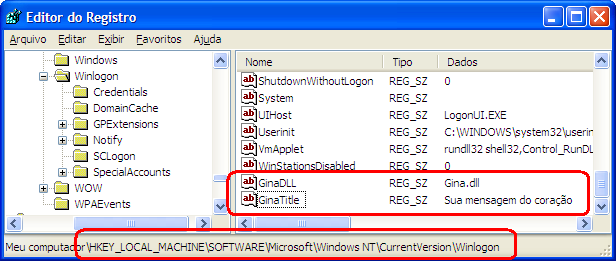
    To install a GINA, you must create a value called GinaDLL at the Winlogon registry key, as it is shown below. This value is queried by Winlogon.exe and, if this value does not exist, the default GINA is loaded, though. The GinaTitle value should contain the message that will appear at the dialog titles. Actually, this value has nothing to do with Windows: our stub GINA is the one that reads this value. From the source files, available for download at the end of this post, there is a script file that sets these registry keys to make your life easier.

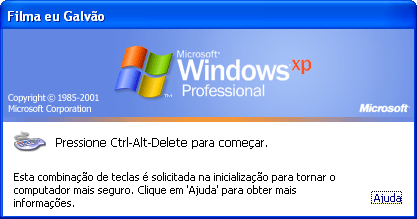
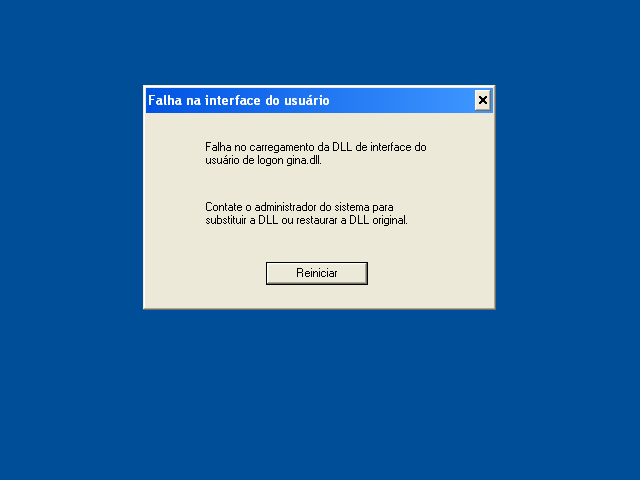
    Make a copy of Gina.dll file to the System32 directory. Make sure that everything is all right before rebooting the machine to make these changes take effect. If something is wrong and Winlogon.exe is not able to load the GINA, the window below appears before anything else.

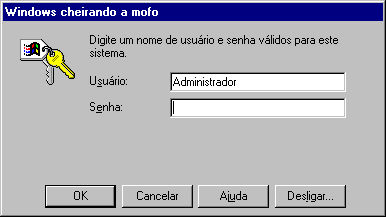
    This MessageBox design has improved greatly from Windows 2000. If the same problem happens on Windows NT 4.0, the following message would be displayed.

    Useful tips for GINA coders

    Writing GINA is the opportunity for User-Mode developers generating their own blue screens. Your DLL is loaded by Winlogon.exe, and thus, it runs on its process address space. This means that if you have an unhandled exception, this will bring this process down. Winlogon is a critical process and it cannot be overthrown. In short, the blue screen is shown up.

    The next tip is kind of silly, but it’s worth being commented. During the process of developing a GINA, it is natural to have multiple builds and you will need to replace the GINA that is being used for the new one. You may have tried to override it, but as always, Winlogon.exe keeps it loaded and you cannot delete the current one. Like any DLL under these conditions, you can rename it while it is being used by a program. This lets you put a new version at the System32 directory without having to delete the one which is currently running. When the system is restarted, Winlogon will pick up the new GINA and drop the old one.

    I hope you enjoyed the new toy. Now I need to continue that post.
    Have fun!

    TitleGina.zip

  • ExAllocatePool with Tagging

    My friend Slug was always a great reference on a different way of seeing things. He usually has a different viewpoint from mine, and I have always learned from these other viewpoints. This post will be different than you are accustomed to seeing here. Wanderley had introduced the subject “How to be a better programmer in the next six months” and brought us this new point of view (at least for me) to see blogs, known as Tagging. Here is my reply.

    I cannot say that everything will be different in the next six months; I am really going to make every effort to turn a better programmer. I think my answer is similar to the response that Strauss has given us, but not equal.

    As some of you know, beyond the work day at Open, I have still faced the university to complete my degree in Computer Engineering. This course has brought me new concepts about micro-processing, embedded systems, computer architecture and other subjects different from Windows programming in C/C++. I can say that it has opened up a little my range of opportunities to learn new things. Developing drivers is, in addition to programming, establishing communication between two near worlds, but virtually unknown to each other. Usually, who knows one of these sides very well, don’t do the same about the other one. It is natural. I have already known a bit of software, and every six months to go, I know some new things about hardware. Knowing better the hardware, I think I can better understand and program the operating system that interacts with it.

    Speaking of new things, this month I have found myself buying a book about Device Drivers for Linux. I have been Microsoft ever since. Obviously, I am referring to the professional aspect. My days of MSX and CP200 exert the same influence that my kindergarten does about my resume. The book has not arrived yet, but certainly, it will feed my database about Software/Hardware interaction and it’ll allow me to draw a parallel between these two development platforms, Windows/Linux, and thus, I’ll be able to better understand what they have in common, both concerning Software/Hardware interaction about operating system concepts.

    A friend of mine once told me that one of the best ways to learn something is teaching. I have been writing this blog for almost a year and have learned a lot from it. Writing about some things, which would be simple, made me take another view and see that there are still more and more details about it. Thus, I end up learning the details that were lost at first. Some lectures I have given the company and the device driver course work as a Boost for this learning way. I confess I’m enjoying it.

    In conclusion and in summary, I will continue studying to get my degree, reading about Linux, continue blogging and being questioned about its issues. This subject is very fun for programmers, but we cannot forget that we are also husbands, sons, brothers, friends and so on. This post can offer you that courage to start studying everything and devote all your time available for the benefit of being the best developer but, cycling and going to the beach are also part of excellent programmer’s rising.

    Enjoy in moderation. 😉
    See you…

  • Bug on my Boot driver! Now what?

    Writing drivers is a task that must be done with little care. After all, any unresolved situation between your code and the operating system will result in a beautiful blue screen. But everything in this life has a cure and fortunately God has created the debugger to deal with these situations. After fixing the problem, it is just to change the .sys file and that’s it. Just changing the file means that the machine is expected to be in a stable condition: then, replace the file on the system and reboot the machine. But life is a surprising box and you may not believe, but most drivers are automagically started. Well, in this case, the only think we can do is to pray that the error does not happen until the driver is replaced. Otherwise, we would have to use some resources, such as putting the hard drive of victim’s machine on another computer to replace the sick driver. When there is no one else’s computer, use the Recovery Console in XP to avoid the sick driver being loaded. With some luck, this driver is not a filter attached to something important like disk, video or File System. You know, if a filter is not able to be loaded, then the main driver, either. In summary, there is a lot of juggling you can invent to replace a buggy driver that is automatically loaded. Is there anything that does not depend much on luck or even on the creativity? Today, I will talk a bit about the replacing driver system with WinDbg.

    Mapping driver files

    You can map the driver files so the WinDbg can replace it at the time it’d be loaded. Is not that beautiful? For this, you must use the .kdfiles command. With this command, you make a link between the driver that runs on the Target machine and the one that has been fixed on the Host side. One way to do this is to initially create a file that lists these two drivers. This file should be a simple text file where the syntax is shown below. This file can have any name and extension.

    map 
    \??\C:\Windows\System32\drivers\MyDriver.sys 
    C:\My_Driver_Project_Folder\MyDriver.sys

    The word map marks the beginning of a mapping; this does not change. Next line is the driver file path to be replaced from. This line should have the same format used in the ImagePath value under the driver key that is on registry. The last line is another driver path. This path could point at a driver in the Host machine itself or on the network.

    This mapping works only in Windows XP or higher, in the Target machine, obviously. If you’re not familiar with terms like Host and Target, check this post out.

    Once created the file, you will use WinDbg to launch the following command:

    kd>.kdfiles C:\Any_Folder\MyFileMap.txt

    Thereafter, whenever the driver is loaded by the system, the kernel checks whether this file is mapped in the debugger, and if so, WinDbg sends the new driver through the debugger connection, such as serial, USB or firewire. For large files, I recommend using firewire. You must understand that the file on Target system’s disk is replaced by the new version. This means that in the forthcoming launches of our driver, the new version will still be loaded, even if the debugger is not connected to the system.

    Does this really work?

    To make things a little clearer, let’s see a practical example. To do this, we need a very simple driver source, or even useless, which can be found here. Let’s change its DriverEntry function, so that it will be as shown below:

    NTSTATUS DriverEntry(IN PDRIVER_OBJECT  pDriverObject,
                         IN PUNICODE_STRING pusRegistryPath)
    {
        //-f--> Let's use __DATE__ and __TIME__ to change this message
        //      each time this driver is built.
        DbgPrint("This driver was built on "__DATE__" "__TIME__"\n");
     
    ...

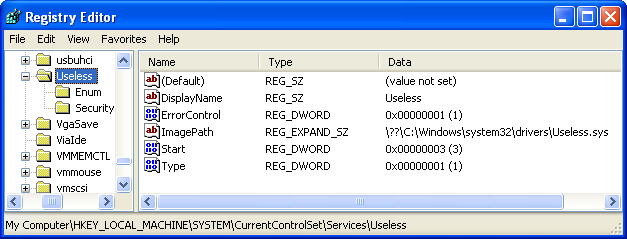
    So, we build an initial version of the driver and we install it on the Target machine in the way you best think, but we’ll assume that after the driver has been installed, the registry will be as shown below.

    If we start the driver, we will have something like the following string in the debugger output:

    This driver was built on Jul 16 2007 00:04:03

    Now, we’ll create the mapping file. Here I will save it as Z:\Sources\DriverEntry\Useless\map.txt. Following the same format the driver was registered in the registry, our mapping file should have the following content:

    map
    \??\C:\Windows\System32\drivers\Useless.sys
    Z:\Sources\DriverEntry\Useless\objchk_wxp_x86\i386\Useless.sys

    Notice that the folder where I saved my file map.txt is the same where the driver sources are. This is just a matter of organization. The mapping file could be in any folder. Then, use the command .kdfiles as shown below. Notice that we list the existing maps simply using the same command without any parameters.

    kd> .kdfiles Z:\Sources\DriverEntry\Useless\map.txt
    KD file assocations loaded from 'Z:\Sources\DriverEntry\Useless\map.txt'
     
    kd> .kdfiles
    KD file assocations loaded from 'Z:\Sources\DriverEntry\Useless\map.txt'
    \??\C:\Windows\System32\drivers\Useless.sys ->
    Z:\Sources\DriverEntry\Useless\objchk_wxp_x86\i386\Useless.sys

    Afterwards, we’ll Rebuild the driver (that should change that time stamp) and we will restart it. If everything is right there by your side, you should have an output with a time stamp different from what we had before.

    kd> g
    But now? I did nothing so far...
    KD: Accessing 'Z:\Sources\DriverEntry\Useless\objchk_wxp_x86\i386\Useless.sys'
     (\??\C:\Windows\system32\drivers\Useless.sys)
      File size 2K.
    MmLoadSystemImage: Pulled \??\C:\Windows\system32\drivers\Useless.sys from kd
    This driver was built on Jul 16 2007 00:17:04

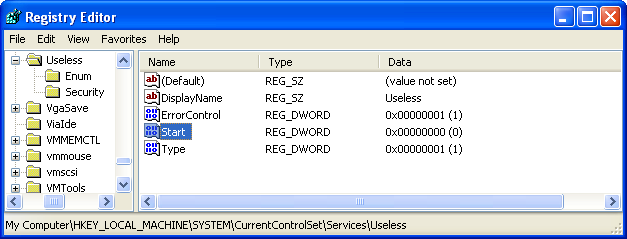
    Well, if this works for a driver with manual start value, then the automatic one also should work. To see this, change your driver start value to System or Automatic, do a Rebuild again in the driver, and finally, we will restart the Target machine. When the driver is loaded, we have the automatic replacement of its image. In WinDbg, we will have the following:

    Connected to Windows XP 2600 x86 compatible target, ptr64 FALSE
    Kernel Debugger connection established.
    Symbol search path is: SRV*c:\websymbols*http://msdl.microsoft.com/download/symbols
    Executable search path is: 
    Windows XP Kernel Version 2600 UP Free x86 compatible
    Built by: 2600.xpsp_sp2_gdr.070227-2254
    Kernel base = 0x804d7000 PsLoadedModuleList = 0x805533a0
    System Uptime: not available
    KD: Accessing 'Z:\Sources\DriverEntry\Useless\objchk_wxp_x86\i386\Useless.sys'
     (\??\C:\Windows\system32\drivers\Useless.sys)
      File size 2K.
    MmLoadSystemImage: Pulled \??\C:\Windows\system32\drivers\Useless.sys from kd
    This driver was built on Jul 16 2007 00:25:38

    Yeah, it really works! But what if was my driver a Boot driver? This means that the driver image will be loaded even before the connection is established with WinDbg. Have you heard that what has no remedy, it is remedied? Fortunately, this is not applied here yet. There is a way to make this work, even with Boot drivers.

    Mapping Boot drivers

    To establish a connection with WinDbg, we need to replace the system loader by a special version. This version makes this connection with the Kernel Debugger, even before the Boot.ini file is read. For this reason, the connection parameters are fixed with COM1 and baud rate of 115200. This loader version is located in the directory C:\winddk\3790\debug of the DDK with its ntldr_dbg name. This file should replace the original loader system version that is at the boot drive root with the ntldr name. The debug version must stay with the same name as the original loader.

    Before rebooting, we need to change the driver’s start value to Boot and remove the ImagePath value from the registry. As you may know, boot drivers do not have that luxury of using file paths that have drive letters. At the end of the changes, we should have the registry as shown below.

    As I said earlier, the driver file path format should be the same as it is on registry, but knowing that now there’s no file path in the registry, so we adopt the same forms adopted by the system. Oh! okay! The same format. And what would it be? To see this format, simply restart the system with the debug loader, which should give us the following screen at boot-up.

    This is the time to connect to Windbg using pre-determined parameters connection. This should result in the following output in the debugger.

    Microsoft (R) Windows Debugger  Version 6.7.0005.1
    Copyright (c) Microsoft Corporation. All rights reserved.
     
    Opened \\.\pipe\com_1
    Waiting to reconnect...
    BD: Boot Debugger Initialized
    BD: osloader.exe base address 00400000
    Connected to Windows Boot Debugger 3790 x86 compatible target, ptr64 FALSE
    Kernel Debugger connection established.
    Symbol search path is: SRV*c:\websymbols*http://msdl.microsoft.com/download/symbols
    Executable search path is: 
    Windows Boot Debugger Kernel Version 3790 UP Checked x86 compatible
    Primary image base = 0x00000000 Loaded module list = 0x00000000
    System Uptime: not available
    The call to LoadLibrary(bootext) failed, Win32 error 0n2
        "The system cannot find the file specified."
    Please check your debugger configuration and/or network access.

    Now you see the Boot.ini selection menu. Select your option and continue loading the system. A list of boot drivers should be presented, which are the ones loaded before the first breakpoint that the debugger can stop.

    BD: \WINDOWS\system32\ntoskrnl.exe base address 804EA000
    BD: \WINDOWS\system32\hal.dll base address 806FF000
    BD: \WINDOWS\system32\KDCOM.DLL base address 80720000
    BD: \WINDOWS\system32\BOOTVID.dll base address 80010000
    BD: \WINDOWS\system32\DRIVERS\ACPI.sys base address 80124000
    BD: \WINDOWS\system32\DRIVERS\WMILIB.SYS base address 80001000
    BD: \WINDOWS\system32\DRIVERS\pci.sys base address 80062000
    BD: \WINDOWS\system32\DRIVERS\isapnp.sys base address 80003000
    BD: \WINDOWS\system32\DRIVERS\compbatt.sys base address 8000C000
    BD: \WINDOWS\system32\DRIVERS\BATTC.SYS base address 80013000
    BD: \WINDOWS\system32\DRIVERS\intelide.sys base address 80017000
    BD: \WINDOWS\system32\DRIVERS\PCIIDEX.SYS base address 80019000
    BD: \WINDOWS\System32\Drivers\MountMgr.sys base address 80152000
    BD: \WINDOWS\system32\DRIVERS\ftdisk.sys base address 8015D000
    BD: \WINDOWS\System32\drivers\dmload.sys base address 80073000
    BD: \WINDOWS\System32\drivers\dmio.sys base address 8017C000
    BD: \WINDOWS\System32\Drivers\PartMgr.sys base address 801A2000
    BD: \WINDOWS\System32\Drivers\VolSnap.sys base address 801A7000
    BD: \WINDOWS\system32\DRIVERS\atapi.sys base address 801B4000
    BD: \WINDOWS\system32\DRIVERS\vmscsi.sys base address 801CC000
    BD: \WINDOWS\system32\DRIVERS\SCSIPORT.SYS base address 801CF000
    BD: \WINDOWS\system32\DRIVERS\disk.sys base address 801E7000
    BD: \WINDOWS\system32\DRIVERS\CLASSPNP.SYS base address 801F0000
    BD: \WINDOWS\system32\DRIVERS\fltMgr.sys base address 801FD000
    BD: \WINDOWS\system32\DRIVERS\sr.sys base address 8021D000
    BD: \WINDOWS\System32\Drivers\KSecDD.sys base address 8022F000
    BD: \WINDOWS\System32\Drivers\Ntfs.sys base address 80246000
    BD: \WINDOWS\System32\Drivers\NDIS.sys base address 802D3000
    BD: \WINDOWS\System32\Drivers\Useless.sys base address 8000F000
    BD: \WINDOWS\System32\Drivers\Mup.sys base address 80300000
    BD: \WINDOWS\system32\DRIVERS\agp440.sys base address 8031B000
    Shutdown occurred...unloading all symbol tables.
    Waiting to reconnect...

    Here the connection to the loader is closed. A new connection would be established if you had selected the Debug entry from Boot.ini, but what we have to note here, is the file path format used to load drivers during system boot. Notice that our test driver is among the drivers from the above list. Let us adopt this same file path format on our mapping file.

    map
    \WINDOWS\System32\Drivers\Useless.sys
    Z:\Sources\DriverEntry\Useless\objchk_wxp_x86\i386\Useless.sys

    After modifying the mapping file and save its contents to disk, we update the WinDbg, so it takes this change. Then, we will restart the system.

    kd> .kdfiles Z:\Sources\DriverEntry\Useless\map.txt
    KD file assocations loaded from 'Z:\Sources\DriverEntry\Useless\map.txt'
     
    kd> .reboot
    Shutdown occurred...unloading all symbol tables.
    Waiting to reconnect...
    BD: Boot Debugger Initialized
    Connected to Windows Boot Debugger 3790 x86 compatible target, ptr64 FALSE
    Kernel Debugger connection established.  (Initial Breakpoint requested)
    Symbol search path is: SRV*c:\websymbols*http://msdl.microsoft.com/download/symbols
    Executable search path is: 
    Module List address is NULL - debugger not initialized properly.
    WARNING: .reload failed, module list may be incomplete
    KdDebuggerData.KernBase < SystemRangeStart
    Windows Boot Debugger Kernel Version 3790 UP Checked x86 compatible
    Primary image base = 0x00000000 Loaded module list = 0x00000000
    System Uptime: not available
    The call to LoadLibrary(bootext) failed, Win32 error 0n2
        "The system cannot find the file specified."
    Please check your debugger configuration and/or network access.

    The same message sequence happens, but this time, the mapping is done as it should and we have the following output when the boot drivers are loaded.

    BD: osloader.exe base address 00400000
    BD: \WINDOWS\system32\ntoskrnl.exe base address 804EA000
    BD: \WINDOWS\system32\hal.dll base address 806FF000
    BD: \WINDOWS\system32\KDCOM.DLL base address 80720000
    BD: \WINDOWS\system32\BOOTVID.dll base address 80010000
    BD: \WINDOWS\system32\DRIVERS\ACPI.sys base address 80124000
    BD: \WINDOWS\system32\DRIVERS\WMILIB.SYS base address 80001000
    BD: \WINDOWS\system32\DRIVERS\pci.sys base address 80062000
    BD: \WINDOWS\system32\DRIVERS\isapnp.sys base address 80003000
    BD: \WINDOWS\system32\DRIVERS\compbatt.sys base address 8000C000
    BD: \WINDOWS\system32\DRIVERS\BATTC.SYS base address 80013000
    BD: \WINDOWS\system32\DRIVERS\intelide.sys base address 80017000
    BD: \WINDOWS\system32\DRIVERS\PCIIDEX.SYS base address 80019000
    BD: \WINDOWS\System32\Drivers\MountMgr.sys base address 80152000
    BD: \WINDOWS\system32\DRIVERS\ftdisk.sys base address 8015D000
    BD: \WINDOWS\System32\drivers\dmload.sys base address 80073000
    BD: \WINDOWS\System32\drivers\dmio.sys base address 8017C000
    BD: \WINDOWS\System32\Drivers\PartMgr.sys base address 801A2000
    BD: \WINDOWS\System32\Drivers\VolSnap.sys base address 801A7000
    BD: \WINDOWS\system32\DRIVERS\atapi.sys base address 801B4000
    BD: \WINDOWS\system32\DRIVERS\vmscsi.sys base address 801CC000
    BD: \WINDOWS\system32\DRIVERS\SCSIPORT.SYS base address 801CF000
    BD: \WINDOWS\system32\DRIVERS\disk.sys base address 801E7000
    BD: \WINDOWS\system32\DRIVERS\CLASSPNP.SYS base address 801F0000
    BD: \WINDOWS\system32\DRIVERS\fltMgr.sys base address 801FD000
    BD: \WINDOWS\system32\DRIVERS\sr.sys base address 8021D000
    BD: \WINDOWS\System32\Drivers\KSecDD.sys base address 8022F000
    BD: \WINDOWS\System32\Drivers\Ntfs.sys base address 80246000
    BD: \WINDOWS\System32\Drivers\NDIS.sys base address 802D3000
    KD: Accessing 'Z:\Sources\DriverEntry\Useless\objchk_wxp_x86\i386\Useless.sys'
     (\WINDOWS\System32\Drivers\Useless.sys)
      File size 2K.BD: Loaded remote file \WINDOWS\System32\Drivers\Useless.sys
     
    BlLoadImageEx: Pulled \WINDOWS\System32\Drivers\Useless.sys from Kernel Debugger
    BD: \WINDOWS\System32\Drivers\Useless.sys base address 8000F000
    BD: \WINDOWS\System32\Drivers\Mup.sys base address 80300000
    BD: \WINDOWS\system32\DRIVERS\agp440.sys base address 8031B000
    Shutdown occurred...unloading all symbol tables.
    Waiting to reconnect...

    And later, our proof that the driver file has been successfully replaced.

    Connected to Windows XP 2600 x86 compatible target, ptr64 FALSE
    Kernel Debugger connection established.  (Initial Breakpoint requested)
    Symbol search path is: SRV*c:\websymbols*http://msdl.microsoft.com/download/symbols
    Executable search path is: 
    Windows XP Kernel Version 2600 UP Free x86 compatible
    Built by: 2600.xpsp_sp2_gdr.070227-2254
    Kernel base = 0x804ea000 PsLoadedModuleList = 0x8056d620
    System Uptime: not available
    This driver was built on Jul 16 2007 01:18:53

    I assure you that this could still save your life if you had a File System filter with a bug in its DriverEntry on a customer’s machine. The expression of panic when the customer sees his machine restarting in an endless loop is interesting, but keeping your job is a little more interesting.

    See you!

  • Installing and Using DSF

    You are probably already tired of reading that OSR has hardware kits for driver development training for USB and PCI. It’s really frustrating to want to learn how to develop drivers that control board without even having one around. But I am poor and I have no money to buy these imported toys. Actually, I also got some pain when I had to go to the post office to get two kits I had bought and paid a tax of U$ 183.59, not counting the kit’s cost. Well, this is a point.

    Assuming you are already an experienced programmer and knows how to make drivers for USB devices with one tied eye behind your back, imagine that you have to write a driver for a USB device that is not ready yet. That is, you have the specification, you know its characteristics, but in fact, the device is not ready for you to do all the tests you need. In this case, the training kit would not help much. This is another point.

    Joining these points, we can see that we are lost and the only way is just forget everything and go to sell coconut water at the beach.

    A considerable alternative

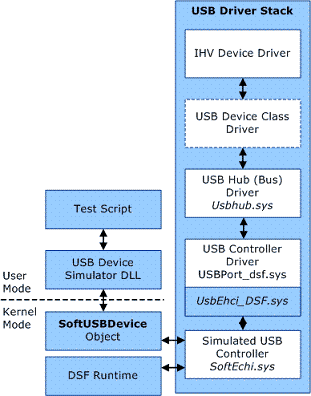
    Taking these same points, Microsoft has developed the Device Simulation Framework for USB Devices. This framework is composed of, among other components, a driver that is installed on your test machine that simulates an USB controller. This driver is Lower Filter Drivers for Windows USB controller drivers. It intercepts the interactions that Windows does with the actual hardware and simulate hardware interrupts. From driver’s viewpoint, there is no difference between DSF and real devices.

    But how can the framework simulate a USB device that it doesn’t know? Actually, the framework redirects these interactions to components in User-Mode that can be written by you in any language that can use COM. This way, you can control device behavior being simulated. Observe the figure borrowed from the MSDN page, so you can have a clearer picture of how these components are organized.

    Installing DSF

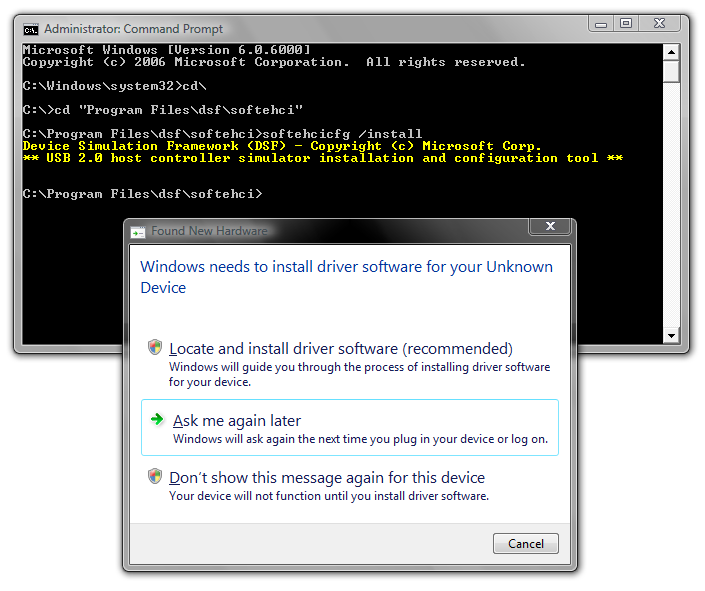
    The DSF comes in the WDK ISO that you can download from Microsoft. It can only be installed on Windows XP SP2 or higher (including x64 platforms). When you install WDK on your machine, the DSF is not installed. You need to install it separately. The dsfx86runtime.msi and dsfx64runtime.msi files, responsible for installation, are located in the \dsf of the ISO. The framework installation is extremely simple, but you can only see something when, after installed, you run “softehcicfg /install” command line at the “\Program Files\dsf\softehci” folder, as it is shown below.

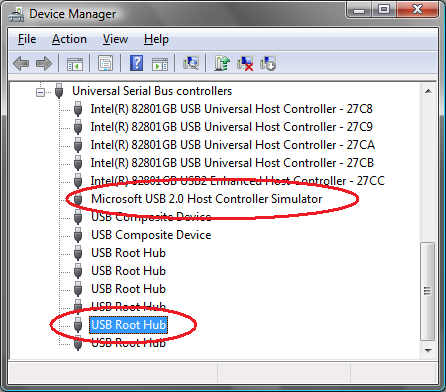
    This command creates a virtual USB controller in your device tree, which can be seen on Device Manager. Your system may ask the drivers for this new hardware that was added. If it does, enter the system directory (C:\Windows) for the search for drivers taking place. After the drivers have been installed, you should get two new devices. They are: Microsoft USB 2.0 EHCI Host Controller Simulator and USB Root Hub, as it is shown below.

    Using VBScript to write devices

    To simulate devices, DSF installs a group of components that implement COM objects, such as: Devices, Configurations, Interfaces, Endpoints, Descriptors, and so on. Who has already developed firmware for USB knows exactly what I mean. With these objects, you can write components that can simulate any USB device. Along the framework, three examples of devices that can be simulated are also installed. These devices’ sources are examples that come together in the WDK. They are located at \WinDDK6000\src\Test\DSF\USB. To use one of these examples, we just need a language script, or any language able to use COM interfaces.

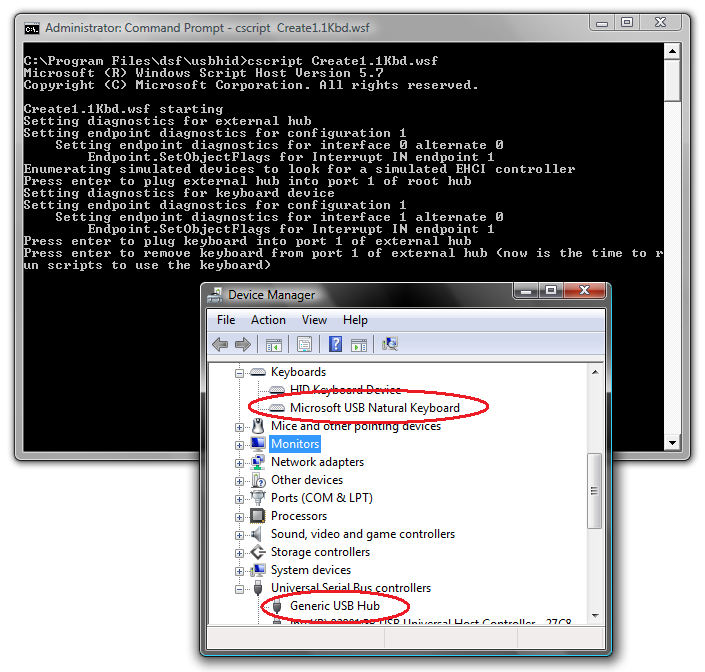
    Let’s take a look at the keyboard example and look for its IRPs. To make the keyboard work, go to the “\Program Files\dsf\usbhid” and run the following command line: “cscript Create1.1Kbd.wsf” and follow the steps. If this is the first time you are doing this, Windows may ask the drivers for new devices that will be created. The script will create a Generic USB Hub and a USB Microsoft Natural Keyboard, as it is shown below.

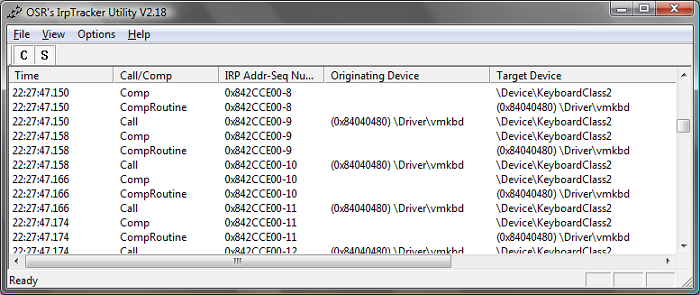
    Before removing these devices, let’s take a look using IRP Tracker, a software that I have mentioned in another post, and watch this simulated keyboard’s IRPs. Start the IRP Tracker and select all KbdClass driver. KbdClass is the driver responsible for centralizing and implementing interfaces for the keyboard device class. The IRPs from all keyboards are here.

    While the first command prompt is stopped, start another one and from the same directory, run the following command line: “cscript Use1.1Kbd.wsf”. This script simulates pressing keys on the simulated keyboard writing the phrase “Hello World!”. For each key the system gets, records are generated from monitored IRPs. Thus, the IRP Tracker should look as it is shown below.

    This is an excellent tool for using with virtual machines and it can anticipate a good amount of testing until the actual hardware is ready. In cases where the hardware and the driver are new, this could be a good way to discover which one is causing the issue. After all, hardware has bugs, too. Even if you’re a student and have no hardware, this could be useful to train your learning. At least, you will not burn anything.

    See you!

  • Let’s Start Again

    Some drivers need to start as soon as the system loads, I mean, while the system loads. When we set our driver with Start = 0 (Boot), our driver loads among very basic drivers such as File Systems, Bus Drivers and so on. Once, I needed a Boot driver to open a file to get some system information. Unfortunately things like partitions, volumes and File Systems were still not working, so I had to postpone the process a little. In this post, I will comment about how to continue your driver DriverEntry start-up process after the function having ended.

    To illustrate the case, I have written a driver that clearly illustrates this situation. The full project is on a link for downloading at the end of this post. Looking at out DriverEntry implementation, we have:

    /****
    ***     DriverEntry
    **
    **      Driver entry point, which will be called while
    **      the system Boots (like "I have just turned my computer on").
    */
    extern "C" 
    NTSTATUS DriverEntry(IN PDRIVER_OBJECT  pDriverObj,
                         IN PUNICODE_STRING pusRegistryPath)
    {
        NTSTATUS    nts;
     
        //-f--> We're back...
        KdPrint(("Starting DrvReinit...\n"));
     
        //-f--> Register the unload callback routine
        pDriverObj->DriverUnload = OnDriverUnload;
     
        //-f--> Try to open a file as early as possible, thereafter
        //      I was born within seven months.
        nts = TryOpenFile();
     
        //-f--> And as you can see...
        if (!NT_SUCCESS(nts))
        {
            //-f--> The file was not opened.
            KdPrint(("Scheduling reinitialization.\n"));
     
            //-f--> And as far as I can imagine, the reason is as it follows:
            ASSERT(nts == STATUS_OBJECT_PATH_NOT_FOUND);
     
            //-f--> Register OnReinitialize routine so it'll be called later.
            //      In this case, later means whenever all boot drivers have
            //      been loaded.
            IoRegisterBootDriverReinitialization(pDriverObj,
                                                 OnReinitialize,
                                                 NULL);
        }
        else
        {
            //-f--> Er... Are you sure you have installed that driver
            //      correctly? Well, your system is not booting now
            //      and you just started your driver manually.
        }
     
        //-f--> If the DriverEntry routine doesn't return STATUS_SUCCESS,
        //      OnReinitialize will not be called.
        return STATUS_SUCCESS;
    }

    IoRegisterBootDriverReinitialization() function (Phew! Some of these functions require a breath) registers a callback routine that will be called whenever all boot drivers have been loaded. That will give us a second chance to try to do what has been proposed. This routine is typically used in filters that attach on non-Plug-and-Play devices, and thus, they cannot rely on AddDevice() function calling to be notified that a new device was created.

    In our example, the goal is simply to read a file. Accordingly, the error we have received is STATUS_OBJECT_PATH_NOT_FOUND. To ensure that the file you’re about to read actually exists, we will use the actual file where the driver is implemented. Therefore, if our code is running, the file must be there.

    /****
    ***     TryOpenFile
    **
    **      This routine tries to open the file where this driver is implemented.
    **      If this code is running, then this file must be there.
    */
    NTSTATUS TryOpenFile(VOID)
    {
        NTSTATUS            nts;
        IO_STATUS_BLOCK     IoStatusBlock;
        HANDLE              hFile;
        OBJECT_ATTRIBUTES   ObjAttributes;
        UNICODE_STRING      usFilePath =
            RTL_CONSTANT_STRING(L"\\??\\C:\\Windows\\System32\\drivers\\DrvReinit.sys");
     
        //-f--> Hello debugger...
        KdPrint(("Trying open the file...\n"));
     
        //-f--> Filling the OBJECT_ATTRIBUTES structure.
        //      What can I do? It makes part of it.
        InitializeObjectAttributes(&ObjAttributes,
                                   &usFilePath,
                                   OBJ_CASE_INSENSITIVE,
                                   NULL,
                                   NULL);
     
        //-f--> Try to open the file.
        nts = ZwCreateFile(&hFile,
                           GENERIC_READ,
                           &ObjAttributes,
                           &IoStatusBlock,
                           NULL,
                           0,
                           FILE_SHARE_READ | FILE_SHARE_WRITE,
                           FILE_OPEN,
                           0,
                           NULL,
                           0);
     
        //-f--> Did it open or not?
        if (!NT_SUCCESS(nts))
        {
            //-f--> I'm sorry, maybe next time.
            KdPrint(("Error 0x%08x opening the file.\n", nts));
        }
        else
        {
            //-f--> So, it wasn't that hard.
            KdPrint(("File opened OK. Er... So, let's close it now.\n"));
     
            //-f--> Close the file handle. We want nothing from it anyway.
            ZwClose(hFile);
        }
        return nts;
    }

    Initially, when we had tried to open this file from DriverEntry function and the error returned, indicating that it does not exist, we can fall into an existential crisis. After all, if the file has not existed, how was the driver loaded? Doesn’t the driver exist? Don’t I exist? Other crises could be mentioned as the well-known ones:

    “God is love.
    The love is blind.
    Steve Wonder is blind.
    So, Steve Wonder is God.

    Someone told me I’m no one.
    No one is perfect.
    So, I am perfect.
    But only God is perfect.
    So, I am God.

    If Steve Wonder is God, I am Steve Wonder!
    My God, I am blind!”

    But back to the subject, if the re-initialization routine is executed and the service that the driver needs is not yet available, so we can re-schedule this routine calling once again (or as many times as necessary). One of the parameters that re-initialization routine receives is the one which tells you how many times it had been called by the system. This could be used to give up on the resource that never appears when the thousandth attempt has failed. Follow our routine sample:

    /****
    ***     OnReinitialize
    **
    **      This routine is registered by the IoRegisterBootDriverReinitialization 
    **      routine to be called later.
    */
    VOID OnReinitialize(IN PDRIVER_OBJECT     pDriverObj,
                        IN PVOID              pContext,
                        IN ULONG              ulCount)
    {
        NTSTATUS    nts;
     
        //-f--> This routine can be rescheduled as many times as necessary.
        //      Let's show how many it's been so far.
        KdPrint(("OnReinitialize was called %d times...\n", ulCount));
     
        //-f--> If this commentary did not exist, you would never know
        //      the following routine would try open a file.
        nts = TryOpenFile();
     
        //-f--> So, did it work?
        if (!NT_SUCCESS(nts))
        {
            //-f--> If the error code is different from the one below, so
            //      I know nothing about it. It is not my fault. I don't even know you.
            ASSERT(nts == STATUS_OBJECT_PATH_NOT_FOUND);
     
            //-f--> It can't be true. This is not actually happening.
            //      Let's try again a bit latter.
            IoRegisterBootDriverReinitialization(pDriverObj,
                                                 OnReinitialize,
                                                 NULL);
        }
    }

    Installing a Boot driver

    To ensure that we have a need to delay our driver start-up, we will make our sample driver be the first one to be loaded. For this, we use the aforementioned DriverLoader to install it on a specific group.

    After compiling the sample code, copy the driver to the victim machine’s System32\drivers directory. Run DriverLoader, fill up the fields as demonstrated below and click on RegisterService.

    To complete the experience, we will restart the system and connect the kernel debugger to follow ahead. We should have the following output.

    But couldn’t we use a work item for this? Actually, yes, but there are subtle differences between these alternatives. Using a Work Item cannot guarantee that the routine is not being executed before DriverEntry finishes, and obviously it does not ensure that it runs only after all the boot drivers has been loaded.

    See you next time… 😉

    DrvReinit.zip